Buying a car is one of the biggest financial decisions you’ll make. Whether you’re considering a new versus used car, the choice affects your budget, lifestyle, and peace of mind for years to come.
At LifeEventGuide, we’ve helped countless people navigate this decision by breaking down what actually matters. This guide walks you through the financial realities, reliability factors, and personal priorities that should shape your choice.
Financial Considerations When Buying a Car
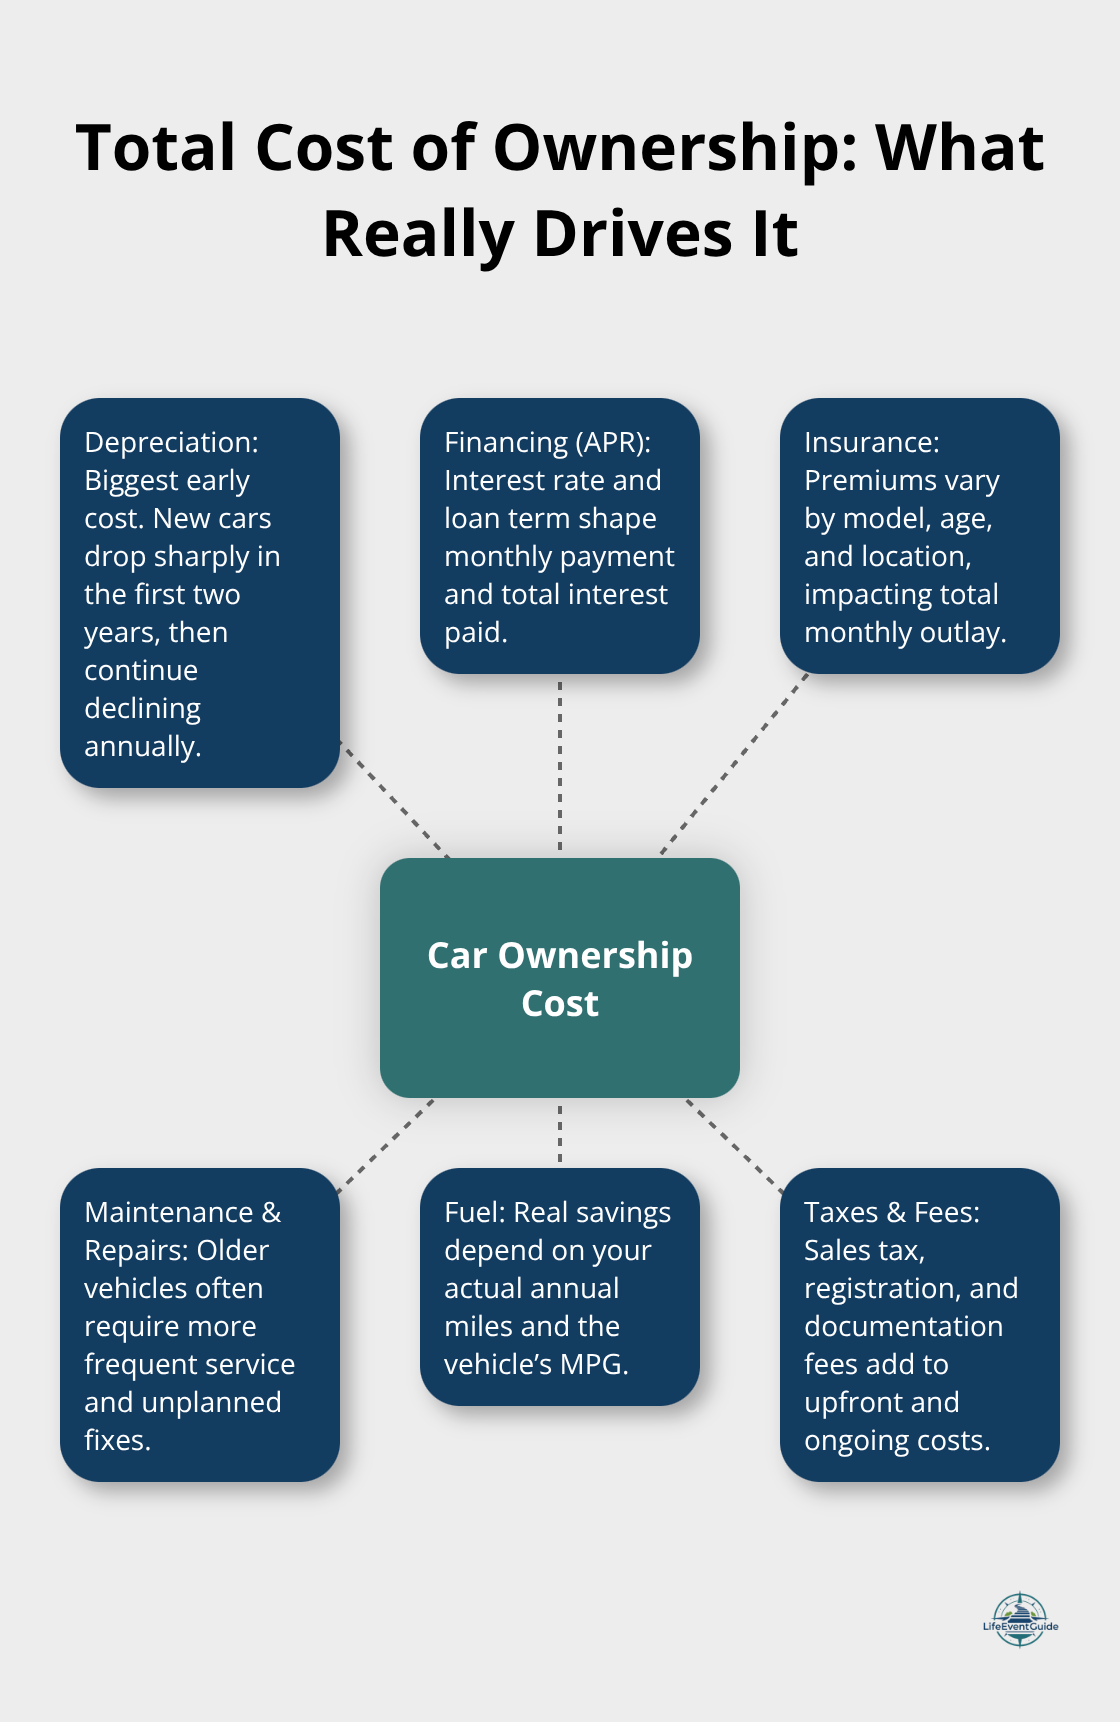
The Real Cost of Ownership
The sticker price tells only half the story. Experian data from Q3 2025 shows the average new car costs about $748 monthly versus $532 for used cars, but this masks a more complex financial picture. A new 2023 Kia Sorento at $32,000 looks expensive next to a used 2020 model at $24,000, yet the $8,000 difference shrinks when you factor in what actually happens over time. New cars depreciate about 30% over the first 2 years, then continue to depreciate 8-12% each year after that. Used cars have already absorbed much of that initial hit, which is why a low-mileage used vehicle often delivers stronger value retention relative to its purchase price. The financing gap matters too: new-car loans averaged 6.56 percent APR in Q3 2025, while used-car loans sat at 11.40 percent.
If you finance a $24,000 used car at that higher rate over 67 months versus a $32,000 new car at the lower rate over 69 months, the monthly payment difference narrows considerably, and sometimes the new car becomes the cheaper monthly option. Comparing total costs matters far more than comparing purchase prices alone.
What Maintenance Actually Costs
Used cars demand more attention to your wallet. A 13-year-old car with 100,000 miles typically costs around $2,000 annually in maintenance-roughly $170 per month. Over a 10-year ownership period, that adds up to approximately $20,000 in repairs and upkeep. New cars come with full manufacturer warranties, commonly covering 3 years or 36,000 miles, which eliminates most early maintenance expenses. Used cars may have no warranty at all, though certified pre-owned vehicles often include manufacturer-backed coverage that provides genuine peace of mind. Insurance premiums also diverge: new cars cost more to insure due to higher replacement costs, though the difference varies by model and your location. The real decision hinges on whether you’re comfortable absorbing unexpected repair bills or prefer the predictability of a warranty.
Getting the Numbers Right
Obtain quotes from your insurance provider for both options before you decide, as this cost can swing your total ownership calculation significantly. For used cars, always pull a vehicle history report and consider paying for an independent inspection before purchase. These steps cost $150 to $300 upfront but prevent you from buying a car with hidden problems that could drain your budget within months. When you compare total loan costs, factor in insurance, maintenance, fuel, and taxes alongside the monthly payment. Tools like NerdWallet’s Total Car Cost Calculator help you see the full picture across a 5- to 10-year horizon. Pre-qualify for auto loans before you shop so you understand what interest rates you’ll actually receive. This knowledge shifts the negotiation in your favor and reveals whether a new or used car truly fits your financial situation.
Reliability, Warranty, and Peace of Mind
New Car Warranties Protect You When You Need It Most
New car warranties shield you from repair costs during the years when problems are least likely to occur. Most manufacturers cover 3 years or 36,000 miles as standard, with some brands extending to 5 years or 60,000 miles. This warranty covers parts and labor, meaning a transmission failure or engine defect costs you nothing. The real value isn’t just financial-it’s the certainty that you won’t face a $3,000 repair bill in year two. However, warranties expire precisely when older cars tend to need them most. Once you hit that 36,000-mile mark, you’re on your own.
Used Cars and the Certified Pre-Owned Advantage
A used car arrives with its warranty already consumed or significantly depleted. Certified pre-owned vehicles bridge this gap by including a manufacturer-backed warranty. This matters because you essentially buy a new car’s warranty protection at a used car’s price. For non-certified used cars, you get nothing unless the previous owner transferred any remaining factory coverage, which is rare. This is why a $24,000 used 2020 Kia Sorento with 29,000 miles and a clean service history appeals to many buyers-the car is still young enough that major failures are uncommon, and you’ve already avoided the steepest depreciation cliff.
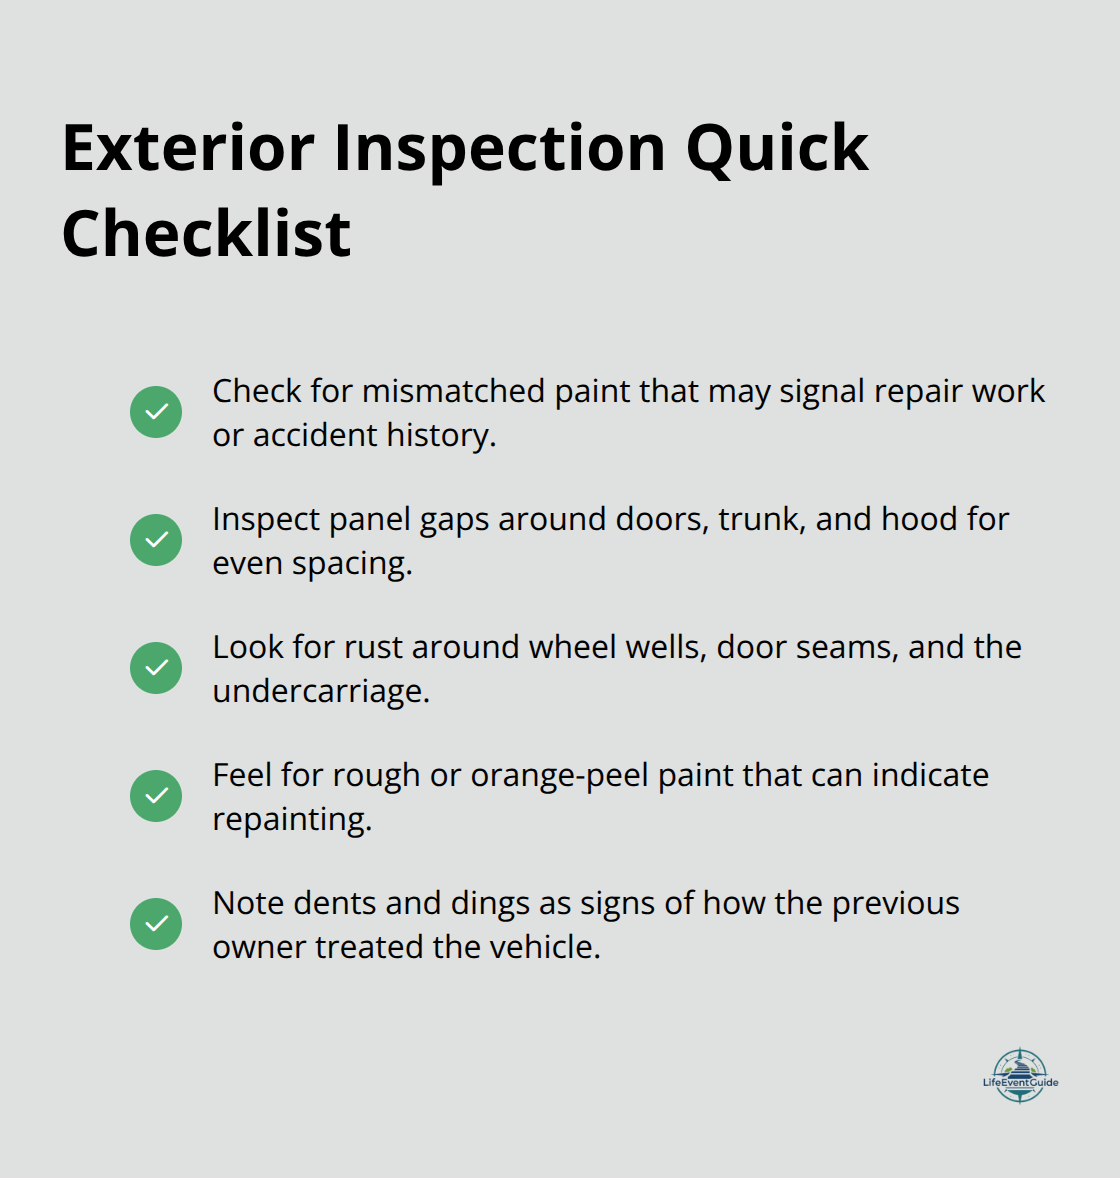
Vehicle History Reports and Independent Inspections Reveal Hidden Problems
Vehicle history reports and independent inspections are your only defense against purchasing someone else’s problems. Services like Carfax or AutoCheck reveal accident history, title status, service records, and odometer readings. An independent pre-purchase inspection by a trusted mechanic costs $150 to $300 but catches hidden damage that no report reveals. This inspection should verify that the seller’s name on the title matches their driver’s license-a critical step that prevents fraud from curbsiders who flip cars without legal ownership. Mechanics check suspension wear, transmission responsiveness, brake condition, fluid leaks, and rust patterns that predict future failures.
Maintenance History Determines How Long Your Car Lasts
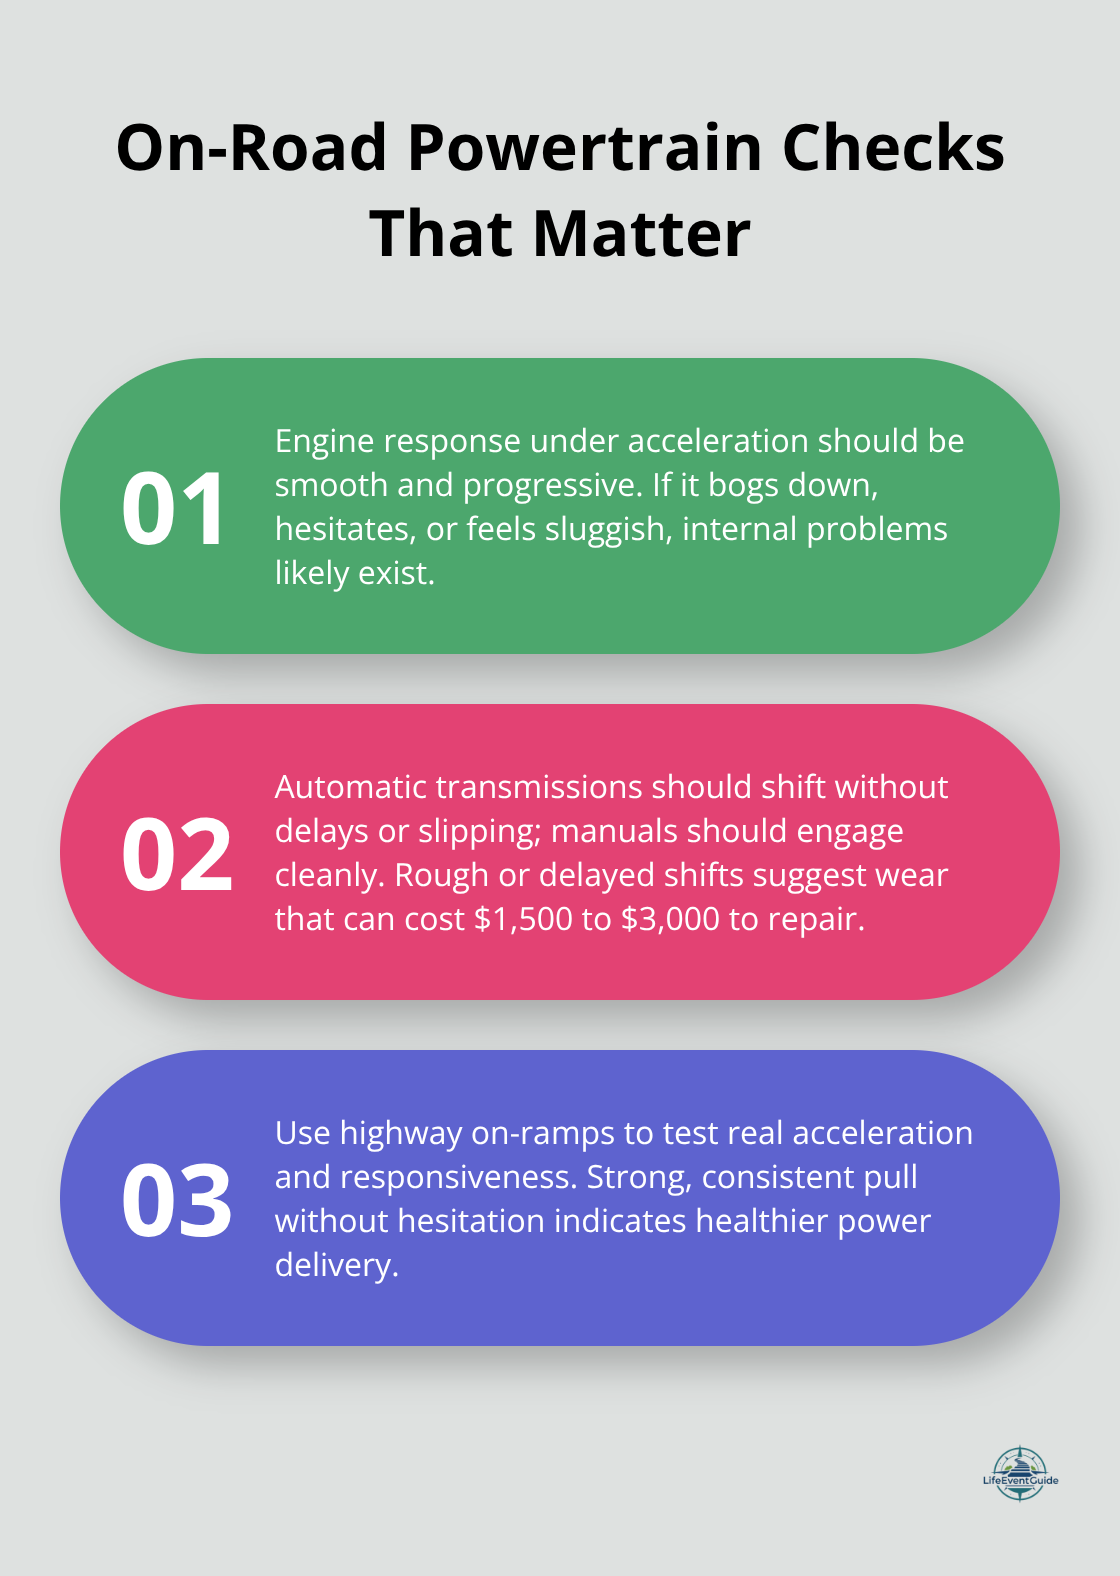
For a used car, a thorough inspection is non-negotiable. A 13-year-old car with 100,000 miles will cost around $2,000 annually in maintenance, but a thorough inspection identifies whether this particular car will land at $1,500 or $3,000. Expected lifespan depends entirely on maintenance history. A used car with documented regular oil changes and brake maintenance will last far longer than one with spotty records. Modern cars routinely reach 200,000 miles with proper care, but skipped services compound into expensive failures. When you compare a new car’s predictable costs against a used car’s variable repair landscape, the inspection transforms guesswork into informed decision-making. This foundation of knowledge about your vehicle’s actual condition sets the stage for understanding how lifestyle factors and personal priorities shape the final choice between new and used.
How Your Driving Patterns Shape the New Versus Used Decision
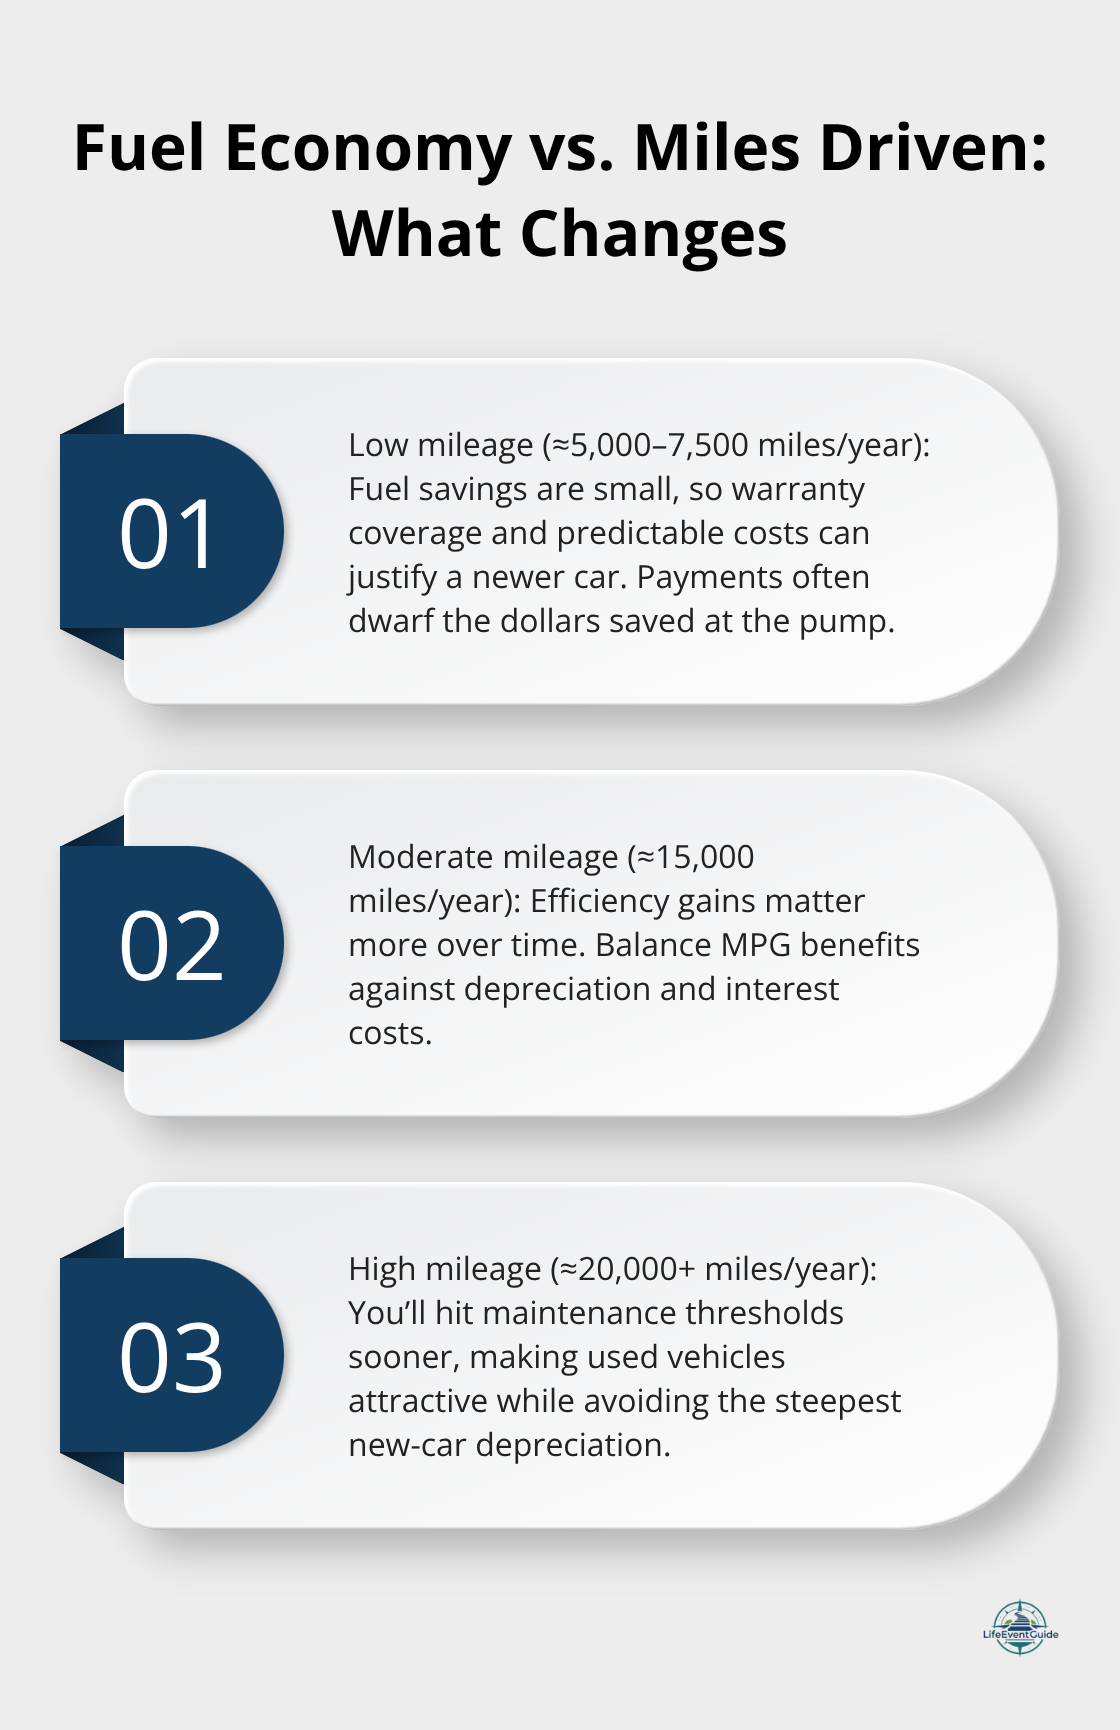
Annual Mileage Determines Fuel Economy’s Real Value
Your annual mileage transforms fuel efficiency from a marketing talking point into actual dollars. If you drive 7,500 miles yearly, a newer car’s superior fuel economy becomes almost irrelevant financially. A 2010 model at 40 miles per gallon consumes roughly 188 gallons annually, costing around $752 per year at current fuel prices. A 2023 model at 50 miles per gallon uses about 150 gallons, saving you approximately $150 annually or $1,500 over a decade. That $1,500 fuel savings vanishes in a single month of higher payments on a new car.
However, if you drive 15,000 miles yearly, fuel efficiency gains double, making the newer car’s economy genuinely meaningful over time. The critical calculation involves comparing your actual annual miles against the car’s depreciation curve and financing costs. A high-mileage driver racking up 20,000 miles yearly should lean toward used vehicles because you’ll hit major maintenance thresholds faster anyway, so you might as well avoid the steepest depreciation hit. Low-mileage drivers who put 5,000 miles annually on their car face the opposite reality: a new vehicle’s warranty and lower maintenance costs justify the premium because you’ll own the car through its warranty period without heavy use.
Driving Habits Affect Reliability and Risk
Driving habits matter equally to annual mileage. If you take frequent long highway trips, a newer car’s reliability and updated safety features become genuine assets. City driving with stop-and-go traffic stresses brakes and transmissions harder, making a used car’s unknown maintenance history riskier. Off-road or unpaved-road driving demands a vehicle with known suspension integrity, which an inspection on a used car can verify but a new car guarantees through warranty coverage.
Technology and Features Shape Daily Experience
New cars offer the latest infotainment systems, driver-assistance features, and safety sensors that genuinely improve daily driving and resale appeal. A 2023 Kia Sorento includes adaptive cruise control, lane-keeping assist, and smartphone integration that a 2020 model may lack entirely. These features aren’t luxuries for families with young children or aging parents; they reduce accident risk and driver fatigue on long trips. However, a three-year-old used car still has modern technology without the $8,000 premium for the absolute latest version.
Environmental Impact Favors Used Cars in Most Scenarios
Fuel efficiency improvements matter less than many assume. The jump from 40 to 50 miles per gallon sounds dramatic until you calculate actual dollars. At $150 yearly savings, you’d need to own the car for 50 years to recoup an $8,000 premium through fuel alone. Environmental impact from manufacturing a new car also weighs against fuel savings for the first several years of ownership. A used car’s smaller environmental footprint from avoided production makes it the greener choice unless you keep the new car for 10+ years and drive it extensively.
Match Your Choice to Your Actual Driving Life
Try a new car for its warranty, latest technology, and guaranteed reliability if you plan to keep it beyond 100,000 miles and drive it frequently. Try a used car if you drive moderately, can afford an inspection, and accept variable maintenance costs in exchange for lower upfront payments and depreciation protection.
Final Thoughts
The new versus used car decision rests on three interconnected factors: your financial situation, your tolerance for maintenance uncertainty, and how you actually use your vehicle. New cars offer predictable costs through warranties, latest safety features, and lower maintenance expenses during ownership. Used cars deliver immediate depreciation protection and lower monthly payments, though they demand more attention to inspection and repair budgeting. Neither choice is universally right or wrong-the correct answer depends entirely on your circumstances.
Start with a total cost of ownership calculation across five to ten years, not just the monthly payment. Factor in insurance quotes, expected maintenance based on the specific model’s reliability history, fuel costs aligned with your actual annual mileage, and taxes. This complete picture reveals whether the $8,000 premium for a new car costs more or less than financing a used vehicle at higher interest rates while absorbing repair expenses. Pre-qualify for loans before shopping so you understand the interest rates available to you, then compare those rates across new and used options to make an informed new versus used car decision.
Write a pros-and-cons list specific to your priorities and gather competing price quotes from multiple dealers. Compare loan offers side by side, verify vehicle history reports before committing, and use our structured decision-making framework to transform this stressful choice into a manageable process where you control the outcome. This methodical approach prevents costly mistakes and builds confidence in your final decision.
Publisher’s Note: LifeEventGuide is an independent educational publisher. Some articles reference tools or services we recommend to help readers explore options related to major life transitions. Learn more about how we make recommendations here.
Buying your first home is one of the biggest decisions you’ll make. Understanding the home buying timeline helps you stay organized and avoid surprises along the way.
At LifeEventGuide, we’ve created this step-by-step schedule to walk you through each phase. From preparing your finances to signing the final papers, you’ll know exactly what to expect.
Preparing Your Finances for Home Buying
The first step toward homeownership requires an honest look at your financial health. Your credit score determines everything in the mortgage process-lenders use it to decide whether to approve you and what interest rate you’ll pay. A score of 620 is the minimum for most conventional loans, but scores above 740 typically qualify for the best rates. If your score falls below 620, you need to improve it before applying. Check your credit report for errors at the authorized free source, annualcreditreport.com. Dispute any inaccuracies immediately because fixing them takes time. Pay down existing debts, especially credit card balances, since high utilization ratios damage your score. Avoid opening new credit accounts or missing payments for at least six months before applying for a mortgage-this period matters more than most people realize.
Calculate Your Down Payment and Closing Costs
Down payments range from 3% to 20% of the home price, depending on the loan type. Federal Housing Administration loans require only 3.5% down, while conventional loans typically need 5% to 20%. A 3% down payment on a $350,000 home means saving $10,500, but closing costs add another 2% to 5% of the purchase price-typically $7,000 to $17,500 for that same home. Many first-time buyers underestimate closing costs, which include appraisal fees, title insurance, inspection fees, and lender fees. You cannot borrow closing costs from your lender, so this money must come from your savings. Start saving now, and consider opening a high-yield savings account to grow your down payment faster than a traditional savings account.
Secure Pre-Approval Before House Hunting
Pre-approval for a mortgage changes everything before you start house hunting. Pre-approval means a lender has verified your income, debts, and credit, then committed to lending you a specific amount. This letter proves to sellers that you’re a serious buyer and can actually afford an offer. The process takes three to five business days and costs nothing. You’ll need recent pay stubs, tax returns from the last two years, bank statements, and a list of debts. Pre-approval differs from pre-qualification, which is just a rough estimate based on information you provide-it carries no weight with sellers. With pre-approval in hand, you move into the next phase ready to search for properties with confidence.
Finding Properties, Making Offers, and Inspecting Your Home
Work with a Real Estate Agent to Find Properties
With pre-approval in hand, you’re ready to search for properties. Most first-time buyers work with a real estate agent, and this choice matters significantly. Agents have access to the Multiple Listing Service, which shows all available properties in your area before they hit public websites. When selecting an agent, interview at least three candidates and ask about their experience with first-time buyers specifically. An agent familiar with your local market knows neighborhood trends, school district boundaries, and which properties tend to appreciate.
Stay Disciplined During Your Property Search
Once you start viewing homes, stay disciplined about your budget and must-have features. It’s easy to fall in love with a home outside your price range, but doing so creates financial stress immediately. Attend open houses on weekends when possible, as they draw multiple buyers and give you a sense of market competition. This exposure helps you understand what your money actually buys in your area and prevents emotional decisions later.
Make Your Offer and Negotiate Terms
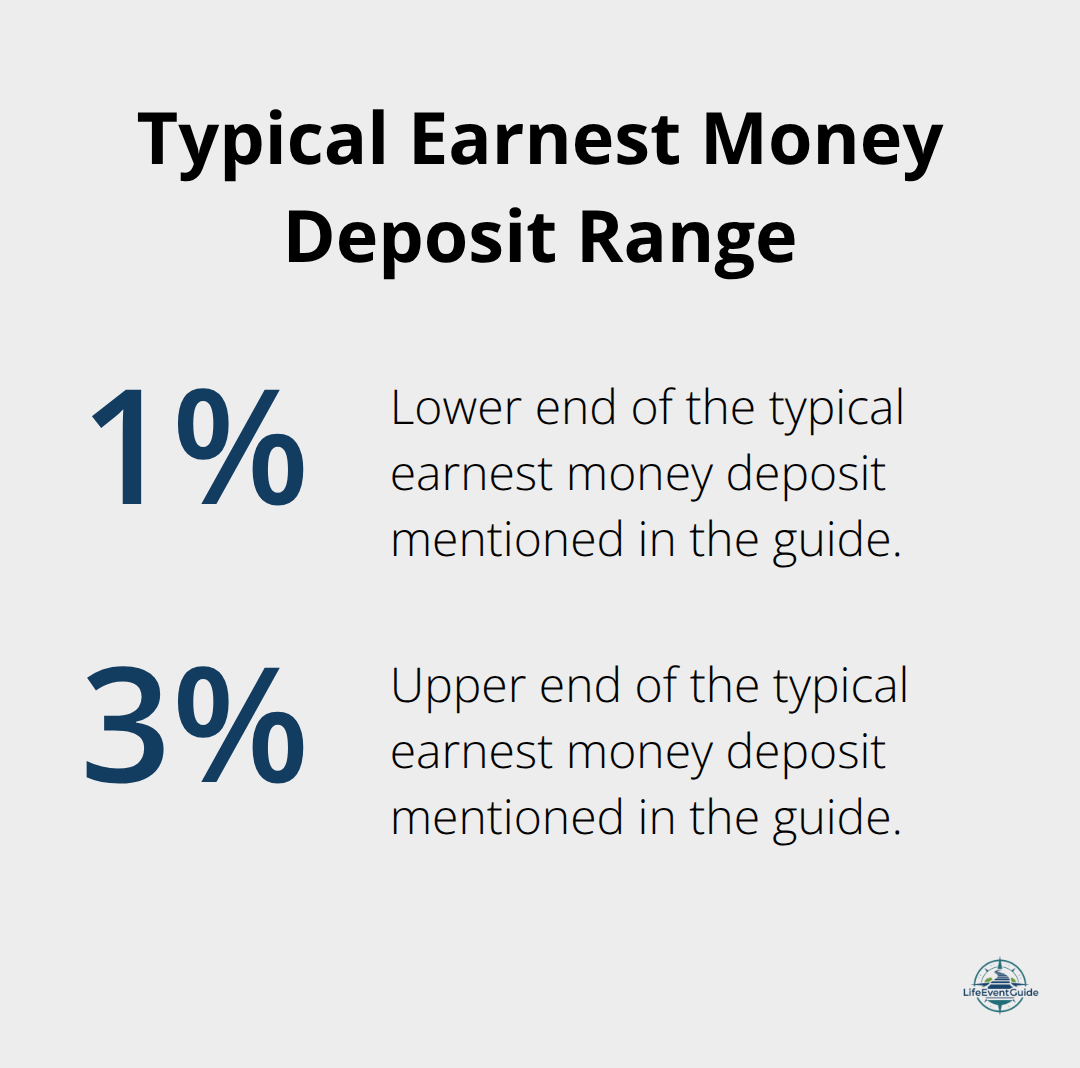
When you find a property you want, your agent will help you craft an offer. The offer includes the purchase price, earnest money deposit (typically 1-3% of the purchase price), and contingencies like inspection and appraisal. In competitive markets, offering above asking price or waiving contingencies might seem necessary, but this strategy backfires frequently.
Contingencies protect your interests without preventing sales in normal conditions.
Complete the Home Inspection
Once your offer is accepted, the inspection phase begins within 7-10 days. A professional home inspector examines the roof, foundation, plumbing, electrical systems, HVAC, and structural integrity, then provides a detailed report. This inspection protects you from inheriting expensive repairs-a roof replacement costs $8,000-$15,000 on average, while foundation repairs can exceed $20,000. If the inspection reveals significant issues, you can renegotiate the price, request repairs, or walk away entirely.
Verify the Appraisal and Protect Your Finances
Simultaneously, the lender orders an appraisal to verify the home’s value matches your offer price. The appraisal typically takes 7-10 business days and costs $400-$600. If the appraisal comes in lower than your offer price, you have three options: negotiate a lower price with the seller, increase your down payment to cover the gap, or withdraw your offer. This step stops many buyers from overpaying in heated markets. Throughout this phase, communicate with your lender about any changes to your finances-new debts, job changes, or large purchases can jeopardize your approval. Stay disciplined during this waiting period, and avoid making major financial moves until closing. Once the inspection and appraisal clear, you move into the final phase where you’ll review loan documents, conduct a final walkthrough, and prepare to sign the papers that make you a homeowner.
What Happens in Your Final Week Before Closing
Review Your Closing Disclosure Carefully
The three weeks between appraisal approval and closing move quickly, and most first-time buyers feel overwhelmed by paperwork during this stretch. Your lender will send you a Closing Disclosure, a standardized document required by federal law that outlines your final loan terms, interest rate, monthly payment, and all closing costs broken down by line item. You must receive this document at least three business days before closing, and you should read it carefully against your initial Loan Estimate to spot any changes. Common discrepancies include title insurance costs that shifted, property taxes recalculated based on new assessment data, or lender fees that increased without explanation. If anything differs significantly from your Loan Estimate, contact your lender immediately and ask for a written explanation before closing day arrives. Many lenders add unnecessary fees or miscalculate property taxes, so questioning these items protects your wallet.
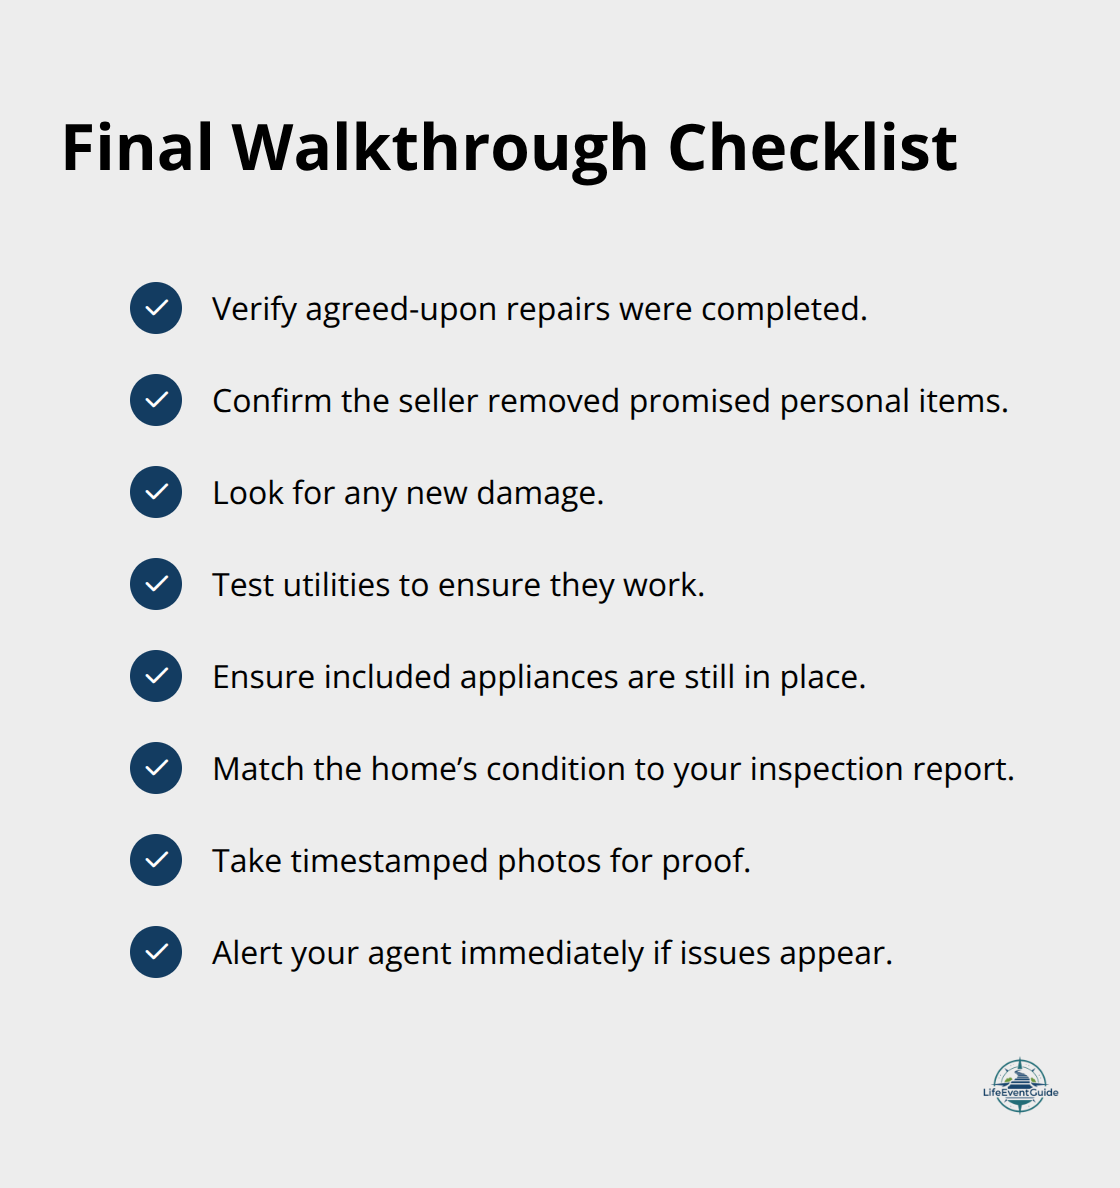
Conduct Your Final Walkthrough
Schedule your final walkthrough 24 hours before closing, not three days before, because things change in real estate constantly. Bring a checklist and verify that agreed-upon repairs were actually completed, that the seller removed personal items they promised to take, and that no new damage appeared. Check that utilities still function, appliances included in the sale remain in place, and the property matches the condition documented during your inspection.
Take photos of the final walkthrough as proof of the property’s condition on closing day. If the seller failed to complete promised repairs or removed items you expected, document everything and notify your real estate agent immediately so they can contact the seller’s agent before closing.
Prepare for Closing Day
Closing day itself involves signing approximately 50 to 100 pages of documents, though many are duplicates required by different lenders or government agencies. Arrive 15 minutes early, bring a government-issued ID and proof of homeowners insurance, and plan to spend 60 to 90 minutes at the title company or attorney’s office. The closing agent will walk you through each document, but they cannot provide legal advice, so if anything confuses you, ask questions directly. Wire your down payment and closing costs to the title company before closing day, never the day of closing, because wire fraud targeting homebuyers costs victims significant losses per incident. Contact your lender directly using a phone number from their official website to confirm wire instructions rather than trusting email or documents provided by the title company (this step prevents criminals from intercepting your funds through fraudulent communications).
Complete the Final Transfer
After all documents are signed and funds transfer, the title company records the deed with the local government, and you officially own the property. Your lender will fund the mortgage and send the seller’s proceeds, typically completing within 24 hours. Keep copies of every document you sign at closing, including the final Closing Disclosure, deed, title insurance policy, and mortgage note, because you’ll need these for tax purposes, future refinancing, or if disputes arise later.
Final Thoughts
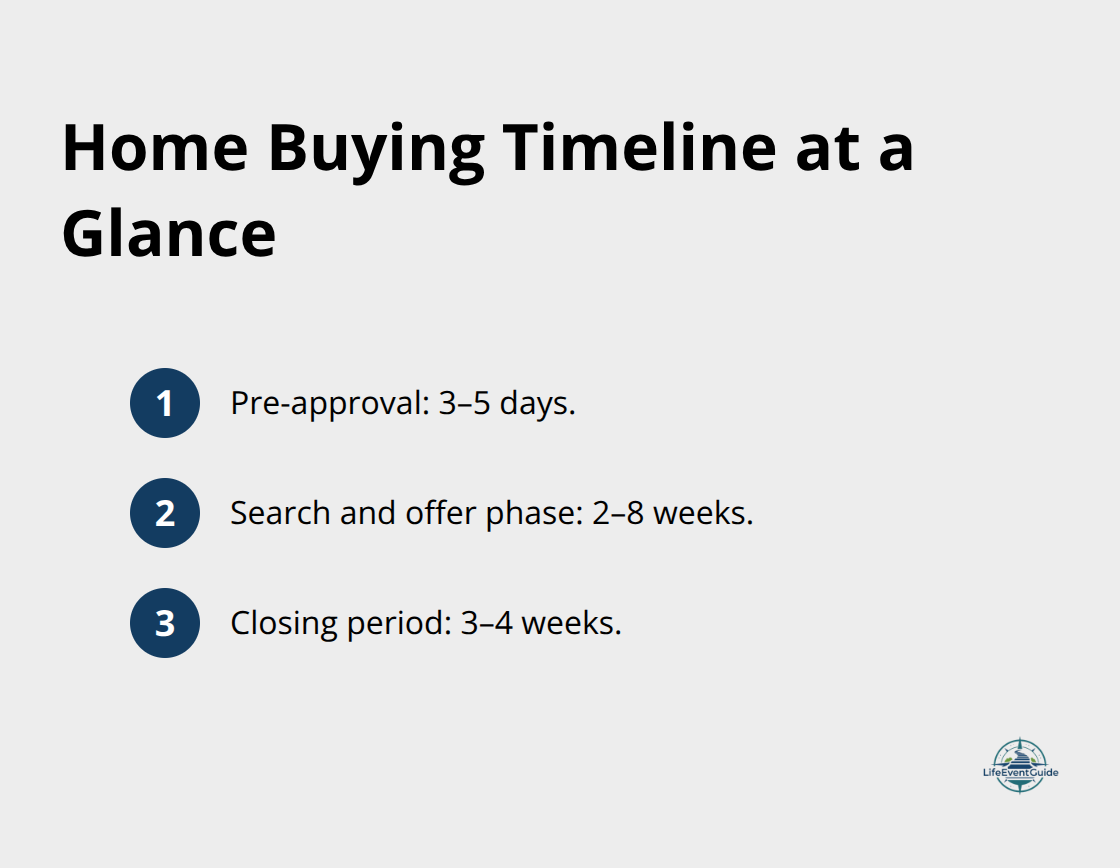
You’ve now walked through the entire home buying timeline from financial preparation through closing day. The journey involves multiple phases, each with specific tasks and timelines that compound if you skip steps or rush through them. Pre-approval takes three to five days, the search and offer phase typically spans two to eight weeks depending on market conditions, and closing takes another three to four weeks after your offer is accepted. Understanding this schedule prevents panic when timelines stretch longer than expected.
First-time buyers commonly make preventable mistakes that cost thousands of dollars or derail purchases entirely. Overextending your budget happens when you fall emotionally attached to a property and ignore your pre-approval limits. Opening new credit accounts or making large purchases between pre-approval and closing jeopardizes your loan approval, even after you’ve been cleared to proceed. Skipping the home inspection to save $300–$500 exposes you to repair costs that dwarf inspection fees, while waiving contingencies in competitive markets removes your protection if the appraisal comes in low or inspections reveal major problems.
Moving into your new home marks the beginning of homeownership, not the end of planning. You’ll face decisions about maintenance schedules, property taxes, homeowners insurance adjustments, and long-term improvements. Visit our publisher recommendations to explore resources that support your transition into homeownership with confidence and clarity.
Publisher’s Note: LifeEventGuide is an independent educational publisher. Some articles reference tools or services we recommend to help readers explore options related to major life transitions. Learn more about how we make recommendations here.
Bringing home a newborn is one of life’s most profound moments—equal parts joy, wonder, and if we’re honest, a little overwhelm. The nursery needs setting up, the hospital bag needs packing, and there’s a seemingly endless list of tiny essentials you never knew existed.
This guide breaks down everything you truly need before, during, and after baby arrives. We’ve organized items by category, flagged the absolute must-haves, and noted what can wait. Whether you’re nesting at 30 weeks or scrambling in the final days, this checklist will help you feel prepared, confident, and ready to welcome your little one home.
What This Guide Covers:
Essential gear by category (feeding, sleeping, diapering, clothing, bathing, safety)
Hospital bag checklist for labor and delivery
Important documents and administrative tasks
Week-by-week preparation timeline
Budget-friendly alternatives and what not to buy
Evidence-based safety recommendations
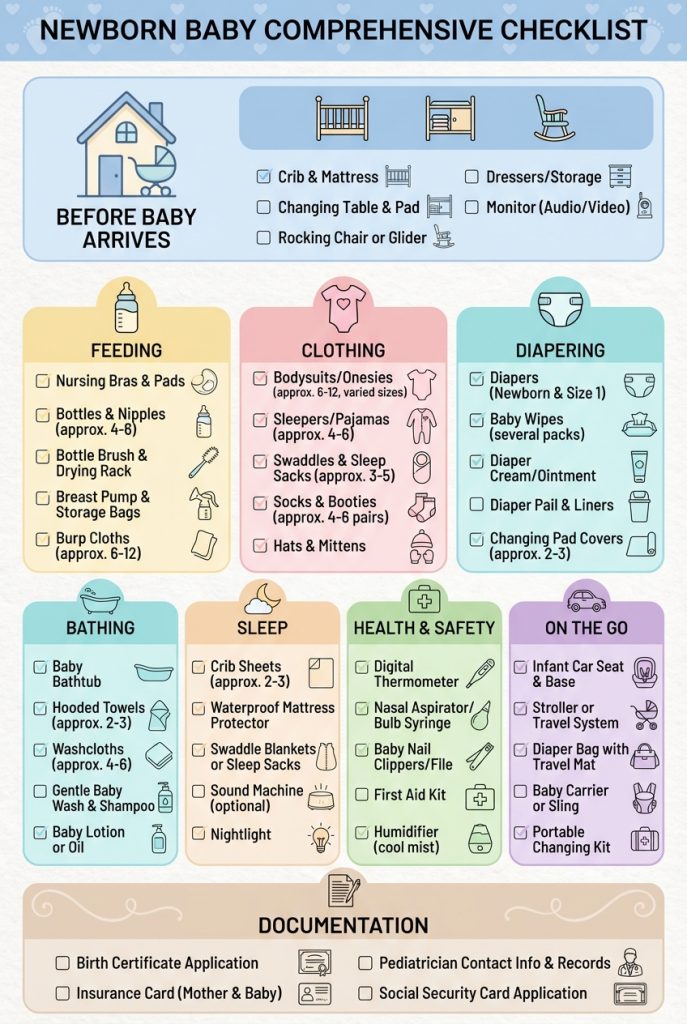
Before Baby Arrives: The Essentials Checklist
Nursery and Sleep (Safe Sleep Foundation)
Must-Haves:
Crib or bassinet that meets current CPSC safety standards (slats no more than 2⅜ inches apart)
Firm, flat mattress with fitted sheets (3-4 sheets for frequent changes)
Waterproof mattress protector (2-3 for rotation during washing)
Sleep sacks or wearable blankets (avoid loose blankets per AAP safe sleep guidelines)
White noise machine (optional but helps many newborns settle)
Blackout curtains or shades for daytime naps
Baby monitor (audio minimum; video optional for peace of mind)
Safety Note: The American Academy of Pediatrics recommends room-sharing (but not bed-sharing) for at least the first 6 months, ideally the first year, to reduce SIDS risk by up to 50%.
Can Wait:
Decorative bedding sets (bumpers, pillows, blankets are unsafe for infants)
Changing table (you can use a changing pad on a dresser)
Glider or rocking chair (comfortable but not essential)
Water bottle (nursing makes you incredibly thirsty)
For Formula Feeding Families:
Must-Haves:
Baby bottles (4-6 bottles; 4-5 oz for newborns)
Bottle nipples (slow-flow for newborns; have backups)
Bottle brush and drying rack
Formula (start with small containers until you know what baby tolerates)
Bottle warmer (optional; warm water bath works too)
Insulated bottle carrier for outings
Note: If using powdered formula, CDC recommends preparing bottles fresh for each feeding for babies under 3 months, immunocompromised, or premature, to reduce infection risk.
High-sided bowls (for when you’re eating one-handed)
Snacks and easy meals stocked for postpartum recovery
Diapering Station
Must-Haves:
Diapers (newborn and size 1; babies go through 8-12 per day initially)
Baby wipes (unscented, sensitive skin formulas; or use warm water and soft cloths)
Diaper cream (zinc oxide-based for prevention and treatment of rash)
Changing pad (portable pads are great for multiple rooms)
Diaper pail or odor-sealing bags
Changing pad covers (2-3 washable covers)
Cloth Diapering Option:
24-36 cloth diapers (newborn or one-size adjustable)
4-6 diaper covers
Wet bag for storage
Cloth-safe detergent
Budget Tip: Store brands and generic diapers often perform just as well as name brands at 30-40% less cost. Buy small packs initially to test fit and absorption.
Onesies or bodysuits (6-8 in newborn and 0-3 month sizes; side-snap or kimono style easiest for newborns)
Sleepers with feet (4-6; zippers are faster than snaps at 3 AM)
Sleep gowns (2-3; great for nighttime diaper changes)
Hats (2-3 soft cotton hats; newborns lose heat through their heads)
Socks or booties (4-6 pairs; they fall off constantly)
Swaddle blankets (3-4 muslin or cotton swaddles, or 2-3 Velcro swaddles)
Going-home outfit (one special outfit plus a backup)
Seasonal outerwear (bunting or snowsuit for winter babies; sun hat for summer)
Sizing Reality Check: Many babies outgrow newborn size within 2-3 weeks. Stock more 0-3 month clothes than newborn.
Laundry Essentials:
Gentle, fragrance-free detergent (regular detergent is fine; “baby” formulas are optional)
Stain remover (enzyme-based for breast milk and formula stains)
Mesh laundry bags for small items like socks
Bathing and Grooming
Must-Haves:
Baby bathtub or sink insert (until baby can sit unassisted)
Soft washcloths (4-6 dedicated for baby)
Hooded baby towels (2-3; keep baby warm after bath)
Gentle baby wash and shampoo (tear-free, fragrance-free; can also use plain water for first month)
Baby lotion (fragrance-free; only if skin is dry—most newborns don’t need it)
Soft-bristle baby brush (for cradle cap)
Infant nail clippers or file (tiny nails grow fast and are sharp)
Digital thermometer (rectal is most accurate for newborns; have petroleum jelly on hand)
Bathing Frequency: Newborns only need 2-3 baths per week. Daily baths can dry delicate skin. Focus on keeping diaper area and skin folds clean between baths.
What NOT to Give: Never give honey to babies under 12 months (botulism risk), aspirin (Reye’s syndrome risk), or cough/cold medicines (not safe or effective for infants).
Extra underwear (hospital usually provides disposables, but bring backups)
Personal toiletries (toothbrush, shampoo, face wash, etc.)
Glasses or contacts (if you wear them)
Maternity pads (hospital provides some, but bring your preferred brand)
For Partner/Support Person:
Snacks and drinks (hospital cafeteria hours vary)
Change of clothes
Phone charger
Camera (if not using phone)
List of people to notify
For Baby:
Going-home outfit (in two sizes: newborn and 0-3 months)
Blanket for car ride
Properly installed car seat (hospital will check before discharge)
Hat and socks
What the Hospital Provides: Most hospitals supply diapers, wipes, basic toiletries, receiving blankets, hats, and initial formula if needed. Ask your provider what’s included.
Important Documents and Administrative Tasks
Before Baby Arrives
Insurance and Financial:
☐ Add baby to health insurance (usually must be done within 30 days of birth)
☐ Review maternity/paternity leave policies and complete paperwork
☐ Understand your insurance’s coverage for pediatric care and where to go for baby’s first appointments
☐ Review life insurance policies
☐ Update or create a will and designate guardianship
Healthcare Setup:
☐ Choose a pediatrician and schedule newborn appointment (usually within first week)
☐ Tour hospital or birth center
☐ Take childbirth class and infant care class
☐ Pre-register at hospital (usually done around 36 weeks)
How many diapers will my newborn use? Newborns typically use 8-12 diapers per day for the first few weeks, then 6-8 per day as they get older. Stock up on size 1 and 2; babies often skip newborn size entirely or outgrow it within two weeks.
What temperature should I keep the nursery? The AAP recommends 68-72°F (20-22°C) to reduce SIDS risk. Dress baby in layers you’d be comfortable in, plus one extra layer, and use a sleep sack instead of blankets.
How often should I bathe my newborn? 2-3 times per week is sufficient. Daily baths can dry out delicate newborn skin. Focus on keeping the diaper area, face, and neck folds clean with a warm washcloth between baths.
When should I start tummy time? Begin tummy time from day one for brief periods (2-3 minutes, 2-3 times daily) while baby is awake and supervised. This builds neck and shoulder strength and prevents flat spots on the head.
Can I use a baby wrap or carrier right away? Yes, as long as baby’s airway is clear and their face is visible. Ensure baby is in an ergonomic position with knees higher than bottom (M-position) and chin off chest.
What if my baby won’t sleep in the bassinet? This is common. Try swaddling, white noise, ensuring the room is dark and cool, and placing a worn shirt near baby (not over face) so they smell you. Always place baby on their back to sleep.
Do I really need to wake a sleeping baby to feed? In the first 2-3 weeks, yes, if baby hasn’t eaten in 3-4 hours during the day (2-3 hours at night for breastfed babies). After baby regains birth weight and pediatrician gives the okay, you can let baby sleep longer stretches.
What’s the best way to soothe a crying baby? Try the “5 S’s”: Swaddle, Side/stomach position (only while awake and supervised), Shush (white noise), Swing (gentle motion), and Suck (pacifier or nursing). Always check for basic needs first: hunger, diaper, temperature.
When can my baby meet visitors? This is a personal choice. Many families wait until after baby’s first vaccines (at 2 months) or limit visitors who aren’t up-to-date on Tdap and flu vaccines. Trust your instincts and don’t hesitate to set boundaries.
Preparing for a newborn is less about perfection and more about creating a safe, loving environment where your baby can thrive—and where you can rest and recover. You don’t need every gadget or the trendiest nursery theme. You need the basics, a support system, and permission to ask for help.
Remember:
Babies need surprisingly little—safe sleep space, food, clean diapers, and your love
Your instincts are powerful; trust yourself
Accept help when offered (meals, errands, holding baby while you shower)
Be kind to yourself in the postpartum period; recovery takes time
Every baby is different; what works for one may not work for yours
You’re already doing the most important work by preparing thoughtfully. Take a deep breath. You’ve got this.
This guide is for informational purposes only and does not substitute for medical advice from your pediatrician or healthcare provider. Always consult with qualified professionals for personalized guidance.
Publisher’s Note: LifeEventGuide is an independent educational publisher. Some articles reference tools or services we recommend to help readers explore options related to major life transitions. Learn more about how we make recommendations here.
A new name marks a new chapter—but the paperwork can feel endless. This comprehensive guide gives you a clear, steady path through every step of the name change process. Whether you’re taking your spouse’s surname, hyphenating, or creating a new family name together, the administrative journey is similar. Follow the checklist, keep copies organized, and move at a calm, sustainable pace. You’ve got this.
According to recent data from the Pew Research Center, approximately 79% of women in heterosexual marriages still choose to take their spouse’s last name, while 14% hyphenate, and 5% keep their maiden name.[1] Regardless of your choice, updating your legal identity requires navigating multiple federal, state, and private institutions—each with their own requirements and timelines.
Before You Begin: Gather These Essentials
Critical Documents:
Certified copies of your marriage certificate (order 3–5 copies)
Request these from the county clerk where you were married
Cost typically ranges from $10–$30 per copy
Processing time: 2–4 weeks in most jurisdictions
Your current government-issued ID (driver’s license, state ID, or passport)
Social Security card (if in the U.S.)
Proof of residence (utility bill, lease agreement, or bank statement dated within the last 60 days)
A simple tracking sheet or folder for confirmations and dates
Optional but Helpful:
Passport-style photos (2–4 copies for various applications)
Digital copies of all documents stored securely in cloud storage
A dedicated email folder for name change confirmations
Notarized copies of your marriage certificate for international use
Understanding the Legal Framework
In the United States, name changes through marriage are governed by state law, but federal agencies like the Social Security Administration (SSA) and the Department of State set their own requirements for updating federal records.[2] Most states recognize a marriage certificate as sufficient legal documentation for a name change, eliminating the need for a court order—a significant simplification compared to name changes for other reasons.
Quick Note on Order and Timing
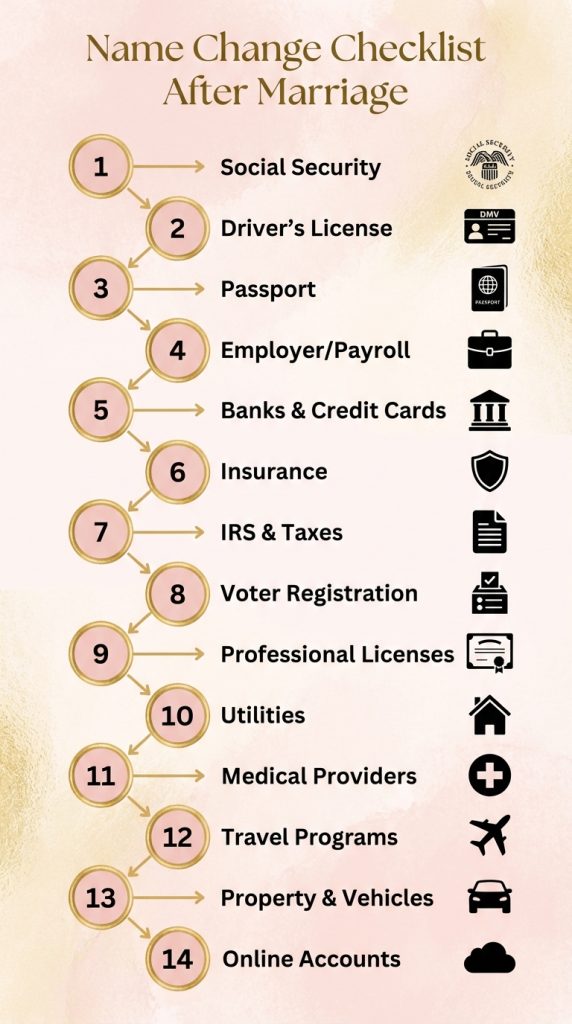
Critical Sequencing: In the U.S., update Social Security first, then your driver’s license/state ID, then your passport. This order matters because:
Social Security Administration (SSA) is the master federal database
DMV/State agencies verify your name against SSA records
Passport services cross-reference both SSA and state ID
Financial institutions validate against government IDs
Most other updates can follow in any order. Expect some agencies to require in-person appointments. Build a simple weekly plan so you’re not rushing—spreading updates over 4–8 weeks is perfectly normal and sustainable.
Processing Time Reference:
Social Security: Instant update in database, new card arrives in 7–10 days
Driver’s License: Same-day issuance in most states
Insurance providers: 1–3 business days for policy updates
Step-by-Step Name Change Checklist (U.S.)
1. Social Security Administration
What to do: File a name change with the Social Security Administration.
Why first: The SSA database is the authoritative source for your legal name. Other federal agencies, employers, financial institutions, and credit bureaus validate identity against SSA records. Updating this first prevents delays and rejections downstream.[4]
What you’ll need:
Form SS-5 (Application for a Social Security Card) – download from ssa.gov or pick up at any SSA office
Original or certified copy of your marriage certificate
Current government-issued photo ID (driver’s license, state ID, or U.S. passport)
How to complete:
In person: Visit your local SSA office (no appointment needed, but expect wait times)
By mail: Mail documents to your local office (only send certified copies, never originals except your current Social Security card)
Processing time: Your name is updated immediately in the system. Your new Social Security card arrives by mail in 7–10 business days.
Important tip: Request a printed receipt or confirmation with the date of your visit. Note this date in your tracking sheet—some DMVs ask when your SSA update was processed.
Special considerations:
If you’re updating both your name and gender marker, you’ll need additional documentation
Non-citizens may have additional requirements based on immigration status
If you’ve lost your Social Security card, you can replace it during the same visit
2. Driver’s License or State ID
What to do: Update your name at the Department of Motor Vehicles (DMV) or equivalent state agency.
Timing: Wait 24–48 hours after your SSA visit to ensure the database sync is complete, though many people successfully update the same day.
What you’ll need:
Updated Social Security confirmation (if available)
Current driver’s license or state ID
Certified marriage certificate
Proof of address (utility bill, bank statement, or lease dated within 60–90 days)
Texas: Accepts marriage certificate; new license issued immediately; $11 fee for duplicate license
New York: Can update online within 30 days of address change; otherwise in-person required
Florida: Requires in-person visit; no online option for name changes; first replacement free within 30 days of marriage[5]
Processing: Most states issue your new license immediately. Some provide a temporary paper license while your permanent card is mailed (7–14 days).
Helpful tip: Ask if you can update voter registration at the same visit—many states offer this convenience. Also inquire about organ donor registry updates if applicable.
3. U.S. Passport
What to do: Submit the appropriate passport application depending on when your current passport was issued.
Form selection:
Form DS-5504 (free): If your current passport is less than one year old
Form DS-82 ($130 fee): If your current passport is more than one year old but still valid
Form DS-11 ($130 fee + execution fee): If your passport is expired
What you’ll need:
Completed application form
Your current passport (will be canceled and returned to you)
Certified copy of your marriage certificate
One new passport photo (2×2 inches, taken within the last 6 months)
Payment for applicable fees
Submission methods:
By mail: Send to the National Passport Processing Center (for DS-5504 and DS-82)
In person: Required for DS-11 at a passport acceptance facility or agency
Processing times (as of 2026):[3]
Routine service: 8–11 weeks
Expedited service: 5–7 weeks (additional $60 fee)
Agency appointment: 5 business days (for urgent travel; requires proof of travel within 14 days)
Travel planning tip: If you have international trips planned within 6 months, start your passport update early. Always ensure the name on your flight booking matches the name on the ID you’ll carry. Some travelers maintain their maiden name passport until expiration to avoid booking complications.
4. Employer, Payroll, and Benefits
What to update:
HR/payroll system and employee records
Direct deposit information (often requires re-verification)
Health insurance enrollment
Retirement accounts (401k, 403b, pension)
Life insurance beneficiaries
Flexible Spending Accounts (FSA) or Health Savings Accounts (HSA)
Workplace email address and internal directory
Employee ID badge and building access cards
Professional email signature
Process: Contact your HR department as soon as your SSA update is complete. Most companies require:
A copy of your marriage certificate
Your new Social Security card (once received)
Updated Form W-4 if changing withholding status
Beneficiary designation forms if updating
Timeline: HR updates typically process within 1–2 pay periods. Verify your next paycheck stub shows your new legal name.
Important considerations:
Update your name before open enrollment to avoid insurance coverage gaps
Confirm your W-2 (issued in January) will reflect your legal name for tax filing
If you have stock options or equity grants, verify these are updated to prevent future complications
Request written confirmation from HR and save it to your documentation folder
5. Banks, Credit Cards, and Financial Institutions
What to update:
Checking and savings accounts
Credit cards (personal and business)
Mortgage or home equity loans
Auto loans and leases
Student loans
Personal loans
Investment accounts (brokerage, IRA, Roth IRA)
Cryptocurrency exchange accounts
Payment apps (Venmo, PayPal, Cash App, Zelle)
What you’ll need:
Valid government-issued ID with new name
Certified copy of marriage certificate
Account numbers for each institution
Bank-specific forms (often available online or in-branch)
Process:
In person: Visit your primary bank branch with documents; they can often update all accounts simultaneously
By phone: Call customer service; may require mailing or uploading documents
Online: Some institutions allow secure document upload through their portals
Timeline: Most banks process name changes within 3–5 business days. New debit/credit cards typically arrive within 7–10 days.
Critical follow-up steps:
Order new checks with your new name
Verify all automatic payments, direct deposits, and recurring transfers continue uninterrupted
Update your name in mobile banking apps
Confirm your credit report reflects the name change (more on this below)
Credit reporting agencies: Your creditors will report your name change to the three major credit bureaus (Equifax, Experian, TransUnion), but you can also notify them directly:
The agencies will link your new and old names to your credit history
Your credit score and history remain intact
Request a free credit report 30 days after updates to verify accuracy[6]
6. Insurance Providers
Types of insurance to update:
Health insurance (individual and employer-sponsored)
Dental and vision insurance
Auto insurance
Homeowners or renters insurance
Life insurance
Disability insurance (short-term and long-term)
Umbrella liability insurance
Professional liability insurance (if applicable)
What you’ll need:
Policy numbers
Copy of marriage certificate
New driver’s license (for auto insurance)
Insurer-specific forms
Why it matters: An incorrect name on your insurance card can cause claims to be denied or delayed. Medical providers verify your identity against your insurance card, and any mismatch can create billing complications.[7]
Process:
Contact each insurance provider’s customer service
Many allow online updates through member portals
Request updated insurance cards and policy documents
Ask if the name change triggers any policy document reissuance
Timeline: Most insurance updates process within 1–3 business days. New insurance cards arrive within 7–10 days.
Important tip: Keep PDFs of all updated policy documents together in a dedicated digital folder. Update your insurance information in your phone’s emergency contact settings.
7. IRS and Tax Filing
What you need to know: The Internal Revenue Service (IRS) pulls your legal name from Social Security Administration records. Once your SSA name is updated, your tax filings should match automatically.[8]
Action items:
Verify your W-2 reflects your new legal name before year-end
If filing jointly, ensure both spouses’ names match SSA records
Update your name with your tax preparer or tax software account
If you file business taxes (1099, Schedule C), update your business entity records
Special consideration for newlyweds: If you married late in the tax year and haven’t completed your SSA name change before filing, you have two options:
File under your maiden name (matching your SSA record at year-end)
Complete your SSA update first, then file with your new name
Filing with a name that doesn’t match SSA records can delay refund processing by 6–8 weeks.
State taxes: Don’t forget to update your name with your state tax agency as well, especially if you file state returns separately.
8. Voter Registration
What to do: Update your voter registration to reflect your new legal name and current address.
Why it matters: Voter registration databases must match your current legal name and address for you to receive ballots and vote without complications.[9]
How to update:
At the DMV: Many states allow simultaneous voter registration updates during your driver’s license visit
Online: Most states offer online voter registration updates through their Secretary of State website
By mail: Download and mail a voter registration form
In person: Visit your county elections office
State-specific resources:
National: vote.gov provides links to each state’s registration portal
Deadlines: Check your state’s voter registration deadlines before elections
Timeline: Updates typically process within 2–4 weeks. You should receive a new voter registration card confirming your updated information.
9. Professional Licenses and Certifications
What might need updating:
State professional licenses (medical, legal, nursing, teaching, real estate, cosmetology, etc.)
Industry certifications (CPA, PE, PMP, etc.)
Professional association memberships
Bar association registration (for attorneys)
Medical board registration (for physicians)
Continuing Education (CE) transcripts and records
Process: Each licensing board has unique requirements. Most require:
Official name change request form
Copy of marriage certificate
Current license number
Reissuance fee (typically $20–$75)
Important considerations:
Lead times: Some boards take 4–8 weeks to process name changes
Certificate reissuance: Ask if a formal reissued certificate is required or if a database update suffices
Wall certificates: Some professions require new wall certificates for display in offices
CE credits: Verify your continuing education credits transfer to your new name without issue
Tip: Start professional license updates early in your name change process, as these often have the longest processing times.
10. Utilities and Household Accounts
What to update:
Electric and gas utilities
Water and sewer services
Trash and recycling collection
Internet service provider
Cable or satellite TV
Mobile phone account
Landline (if applicable)
Home security system
Streaming services (Netflix, Hulu, Spotify, etc.)
Smart home device accounts (Alexa, Google Home, Ring, Nest)
Process:
Most utilities allow name changes via phone or online account portal
Some may require a copy of your marriage certificate
Joint accounts: Decide if you want individual or joint account holder status
Why it matters: Utility accounts in your legal name help establish proof of residence for other updates. They also ensure billing accuracy and credit reporting (if applicable).
Helpful tip: Take screenshots of your account settings before making changes. This allows you to verify all services, auto-payments, and account preferences transferred correctly.
11. Medical Providers, Schools, and Pharmacies
Healthcare providers to notify:
Primary care physician
Specialists (cardiologist, dermatologist, etc.)
Dentist and orthodontist
Eye doctor
Mental health therapist or psychiatrist
Physical therapist
Chiropractor
Patient portals (MyChart, FollowMyHealth, etc.)
Pharmacy updates:
Retail pharmacy (CVS, Walgreens, etc.)
Mail-order prescription services
Pharmacy benefit manager (PBM)
What you’ll need:
New government ID
Updated insurance card
Marriage certificate (some offices may request)
Process:
Call each provider’s office to update records
Bring your new ID and insurance card to your next appointment
Update your name in patient portals yourself or request staff assistance
Why it matters: Accurate patient records prevent prescription errors, insurance claim denials, and medical record mix-ups. Your pharmacy profile must match your insurance exactly for coverage to process correctly.[10]
Educational institutions: If you’re currently enrolled in school or continuing education, update:
Student records and ID
Financial aid accounts (FAFSA)
Student loan servicers
University email and portal access
Library card
Alumni association records
12. Travel Programs and Loyalty Accounts
TSA PreCheck and Global Entry:
TSA PreCheck: Update through the Universal Enrollment Services website or by visiting an enrollment center
Global Entry, NEXUS, SENTRI: Update through your Trusted Traveler Programs (TTP) account
No fee for name changes, but you must update before your next trip
Failure to update can result in denial at security checkpoints
Airline loyalty programs:
Frequent flyer accounts (American AAdvantage, Delta SkyMiles, United MileagePlus, etc.)
Update through airline websites or customer service
Critical: The name on your booking must match your ID exactly—even middle initials matter
Hotel and car rental programs:
Hotel loyalty (Marriott Bonvoy, Hilton Honors, IHG Rewards, etc.)
Car rental (Hertz Gold, Enterprise Plus, National Emerald Club, etc.)
Vacation rental profiles (Airbnb, VRBO)
Other travel accounts:
Travel credit cards (update through your card issuer)
Critical tip: Complete all travel program updates before booking new trips. Name mismatches can prevent boarding and are expensive to correct last-minute.
13. Vehicle Titles, Registration, and Property Deeds
Vehicle updates:
Vehicle title: Update through your state DMV
Vehicle registration: Often updated simultaneously with title
Auto loan: Notify your lender (bank or credit union)
Car insurance: (covered in Insurance section above)
Process varies by state:
Some states require in-person visits
Others allow mail-in forms
Fees typically range from $15–$50
May require current title, marriage certificate, and ID
Property and real estate:
Home deed: Generally does not require updating immediately—your legal name is what matters, and a marriage certificate proves the connection
Mortgage: Notify your mortgage servicer (especially for payment matching)
Property tax records: Update with your county assessor
Homeowners insurance: Update with your insurance provider
HOA records: Notify your homeowners association
Trusts and estate planning documents: If you have:
Living trusts
Wills
Power of attorney documents
Healthcare directives
Beneficiary designations
Consult with an estate planning attorney to determine if amendments or restatements are necessary. In most cases, a marriage certificate connects your previous and new identity, but complex trusts may require formal updates.
14. Digital Life and Online Accounts
Email accounts:
Update display name in Gmail, Outlook, Yahoo, etc.
Consider creating a new email with your married name
Set up forwarding if transitioning email addresses
Update email signatures
Social media profiles:
Facebook, Instagram, Twitter/X, LinkedIn, TikTok
Update profile names, usernames (if desired), and about sections
Privacy consideration: You can keep your maiden name on social media if preferred
Cloud storage and productivity:
Google Drive, iCloud, Dropbox, OneDrive
Microsoft 365, Google Workspace accounts
Password managers (LastPass, 1Password, Dashlane)
E-commerce and shopping:
Amazon, eBay, Etsy
Online grocery delivery (Instacart, Shipt)
Retail accounts (Target, Walmart, etc.)
Subscription boxes and auto-deliveries
E-signature and legal:
DocuSign, HelloSign, Adobe Sign
Online notary services
Legal document platforms
Subscriptions and memberships:
Streaming services (covered above)
Gym and fitness memberships
Professional networking sites
Magazine and newspaper subscriptions
Warehouse clubs (Costco, Sam’s Club)
Tip: Prioritize accounts where your legal name is required for payments or legal documents first, then update social and display names at your leisure.
Printable Mini-Checklist
Phase 1: Core Identity (Week 1-2)
☐ Social Security Administration
☐ Driver’s license/State ID
☐ Passport (if traveling internationally within 6 months)
☐ Voter registration
Phase 2: Work and Money (Week 2-3)
☐ Employer/payroll/benefits
☐ Banks and credit unions
☐ Credit cards
☐ Loans and mortgages
☐ Investment and retirement accounts
Phase 3: Insurance and Taxes (Week 3-4)
☐ Health insurance
☐ Dental and vision insurance
☐ Auto insurance
☐ Homeowners/renters insurance
☐ Life insurance
☐ Disability insurance
☐ IRS (via SSA automatic update)
Phase 4: Professional and Property (Week 4-6)
☐ Professional licenses
☐ Vehicle title and registration
☐ Property deeds (if needed)
☐ Trusts and estate documents
Phase 5: Daily Life (Week 5-8)
☐ Utilities (electric, gas, water)
☐ Phone and internet
☐ Streaming services
☐ Medical providers
☐ Dentist
☐ Pharmacy
☐ Veterinarian (for pet records)
Phase 6: Travel and Leisure (Week 6-8)
☐ TSA PreCheck/Global Entry
☐ Airline loyalty programs
☐ Hotel rewards programs
☐ Car rental memberships
Phase 7: Digital Life (Ongoing)
☐ Email display names
☐ Social media profiles
☐ Cloud storage accounts
☐ E-signature services
☐ E-commerce accounts
☐ Subscription services
How Long Will This Take?
Fast track: 2–3 weeks If you batch appointments, prep all documents in advance, and dedicate several full days to the process. This approach works well if you have time off after your wedding or honeymoon.
Standard pace: 4–8 weeks A steady, sustainable approach with minimal disruption to work and life. This is the recommended timeline for most people.
Extended timeline: 8–12 weeks If you’re traveling frequently, have complex professional licenses, or prefer spreading tasks across several months.
Time management tip: Schedule 90-minute focused blocks once or twice a week. Each block: one major agency visit or phone call + two quick online account updates. This rhythm prevents burnout and maintains progress.
Common Pitfalls (and How to Avoid Them)
1. Not ordering enough certified copies
The problem: Many agencies require original or certified copies of your marriage certificate. Ordering one or two copies forces you to wait for documents to return before proceeding to the next step.
The solution: Order 3–5 certified copies upfront. At $10–$30 per copy, this small investment saves weeks of waiting. Most counties allow online ordering through their vital records office.
2. Updating travel documents last-minute
The problem: Passport processing takes 8–11 weeks (5–7 weeks expedited). If you book international travel before updating your passport, you’ll face a name mismatch.
The solution: Align your ID updates with your travel calendar. If you have trips planned, either:
Complete your passport update well in advance (3+ months before travel)
Book travel under your maiden name until your new passport arrives
Maintain consistency: name on ticket = name on traveling ID
3. Losing track of confirmations
The problem: When updating 20+ institutions, it’s easy to forget what’s done, what’s pending, and when you made each update. This causes duplicate efforts and missed updates.
The solution: Create a single tracking system (digital or physical):
Spreadsheet with columns: Institution, Date Contacted, Confirmation Number, Date Completed, Notes
Dedicated email folder for all confirmation emails
Cloud folder (Google Drive, Dropbox) for all documentation
4. Skipping professional licenses
The problem: Professional licensing boards often have 4–8 week processing times and specific requirements. Forgetting these can cause legal complications if you sign documents professionally.
The solution: Identify all licenses and certifications early. Start these updates in week 1 alongside Social Security. Create calendar reminders for any required continuing education or renewal dates.
5. Forgetting about automatic payments
The problem: When your bank issues a new credit or debit card with your new name, your old card number may be deactivated, breaking automatic payments.
The solution: Before requesting new cards, screenshot or document all automatic payments. After receiving new cards, systematically update each merchant. Check your bank statements for 2–3 months after to catch any failed payments.
6. Neglecting credit reports
The problem: Credit bureaus sometimes create separate profiles for different name variations, potentially fragmenting your credit history.
The solution: 30 days after completing bank and credit card updates, pull your free annual credit report from all three bureaus (annualcreditreport.com). Verify:
Your new and old names are properly linked
All accounts appear under your profile
No errors or fraudulent accounts exist
7. Rushing the Social Security update
The problem: The SSA database is the foundation. Rushing to the DMV before the SSA update fully processes can cause rejections or delays.
The solution: Wait 24–48 hours after your SSA visit before attempting DMV updates. This gives the system time to synchronize. If visiting the DMV immediately, bring your SSA receipt as proof of update.
State-Specific Considerations
Name change requirements vary by state. Here are some notable differences:
Community Property States: In Arizona, California, Idaho, Louisiana, Nevada, New Mexico, Texas, Washington, and Wisconsin, special rules may apply to property ownership and name changes on deeds.[11]
States with Online DMV Name Changes: A growing number of states allow online driver’s license updates for name changes:
Arizona (with requirements)
Georgia (within 30 days of address change)
Illinois (limited circumstances)
Check your state DMV website for current options
States Requiring In-Person DMV Visits: Most states still require in-person visits for name changes:
California, Texas, Florida, New York, Pennsylvania (among others)
Bring all required documents to avoid multiple trips
Passport Agencies by Region: For urgent passport needs (travel within 14 days), you can visit a regional passport agency:
Boston, Chicago, Detroit, Honolulu, Houston, Los Angeles, Miami, Minneapolis, New Orleans, New York City, Philadelphia, San Francisco, Seattle, Washington DC
Appointment required; proof of urgent travel necessary[3]
International Considerations
If you’re a dual citizen:
Update your name with both countries’ passport agencies
Requirements and timelines vary significantly by country
Some countries don’t recognize name changes after marriage
If you plan to travel internationally:
Ensure your airline ticket name matches your passport exactly
Some countries require a visa with your legal name
Carry a certified copy of your marriage certificate when traveling during transition periods
If you’re married abroad:
You may need to register your foreign marriage certificate with your home country
Some states require an apostille (international certification) on foreign marriage certificates
Contact your county clerk for specific requirements
Timeline for International Name Changes (Common Countries)
United Kingdom: 2–3 weeks for passport update
Canada: 20 business days for passport; varies by province for driver’s license
Australia: 2–3 weeks for passport; varies by state for license
European Union: Varies by country; typically 4–8 weeks
Special Situations
Hyphenating Your Last Name
If you’re hyphenating (e.g., Smith-Jones):
Use the exact same hyphenation format everywhere
Computer systems sometimes read hyphens differently
Be consistent: Smith-Jones vs. Smith Jones vs. SmithJones
Professional tip: Use the hyphenated form as your legal name, but you can use a shortened version professionally
Keeping Your Maiden Name Professionally
Many people maintain their maiden name for professional purposes:
Use your legal name for: government IDs, taxes, insurance, financial accounts
Use your professional name for: work email, publications, professional licenses, social media
Disclose your legal name to HR and licensing boards
This is completely legal and increasingly common
LGBTQ+ Couples and Name Changes
Same-sex couples have the same legal right to change names through marriage:
The process is identical regardless of gender
If both partners are changing names or creating a new combined surname, both will update through the same process
Some couples choose to both take a hyphenated combination
Changing Your Child’s Last Name
If you have children from a previous relationship:
Changing a child’s last name is a separate legal process
Usually requires consent from both legal parents
May require a court order
Consult with a family law attorney for your specific situation
Financial and Legal Protections
Protecting Your Identity During Transition
During the name change process, you may have:
Multiple valid IDs with different names
Credit accounts under two names
Professional records split across identities
To protect yourself:
Keep certified copies of your marriage certificate readily accessible
Maintain a file with old and new IDs during transition periods
Monitor your credit reports for suspicious activity
Use strong, unique passwords for all financial accounts
Enable two-factor authentication wherever possible
Consider a credit freeze during the transition if you’re concerned about identity theft
Tax Implications
Generally, there are no tax implications to changing your name, but keep these in mind:
Your tax filing name must match SSA records
If filing jointly, both spouses’ names must match SSA records
Mismatches can delay refund processing
Update your name before year-end to simplify tax season
Recommendation: Schedule a consultation with your estate planning attorney within 6 months of your marriage to review all documents.
Frequently Asked Questions
Do I need to change my name everywhere?
No. You’re required to update your name where your legal identity, finances, or benefits depend on it (government IDs, banks, insurance, employment). Display names on social media and informal accounts can wait or remain unchanged if you prefer.
What if I’m hyphenating or keeping my maiden name professionally?
This is increasingly common. Use your legal name for government agencies, financial institutions, and anywhere legal identity verification occurs. Use your preferred professional name for work-related platforms, publications, and brand-facing contexts. Be transparent with HR and licensing boards about both names.
Do I need a lawyer?
Usually no. Marriage-based name changes are straightforward and don’t require legal assistance. However, consider consulting a professional for:
Professional licensing in regulated fields (medical, legal)
International name changes or dual citizenship issues
Changing children’s names from previous relationships
Can I keep traveling during the process?
Yes—just ensure the name on your booking matches the ID you’ll carry for that trip. Options:
Book under your maiden name and travel with your old ID (if still valid)
Wait until you receive your new passport to book with your married name
Carry your marriage certificate as proof of name change if using mixed documents (not guaranteed to work—airline discretion)
What if my Social Security update doesn’t show immediately at the DMV?
Wait 24–48 hours for database synchronization. If you’re at the DMV and facing issues, showing your SSA receipt sometimes allows processors to manually verify. If rejected, simply return in 1–2 days.
How do I change my name on my birth certificate?
You don’t. Birth certificates are historical documents and are never updated for name changes. Your marriage certificate serves as legal proof connecting your birth name to your married name.
What if I get divorced and want to reclaim my maiden name?
Your divorce decree typically includes provisions for name restoration. The process is similar to a marriage name change: update SSA first, then DMV, then cascade through other institutions. You’ll use your divorce decree as the legal documentation instead of a marriage certificate.
Can I change to a completely new name through marriage?
State laws vary. Most states allow you to take your spouse’s surname, hyphenate, or combine names. Creating an entirely new surname (not derived from either partner) may require a formal court-ordered name change in some jurisdictions. Check your state’s specific laws.
What happens to my professional publications under my maiden name?
They remain under your maiden name. Many professionals:
Continue publishing under their maiden name
Use both names with “née” (e.g., Dr. Jane Smith née Johnson)
Include both names in author profiles
Create a professional CV that bridges both identities
Will changing my name affect my credit score?
No. Your credit history is tied to your Social Security number, not your name. Credit bureaus will link both names to your single credit profile. Your score and history remain intact.[6]
How do I handle the transition period when I have IDs with different names?
Keep your marriage certificate accessible at all times. If questioned, it’s legal proof connecting both identities. During the 2–8 week transition, you may encounter:
Insurance cards with your old name but prescriptions requiring new ID
Bank cards with your old name but checks with your new name
Mismatched IDs for travel
These are normal and expected. Most institutions understand and accommodate the transition period.
[2] Social Security Administration (2025). “Social Security Number and Card: How to Change Your Name.” https://www.ssa.gov/ssnumber/
[3] U.S. Department of State (2026). “Passport Processing Times and Name Changes.” Bureau of Consular Affairs.https://travel.state.gov/
[4] National Association of Social Security Claimants’ Representatives (2024). “Understanding Social Security Records and Identity Verification.” https://www.nosscr.org/
[5] American Association of Motor Vehicle Administrators (2025). “State Requirements for Driver License Name Changes.” https://www.aamva.org/
To make your name change process even smoother, consider using these tools:
Tracking Spreadsheet Template: Create a spreadsheet with these columns:
Institution/Agency Name
Category (Government, Financial, Insurance, etc.)
Priority (High, Medium, Low)
Date Contacted
Method (In-person, Phone, Online)
Confirmation Number
Date Completed
Notes
Follow-up Required (Yes/No)
Document Checklist:
☐ Marriage certificate ordered (quantity: ___)
☐ Marriage certificate received (date: ___)
☐ Current driver’s license (expires: ___)
☐ Current passport (expires: ___)
☐ Social Security card located
☐ Passport photos taken (date: ___)
☐ Proof of residence documents gathered
☐ Tracking folder created (digital/physical)
Closing: A Steady Finish
This isn’t a sprint—it’s a sequence. Your name change journey is personal, and there’s no single “right” timeline. Some people complete everything in two weeks; others spread it across three months. Both approaches are valid.
Remember:
Move one step at a time
Save every confirmation
Celebrate progress as you go
Ask for help when you need it (HR departments, DMV clerks, and customer service representatives handle name changes daily)
Be patient with yourself during the transition
Your new name deserves a calm, confident arrival in every corner of your life. Marriage is a beautiful milestone, and while the paperwork feels administrative, it’s part of weaving your identities together legally, financially, and socially.
Final encouragement: Thousands of people navigate this process every day. Government agencies and private institutions have well-established procedures. You’re not alone, and you’re fully capable of completing this journey successfully.
Take a deep breath, pull out your tracking sheet, and tackle your first item. Before you know it, you’ll be signing documents with your new name like you’ve had it your whole life.
Congratulations on your marriage, and best wishes as you step into this new chapter—paperwork and all.
Publisher’s Note: LifeEventGuide is an independent educational publisher. Some articles reference tools or services we recommend to help readers explore options related to major life transitions. Learn more about how we make recommendations here.
Moving day can feel overwhelming when you’re juggling dozens of tasks at once. A solid moving day checklist keeps you organized and prevents the last-minute scramble that catches most people off guard.
Here at LifeEventGuide, we’ve seen how a structured approach transforms a stressful move into a manageable process. This guide walks you through every phase, from weeks before you pack your first box to settling into your new place.
Getting Started: The First Weeks Matter Most
Build Your Timeline and Budget
Starting your move weeks in advance separates organized transitions from chaotic ones. Work backward from your move date to create a realistic timeline. If you’re moving in eight weeks, allocate the first two weeks to sorting and decluttering, the next four to packing and logistics, and the final two to final preparations and address changes. This pacing prevents the cramped feeling of last-minute decisions.
Your timeline must include specific dates for contacting moving companies, changing your address with the USPS, and notifying utilities. Many people underestimate how long these administrative tasks take-transferring medical records, coordinating with your old and new utility providers, and updating your address across banks, insurance companies, and subscription services typically requires two to four weeks of scattered effort.
Build your budget around three main categories: moving services, supplies, and setup costs at your new home. Request on-site estimates from at least three moving companies and verify each company’s USDOT number with the U.S. Department of Transportation to confirm registration and safety standards. Professional movers typically cost between $1,400 and $9,700 for a full-service move, though prices vary based on distance and volume. If you’re renting a truck instead, factor in fuel, insurance, and equipment rental fees. Add 15 to 20 percent to your initial estimate as a buffer for unexpected costs.
Sort Your Belongings and Measure Your New Space
Decluttering before packing reduces moving expenses because costs increase with volume. Sort your belongings into three categories: keep, donate, and discard. Items you haven’t used in two years rarely deserve space in your new home.
Measure doorways and rooms in your new place to verify that large furniture will actually fit. This prevents the frustration of discovering a couch won’t navigate through a hallway or a bed won’t fit through a bedroom door. Once you’ve decided what travels with you, finalize your moving company choice and get written confirmation of the date, costs, and specific services included. The written estimate protects both you and the mover by establishing clear expectations.
Secure Your Moving Company and Declare Valuables
If you have items worth over $100 per pound, declare them to your mover and consider additional insurance coverage, as standard policies have per-item limits. Confirm all arrangements two weeks before moving day and provide your mover with complete old and new addresses plus multiple contact numbers. This level of detail prevents day-of confusion and missed appointments. With your timeline locked in and your mover confirmed, you can now focus on the physical work of preparing your home and items for transport.
Packing and Logistics: Getting the Details Right
Pack Room by Room with a Consistent System
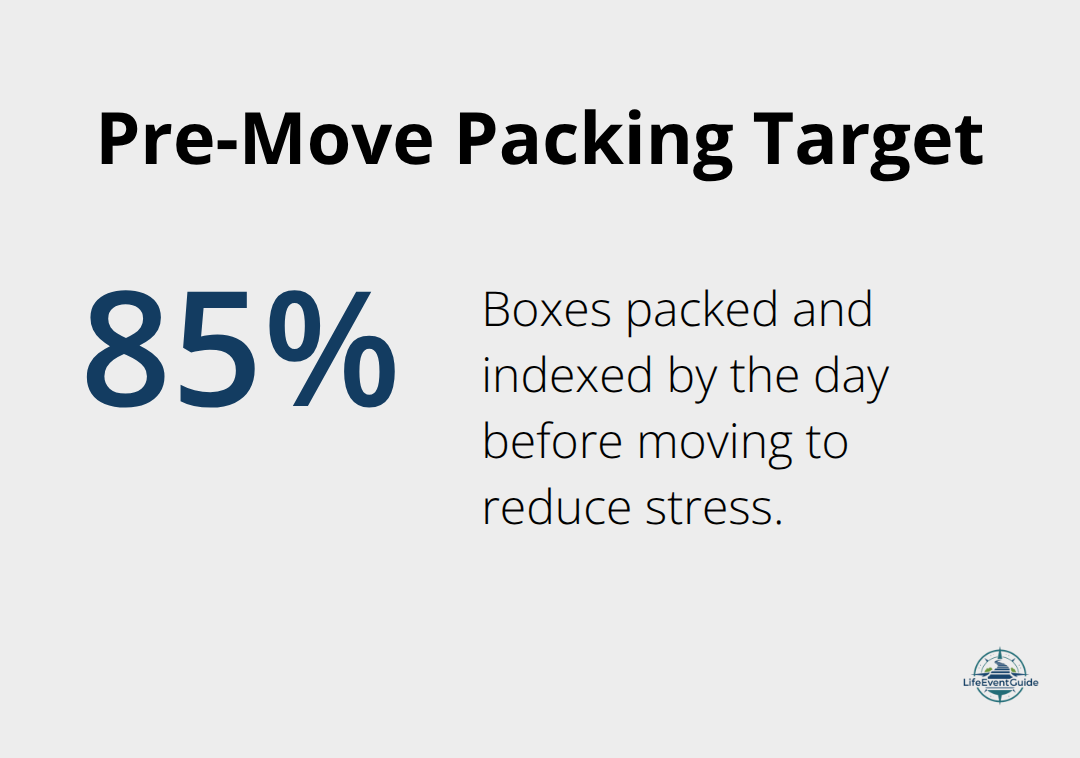
Packing room by room with a consistent system prevents items from scattering across boxes without clear destinations. Start with spaces you use least frequently-guest bedrooms, storage closets, seasonal decorations-so daily disruptions stay minimal. Try to have roughly 85 percent of your boxes packed and indexed by the day before moving rather than chasing perfection in those final chaotic hours. Create a single numbering system across all rooms and maintain one master box index that logs contents and destinations. This approach takes discipline but saves hours on moving day when locating a specific item could otherwise mean unpacking dozens of boxes.
Number each box with a permanent marker on both the top and side so contents remain visible regardless of stacking position. When packing room by room with a consistent system, place heavier boxes at the bottom to stabilize the load and avoid crushing lighter items, with lighter, more delicate items on top. Dish barrels and wardrobe boxes, which you can order when requesting moving company estimates six weeks before your move, protect fragile kitchen items and hanging clothes far better than improvised solutions.
Label Boxes and Create a Color-Coded System
Labeling extends beyond writing contents on boxes. Create a color-coded system using brightly colored labels or markers to assign each room a specific color, then apply that color to every box destined for that space. Movers move faster and more accurately when they can spot a red label means master bedroom without reading individual labels. This visual system reduces confusion and accelerates the unloading process significantly.
Update Utilities and Address Information
Update utilities and address changes during weeks three through six of your timeline to avoid service gaps. Contact your electricity, gas, water, phone, and internet providers simultaneously rather than staggering calls, since coordination schedules installation around your moving date. Set up new accounts before canceling old ones to prevent lapses, especially for internet service.
The USPS Change of Address form processes within three to five business days, so submit it four weeks before moving. Simultaneously notify banks, credit card companies, insurance providers, subscription services, and the IRS using a simple spreadsheet tracking which entities you’ve contacted and when. Medical records transfers typically require written release forms and take two to four weeks, so initiate these requests at the six-week mark. Forward mail from your old address to your new one for at least six months to catch payments and notices that arrive late.
With your boxes labeled, your utilities coordinated, and your address changes submitted, you’ve completed the groundwork that prevents moving day surprises. The final preparation phase focuses on the items and documents that require special handling during the actual move.
What to Protect on Moving Day
Secure Your Most Valuable Possessions
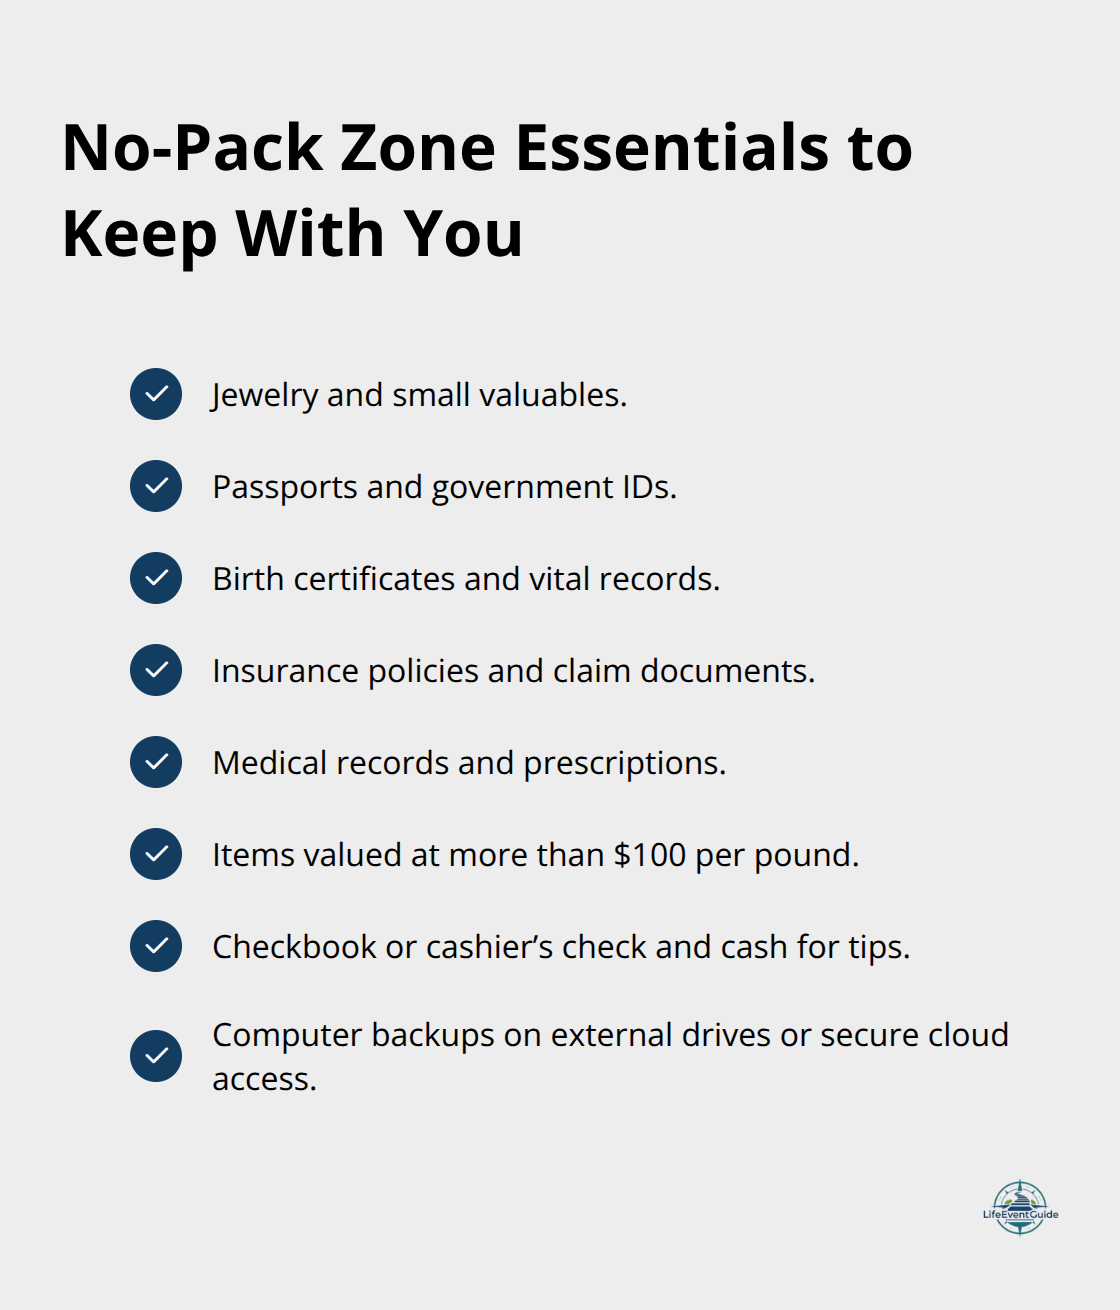
The 24 hours surrounding your move require a different mindset than the weeks of preparation that came before. While movers handle the bulk of your possessions, certain items demand your personal attention and control. Keep all important documents, valuables, and irreplaceable items with you rather than on the moving truck. This means your jewelry, passports, birth certificates, insurance policies, medical records, and any items worth more than $100 per pound travel in your vehicle or stay in your direct possession.
Create a secure case or lockbox for jewelry and store computer backups on external drives or cloud storage that you transport yourself. Your checkbook must remain accessible and unpacked-you’ll need it to pay the movers with a cashier’s check or money order on arrival, plus cash for tips ranging from 10% to 20%, up to $100 per mover.
Establish a No-Pack Zone
Place your documents and valuables in a designated No-Pack Zone, clearly labeled so movers understand they should skip this area entirely. Position your No-Pack Zone in an out-of-the-way spot like a closet or your vehicle to prevent accidental packing. This physical boundary protects irreplaceable items from ending up on the truck and gives you peace of mind during the controlled chaos of moving day.
Complete Your Final Walkthrough
Before the moving truck arrives, conduct a final walkthrough of your old home with a checklist focused on overlooked spaces. Check inside kitchen cabinets, bathroom drawers, closets, and storage areas where items hide during regular packing. Verify that garage shelves, attic spaces, and basement corners are empty. Take photos or video of empty rooms and closets to document the condition of your old home for your security deposit or sale records.
Verify Your Mover’s Credentials and Confirm Logistics
Confirm your moving company’s arrival time the day before by calling with your complete contact number and verifying the USDOT number on their truck matches the number on your written estimate-this simple verification prevents unlicensed operators from entering your home. Have your moving company’s contact information and your new address readily available on moving day so you can provide clear directions and confirm estimated arrival times. Arrange your payment method in advance and keep cash accessible rather than scrambling to find an ATM when the truck arrives.
Final Thoughts
Your moving day checklist extends beyond the truck’s departure from your old home. Set up your bedroom first so you have a comfortable place to sleep, then tackle bathrooms and the kitchen to restore basic comfort faster than unpacking every box in sequence. Resist the urge to organize everything perfectly during the first 48 hours-focus instead on making your space livable, and you can arrange decorative items and fine-tune storage later when you’re not exhausted.
Inspect items for damage as boxes come off the truck and document any issues immediately with photos of broken items or dents on furniture before the movers leave. File a damage claim with your moving company within the timeframe specified in your contract (typically 30 days), as this documentation protects your claim and creates a clear record of what happened during transport. Address changes with financial institutions and subscriptions require attention within the first two weeks of moving to prevent billing problems and missed notifications.
We at LifeEventGuide recognize that moving involves dozens of interconnected tasks across weeks and months. Our moving day checklist and event-specific resources help you navigate major life transitions with clarity and confidence, reducing the risk of overlooked details and unnecessary stress.
Publisher’s Note: LifeEventGuide is an independent educational publisher. Some articles reference tools or services we recommend to help readers explore options related to major life transitions. Learn more about how we make recommendations here.
I learned the hard way that buying a home is just the beginning of your financial commitment.
Everyone talks about down payments and mortgage rates. Nobody mentions the $3,500 sump pump replacement two months after closing.
Or the air conditioning unit that dies a year later.
These weren’t small inconveniences. They were financial gut punches that standard home-buying advice never prepared me for. And I’m not alone—77% of homeowners face unexpected repair costs in their first year of ownership.
The Financial Blind Spot Everyone Has
When I started assessing my finances for home buying, I did everything right.
I checked my credit score. I calculated my debt-to-income ratio. I used mortgage calculators to estimate monthly payments including property taxes and insurance.
But here’s what those calculators don’t tell you: home maintenance accounts for an average of $8,808 annually. That’s on top of your mortgage, taxes, and insurance.
The real kicker? 52% of homeowners admit the true cost of owning a home surprised them, with the average homeowner shelling out an additional $15,405 each year beyond their mortgage payment.
I wish someone had told me to budget 1% to 4% of my home’s value annually just for maintenance. Instead, I learned this lesson when my sump pump failed just two months after I bought my first house.
The $3,500 Wake-Up Call
Two months into homeownership, my basement started flooding.
The sump pump had failed completely. The replacement cost me $3,500—money I didn’t have budgeted because I’d just depleted my savings on the down payment and closing costs.
This wasn’t an unusual situation. The average sump pump replacement ranges from $644 to $2,105, but costs can climb to $4,700 depending on the system complexity. Mine was on the higher end because of how the previous system was installed.
A year later, in a different house, my air conditioning unit died. HVAC replacement in 2025 ranges from $5,000 to $12,000, with most homeowners paying around $13,430 for a complete system.
These experiences changed how I approach home buying entirely.
What I Now Know About Home Inspections
After getting burned twice, I realized the problem wasn’t just maintenance costs.
The problem was my home inspector.
Here’s something most first-time buyers don’t know: over 1 in 4 homeowners ended up discovering something in their homes that their inspector should have found. Additionally, 13% regret using the home inspector they did, and 27% wish their inspector had been more thorough.
I learned this lesson backwards. When I sold one of my houses, the buyer’s inspector was incredibly thorough. He found things my original inspector had completely missed.
Things a Tough Inspector Catches
The buyer’s inspector found fogging between glass panels in the windows—a sign of seal failure that would eventually require replacement.
He noticed electrical outlets installed upside down, which isn’t just an aesthetic issue but can indicate rushed or improper electrical work throughout the house.
He spent time examining the HVAC system’s age and condition, not just whether it was currently working.
That experience taught me more about home inspections than my own purchases ever did.
How to Find a Really Tough Inspector
Most people ask their real estate agent for an inspector referral.
This creates a conflict of interest you need to understand. Your agent wants to close the deal. An inspector who finds too many problems can kill deals. An inspector who gets referrals from agents may feel pressure to go easy on inspections.
Consumer experts advise: unless you deeply trust your agent, find your own inspector.
Now when I buy a house, I look for inspectors with specific characteristics. I want someone who has been doing this for at least 10 years. I read reviews looking for complaints that they’re “too picky” or “found too many minor issues”—those are actually positive signs.
I also make sure I’m present during the inspection. Being there in person has taught me more than any written report ever could.
What Being Present During Inspection Reveals
When you’re physically there, you see how the inspector approaches each system.
You can ask questions in real-time. You can see their facial expressions when they find something concerning. You can watch them test things multiple times if they’re not satisfied with the first result.
The written report will tell you there’s a problem. Being present tells you how serious the inspector thinks it really is.
If I’m not satisfied with the first inspection, I’ll get a second one done. Yes, it costs more money upfront. But it’s nothing compared to a $3,500 surprise two months after closing.
The Big-Ticket Items You Need to Examine
I now focus obsessively on anything that could be a major expense if it breaks.
This means going beyond the standard inspection checklist.
HVAC System
Ask how old the system is. Ask when it was last serviced. Ask to see maintenance records if the seller has them.
Most HVAC systems last 15-20 years. If the system is 12 years old, you need to budget for replacement soon—even if it’s currently working fine.
Roof
Get the age of the roof in writing. Ask about the warranty. Look for signs of patch jobs that might indicate recurring problems.
A roof replacement can cost $5,000 to $25,000 depending on size and materials.
Water Heater
These typically last 8-12 years. If it’s older than 8 years, replacement should be in your near-term budget.
Foundation and Drainage
This is where my sump pump lesson comes in. Ask about basement flooding history. Ask neighbors if you can. Look for water stains or musty smells.
Foundation repairs can cost thousands or even tens of thousands of dollars.
Plumbing
Old pipes can mean constant leaks and eventual full replacement. Ask about the age of the plumbing system and what material the pipes are made from.
The First Year Reality Check
Even with perfect inspections, you need to prepare for the first year.
The average homeowner encounters about four surprises or unexpected costs within the first year, spending around $3,600 to address them. Top expenses include appliance replacement (56%), exterior repairs like windows (53%), and major repairs like roofing (52%).
Here’s what nobody tells you: 44% of homeowners experienced their first surprise repair within the first year after closing, and 12% faced one in the first month.
You need an emergency fund specifically for home maintenance. I recommend having at least $5,000 to $10,000 set aside beyond your regular emergency savings.
What About Pre-Approval and Financing?
Getting pre-approved is important, but it’s not just about knowing how much you can borrow.
It’s about understanding what you’re committing to for the next 15 to 30 years.
When you get pre-approved, lenders tell you the maximum you can borrow. This is almost always more than you should actually spend. Lenders don’t factor in your lifestyle, your other financial goals, or those maintenance costs we’ve been discussing.
I learned to take the pre-approval amount and reduce it by 20-25%. That gives you breathing room for maintenance, repairs, and life.
Shop Around for Lenders
Don’t just go with the first lender your agent recommends.
Talk to local banks, credit unions, and online lenders. Compare not just interest rates but also fees, closing costs, and loan terms.
A difference of even 0.25% in interest rate can save you thousands over the life of the loan.
The Real Estate Agent Question
Your agent works for you, but they also work on commission.
They get paid when the deal closes. This creates an incentive structure you need to understand.
A good agent will prioritize your long-term satisfaction over closing one specific deal. They’ll encourage you to walk away from a house with too many problems. They’ll support getting multiple inspections if needed.
A mediocre agent will push you toward closing because that’s how they get paid.
Ask potential agents: “Tell me about a time you advised a client not to buy a house.” Their answer will tell you everything you need to know.
House Hunting Without Losing Your Mind
House hunting is emotionally exhausting.
You’ll fall in love with houses that are overpriced. You’ll find perfect houses that go under contract before you can make an offer. You’ll attend dozens of open houses that all start to blur together.
Here’s what helped me: I created a spreadsheet with every house I viewed. I noted the address, price, pros, cons, and big-ticket items that would need replacement soon.
This removed some of the emotion from the process. When I looked back at my notes, I could see patterns I’d missed in the moment.
I also learned to separate “want” from “need.” That beautiful kitchen is nice, but it doesn’t matter if the roof needs replacing in two years.
Making an Offer That Protects You
When you make an offer, contingencies are your protection.
Never waive the inspection contingency. Nearly 1 in 4 homeowners waived their home inspection before purchase, and 23% regretted it while 41% said it didn’t save them money in the long run.
The inspection contingency lets you walk away or renegotiate if major problems are found.
The financing contingency protects you if your loan falls through.
The appraisal contingency matters if the house appraises for less than your offer price.
Yes, waiving contingencies can make your offer more competitive. But it also removes your safety net. In my experience, it’s not worth the risk.
What Closing Day Actually Looks Like
Closing day involves signing more documents than you thought possible.
Review everything carefully. Understand every fee. Ask questions about anything that looks different from what you expected.
Bring a certified check or arrange a wire transfer for your down payment and closing costs. These typically range from 2% to 5% of the home’s purchase price.
Adding up down payment, furnishing, renovations, and tools purchased, the first year of homeownership can cost $86,698. Nearly 1 in 4 people didn’t budget for closing fees at all.
Once everything is signed and the money is transferred, you get the keys.
That moment feels incredible. Just remember that homeownership is a marathon, not a sprint.
What I Wish Someone Had Told Me
Buying a home is exciting. It’s also the largest financial commitment most people ever make.
The standard advice focuses on credit scores, down payments, and mortgage rates. That’s important, but it’s incomplete.
The real cost of homeownership includes maintenance, repairs, and unexpected failures. Budget for these from day one.
Find the toughest inspector you can, not the nicest one. Be present during the inspection. Don’t be afraid to get a second inspection if something feels off.
Examine big-ticket items obsessively. Know the age and condition of every major system in the house.
Take your pre-approval amount and reduce it by 20-25% to find what you should actually spend.
Understand that your agent, your lender, and even your inspector all have incentive structures that may not perfectly align with your long-term interests.
Keep detailed notes during house hunting to remove emotion from your decision-making.
Never waive contingencies just to make your offer more competitive.
And most importantly: expect surprises in the first year. Budget for them. Prepare for them.
Because that $3,500 sump pump replacement taught me more about homeownership than any guide ever could.
The excitement of getting the keys is real. Just make sure you’re financially prepared for everything that comes after.
Publisher’s Note: LifeEventGuide is an independent educational publisher. Some articles reference tools or services we recommend to help readers explore options related to major life transitions. Learn more about how we make recommendations here.
Getting your pet’s vaccinations right from the start sets them up for a healthy life. A proper pet vaccination schedule protects against serious diseases and builds immunity at the right moments.
Here at LifeEventGuide, we know that new pet owners often feel uncertain about when and what to vaccinate. This guide walks you through each stage, from your puppy or kitten’s first shots to adult boosters, so you can make informed decisions with your veterinarian.
How Vaccinations Build Your Pet’s Immunity
Training Your Pet’s Immune System
Vaccinations train your pet’s immune system to recognize and fight specific diseases before exposure occurs. When your veterinarian administers a vaccine, it introduces a weakened or inactive version of a disease, triggering your pet’s body to produce antibodies as a defense mechanism. This preparation matters because the diseases vaccines prevent-like canine parvovirus, feline panleukopenia, and rabies-pose serious threats that can cause gastrointestinal disease, organ failure, or death. Rabies stands out as particularly critical since it has no cure and can transmit to humans, making vaccination a public health requirement in most areas.
Core Vaccines: Protection for All Pets
Core vaccines protect against the most dangerous diseases and apply to all pets. For dogs, core vaccines include rabies, distemper, adenovirus, and parvovirus, typically given as a combination shot called DHPP. For cats, the core vaccine is FVRCP, which covers feline viral rhinotracheitis, calicivirus, and panleukopenia, plus a separate rabies vaccine. These vaccines form the foundation of your pet’s protection against diseases that spread widely and cause severe illness.
Non-Core Vaccines: Tailored to Your Pet’s Life
Non-core vaccines target diseases based on your pet’s lifestyle and geographic risk. A dog that spends time in boarding facilities or dog parks benefits from Bordetella and canine influenza vaccines. A dog that hikes or swims in areas where wildlife urine contaminates water should receive leptospirosis protection, as this bacterial infection can cause liver and kidney failure. Cats with outdoor access face feline leukemia virus exposure, which causes immune suppression and cancer, making FeLV vaccination worth discussing with your veterinarian.
The Critical Window: Maternal Antibodies and Timing
Maternal antibodies fade around 6 to 8 weeks of age. This window creates a vulnerability period where your puppy or kitten needs vaccinations to build their own immunity. According to WSAVA 2024 vaccination guidelines, puppies should start core vaccines at 6 to 8 weeks and receive boosters every 3 to 4 weeks until 16 weeks of age. Kittens follow a similar timeline, typically starting at 9 weeks. This series approach works because maternal antibodies can interfere with vaccine effectiveness, so multiple doses given weeks apart ensure your pet develops lasting protection as those maternal antibodies decline. Skipping doses or waiting too long between shots creates gaps where your pet remains vulnerable to serious illness.
From Puppies to Adults: Adjusting Your Vaccination Plan
After the initial puppy or kitten series, your pet transitions to an adult vaccination schedule that typically involves boosters every 1 to 3 years, depending on the vaccine type and your veterinarian’s assessment of disease risk in your area. Your veterinarian will tailor the schedule based on your pet’s age, health status, lifestyle, and local disease prevalence (which is why a one-size-fits-all approach fails to serve most pets well). Vaccine costs vary by geography and provider, with core vaccines ranging from $27 to $96 per shot nationally, so discussing the full vaccination plan upfront helps you budget appropriately. Understanding these variables prepares you to work with your veterinarian on a schedule that fits your pet’s specific needs and your family’s circumstances.
Starting Your Puppy or Kitten’s Vaccination Series
Your puppy or kitten’s first vaccines arrive at 6 to 8 weeks of age, when maternal antibodies fade enough for their immune system to respond effectively to vaccination. At this stage, puppies receive the DHPP vaccine covering distemper, adenovirus, parainfluenza, and parvovirus in a single injection. Kittens receive the FVRCP vaccine protecting against feline viral rhinotracheitis, calicivirus, and panleukopenia. Both species also start parasite prevention at 8 weeks with products targeting fleas, ticks, and heartworms, since these parasites pose immediate threats to young pets. Your veterinarian will also recommend deworming and fecal testing at this first visit to screen for intestinal parasites that commonly affect young animals.
Why the Initial Appointment Sets the Foundation
This first appointment establishes your pet’s protection baseline, but it marks only the start of the vaccination series. Many new pet owners mistakenly believe one vaccine provides full protection, which leaves their pet vulnerable during the critical weeks ahead. Your veterinarian will explain what each vaccine covers and answer questions about your pet’s specific risk factors based on your location and lifestyle.
The Booster Schedule That Builds Lasting Immunity
Boosters every 3 to 4 weeks until 16 weeks of age create the immunity your pet needs for long-term protection. At 12 weeks, puppies receive a DHPP booster and kittens receive an FVRCP booster. At 16 weeks, both species receive their final core vaccine boosters; puppies also get their first rabies vaccine while kittens receive rabies and may receive feline leukemia vaccination depending on outdoor exposure risk.
Each booster increases antibody levels as maternal antibodies continue declining, ensuring your pet develops robust protection. Non-core vaccines for dogs, such as leptospirosis, Bordetella, or Lyme disease, typically start at 12 weeks if your veterinarian recommends them based on your region and lifestyle. Spacing matters more than most owners realize; compressed schedules or missed appointments create gaps where your young pet remains susceptible to serious illness. At 6 months of age, dogs may undergo a SNAP 4DX test to screen for heartworm, Lyme disease, ehrlichiosis, and anaplasmosis, providing early detection of tick-borne diseases.
Transitioning to Adult Maintenance
Once your pet reaches 4 months of age and completes the initial vaccination series, they transition to an adult maintenance schedule. One year after the final booster in the puppy or kitten series, your pet needs a booster to reinforce immunity as they move out of the vulnerable young stage. After this one-year booster, many core vaccines can be given every 1 to 3 years depending on the specific vaccine formulation and your veterinarian’s risk assessment for your geographic area. Rabies vaccination frequency depends on local regulations and whether you choose a 1-year or 3-year formulation, so confirm requirements with your veterinarian.
Keeping Records and Staying on Track
This transition period shifts your thinking from vaccination as a series to vaccination as ongoing maintenance. Accurate records matter significantly at this stage; your veterinarian needs to know exactly when each vaccine was administered to calculate booster timing correctly. Avoid gaps of more than one year for core vaccines, as this resets your pet’s protection timeline and may require restarting the series. Your veterinarian will send reminders based on your pet’s individual schedule, but staying proactive ensures your pet never misses a booster window. As your pet moves into adulthood, lifestyle factors and regional disease prevalence will shape which additional vaccines make sense for your specific situation.
How Often Your Adult Pet Needs Boosters
Once your pet enters adulthood, vaccination shifts from a series to a maintenance schedule, but the frequency depends entirely on which vaccines your veterinarian recommends and your pet’s individual risk profile. Many core vaccines can be administered every three years after the one-year booster following the puppy or kitten series, though some veterinarians may recommend annual boosters based on local disease prevalence or your pet’s health status. Rabies vaccination follows local regulations, which vary significantly by state and county-some areas require annual rabies boosters while others accept three-year formulations, so confirm your local requirements with your veterinarian rather than assuming a standard timeline applies.
Budgeting for Annual Versus Three-Year Protocols
The cost difference between annual and tri-annual protocols matters for your budget: if your core vaccines cost around $42 for DHPP, $35 for rabies, and $34 for leptospirosis, spacing boosters to every three years instead of annually cuts your annual vaccination expense substantially. However, non-core vaccines typically require annual or more frequent boosters to maintain protection, so a dog receiving Bordetella ($38 average), canine influenza ($53 average), or Lyme disease vaccines ($50 average) will have higher ongoing costs regardless of core vaccine frequency. Your veterinarian should tailor the booster schedule based on whether your dog frequents boarding facilities, dog parks, or hiking trails where exposure risk justifies annual non-core boosters, or whether your indoor cat with no outdoor access needs fewer vaccines than an outdoor cat facing feline leukemia exposure.
Tracking Records and Preventing Protection Gaps
Your vaccination records become your most important tracking tool once your pet reaches adulthood, since missing a booster window can require restarting the entire vaccination series. Request written records from your veterinarian at every appointment and store them digitally as backup, because boarding facilities, training classes, and veterinary specialists will ask for proof of current vaccination before accepting your pet. Set phone reminders based on your pet’s booster due dates rather than relying on veterinary clinic reminders alone, since scheduling delays happen frequently and your pet’s protection gap widens the longer you wait after the due date.
Using Veterinary Tools to Stay Current
Some veterinarians use online portals or text reminders to notify you before boosters are due, which helps prevent gaps-ask your clinic whether they offer this service at your next appointment. If you travel with your pet or plan to board them, check vaccination requirements well in advance, since some facilities require boosters within specific timeframes and you cannot compress booster schedules without losing effectiveness. Your veterinarian’s assessment of local disease prevalence should drive your final booster decisions; if your area has documented Lyme disease cases in dogs, skipping the Lyme booster puts your pet at genuine risk, whereas a region with no Lyme presence makes that vaccine optional.
Aligning Wellness Exams with Booster Schedules
Schedule your annual wellness exam to coincide with booster due dates, allowing your veterinarian to assess your pet’s overall health and adjust the vaccination plan if your lifestyle or local disease threats change. This approach consolidates your pet’s care into one visit and ensures your veterinarian reviews your pet’s complete health picture before administering vaccines. Your veterinarian will ask about any changes in your pet’s environment, travel plans, or social activities that might affect which vaccines your pet needs that year.
Final Thoughts
Your pet’s vaccination schedule spans their entire life, starting with those critical first shots at 6 to 8 weeks and continuing through annual or tri-annual boosters in adulthood. Each milestone you hit-completing the initial series by 16 weeks, receiving the one-year booster, and settling into a maintenance schedule-serves a specific purpose in building and maintaining immunity against serious diseases. These dates reflect how your pet’s immune system develops and how long vaccine protection lasts, not arbitrary timing.
Your veterinarian creates a custom pet vaccination schedule by considering your pet’s age, health status, lifestyle, and the diseases present in your geographic area. A dog that spends weekends at dog parks needs different protection than one that stays home, and a cat with outdoor access faces different risks than an indoor cat. Your vet asks the right questions to identify which core and non-core vaccines actually protect your pet from real threats rather than unnecessary ones.
Maintaining long-term health means treating vaccination as an ongoing responsibility, not a one-time event. Accurate records, reminders for booster due dates, and wellness exams around vaccination appointments keep your pet protected without gaps. At LifeEventGuide, we help families navigate major life transitions with clear frameworks and practical guidance-visit our publisher recommendations to explore resources that support you through bringing a pet into your family.
Publisher’s Note: LifeEventGuide is an independent educational publisher. Some articles reference tools or services we recommend to help readers explore options related to major life transitions. Learn more about how we make recommendations here.
Buying a car is one of the biggest purchases you’ll make, and a test drive is your chance to spot problems before you commit. We at LifeEventGuide know that most people rush through this step, missing red flags that could cost thousands later.
A solid test drive checklist helps you evaluate the car systematically-from the exterior condition to how it handles on the road. This guide walks you through exactly what to inspect before, during, and after your test drive so you can make a confident decision.
What to Inspect Before You Drive Away
The first 15 minutes in a dealership parking lot matter more than most people realize. Walk around the car with fresh eyes and spot problems that become expensive headaches later. Start with the exterior. Look for mismatched paint, which signals poor repair work or accident history. Check panel gaps along doors, the trunk, and hood-gaps should be even all the way around. Uneven gaps mean the car has been in a collision and poorly realigned. Inspect for rust spots, especially around the wheel wells, door seams, and undercarriage. Run your hand over the paint to feel for rough spots or orange-peel texture that indicates repainting. Dents and dings matter less than structural integrity, but they tell you how the previous owner treated the vehicle. A car covered in small dents suggests neglect.
Tire Condition Reveals Previous Owner Behavior
Tire condition is one of the most honest indicators of vehicle history and maintenance. Check tread depth using the penny test-insert a penny into the tread with Lincoln’s head upside down. If you see the top of his head, the tread is too shallow and replacement is urgent. Proper tread depth should be at least 4/32 inch according to safety standards. Look at wear patterns next. Even wear across all four tires suggests proper alignment and maintenance. Excessive wear on the inside or outside edges means alignment problems exist, which cost $150 to $300 to fix. One tire worn significantly more than others points to suspension issues or a history of hard driving. Check that the spare tire, jack, and lug wrench are present and functional. Many used cars arrive at dealerships missing these items, and you’ll need them during ownership.
Lights and Visibility Systems Prevent Accidents
Walk around the entire vehicle and activate every light. Have the salesperson turn on the headlights while you stand in front of the car-both high and low beams should work. Walk to the back and check brake lights, reverse lights, and turn signals. A burned-out bulb costs $15 to $50, but multiple failures suggest electrical problems or poor maintenance. Wiper blades should move smoothly across the windshield without streaking or skipping. If they leave marks or miss sections, replacement blades cost $20 to $40 but indicate the previous owner ignored maintenance. Inspect all windows for cracks or chips. Even small damage spreads quickly due to temperature changes and road vibrations. Check that all windows operate smoothly and seals around them show no cracks or deterioration.
These exterior checks take only minutes but reveal whether the car received proper care. Once you confirm the basics look solid, you’re ready to get behind the wheel and test how the car actually performs on the road.
How the Car Feels on the Road
The moment you press the accelerator tells you whether this car suits your driving style and whether the engine or transmission has problems. Press the accelerator smoothly from a stop and feel how the engine responds-it should build power without hesitation or roughness. On the highway, merge onto a ramp and push the accelerator harder to feel real acceleration. If the engine bogs down, hesitates, or feels sluggish, internal problems likely exist. Automatic transmissions should shift smoothly without delays or slipping between gears; manual transmissions should engage cleanly without grinding or shuddering. Rough shifts or delayed response suggest transmission wear that costs $1,500 to $3,000 to repair.
Test Braking at Multiple Speeds
Start with light pressure on city streets and feel the pedal response-it should feel firm and progressive, not mushy or overly sensitive. At highway speeds, brake harder to test real stopping power. The car should stop straight without pulling left or right, which indicates brake imbalance or suspension issues. Listen for grinding or squealing, which signals worn pads or rotors needing replacement at $300 to $600 per axle.
Evaluate Steering and Suspension Response
Test steering through curves and lane changes. The wheel should respond immediately to your input without delay or numbness. Excessive play in the steering wheel, vagueness during turns, or the car pulling to one side points to alignment problems or suspension wear. Drive over rough pavement and speed bumps to evaluate suspension behavior. The car should absorb bumps smoothly without harsh jolts or excessive bouncing. Clunking noises over bumps indicate worn shocks struts suspension components that cause the vehicle to bounce more than usual and create an uncomfortable ride, costing $400 to $1,200 to fix.
Listen for Engine and Cabin Noise
Turn the radio off and listen carefully to engine noise during acceleration and at highway speeds. A ticking sound suggests valve problems or carbon buildup. Knocking during acceleration indicates engine knock or detonation, a serious concern. Wind and road noise should remain moderate; excessive noise points to poor insulation or worn seals.
Test Climate, Controls, and Technology
Operate the climate control system at full heating and cooling to confirm it reaches temperature and distributes air evenly. Check that all windows and controls operate smoothly and quietly. Connect your smartphone via USB and Bluetooth, then try Apple CarPlay or Android Auto to confirm responsiveness and reliability. Ask the salesperson to demonstrate the infotainment system-menus should be intuitive and the touchscreen should respond without lag. Review safety features like automatic emergency braking, blind-spot warnings, and lane-keeping assist by accessing settings in the car’s menu. Plan your test drive route to include city streets with traffic, highway merging, curves, and rough roads-this real-world variety reveals how the car handles everyday driving and exposes problems that won’t show up on smooth pavement. Once you complete the drive, you’ll have solid data on performance and comfort, but the work isn’t finished yet.
After the Test Drive: What Actually Matters
The test drive ends, but your evaluation shouldn’t. Most buyers walk out of the dealership and make a decision based on how the car felt for 30 minutes, ignoring critical information that emerges once you step away. Sit down with your notes while the drive is fresh in your memory and write down specific observations: did the transmission hesitate during merges, did the brakes feel confident, did the steering respond immediately? Vague impressions fade fast, but concrete details stick. Next, request the vehicle history report and maintenance records from the dealer. A well-maintained car shows consistent service intervals, usually every 5,000 to 7,500 miles for oil changes depending on the vehicle and oil type. Gaps in service history are red flags that suggest the previous owner skipped maintenance, which means hidden damage likely exists.
Verify Odometer Reading and Check for Recalls
Verify the odometer reading matches the vehicle’s age. Check for any open recalls on the manufacturer’s website using the vehicle identification number. The National Highway Traffic Safety Administration database shows which recalls apply to your specific model year and engine type, and you need to confirm the dealer will address these before purchase.
Cross-Reference Fuel Economy Against Real-World Conditions
The EPA estimates on the window sticker rarely match actual driving. If the sticker claims 28 miles per gallon combined, expect 24 to 26 in real conditions, especially if you drive in stop-and-go traffic or cold climates where fuel economy drops 10 to 15 percent according to EPA data. Ask the dealer for the previous owner’s fuel consumption records if available, or calculate it yourself by dividing total miles by total gallons used during your test drive.
This matters because the difference between 24 and 30 mpg adds up to roughly $600 per year on a 12,000-mile annual driving schedule at current fuel prices. Test the infotainment system’s fuel economy display-it often shows real-time consumption and trip averages, which help you understand how your driving habits affect efficiency. Independent reviews from Consumer Reports or professional automotive journalists provide unbiased data on how the car performs over months of testing. Schedule test drives at multiple dealerships for the same model year and trim level. This comparison reveals whether pricing is competitive and whether one example shows better condition than others.
Document Condition and Obtain Professional Inspection
Take photos of the odometer, exterior condition, tire tread, and interior before you leave the dealership. These images create a record of the car’s condition and protect you if disputes arise later about pre-existing damage. For used vehicles, spend $100 to $200 on a pre-purchase inspection from an independent mechanic who has no stake in the sale. They’ll check components you can’t assess yourself-transmission fluid condition, suspension wear, brake system integrity, and whether warning lights indicate serious problems. This inspection often reveals issues that justify negotiating $500 to $2,000 off the asking price.
Compare Multiple Vehicles Systematically
Schedule back-to-back test drives if you’re comparing multiple vehicles, and grade each one consistently using the same criteria: acceleration feel, braking confidence, steering responsiveness, noise levels, and comfort. This systematic approach prevents you from falling in love with the first car and missing a better option. If anything feels off during the test drive-rough shifts, hesitation under acceleration, unusual noises-walk away and test a different example. The car market has inventory, and settling for a vehicle with warning signs leads to expensive repairs within months.
Final Thoughts
A test drive checklist transforms car buying from guesswork into a systematic process that protects your investment. The exterior condition, tire wear, and light functionality reveal how the previous owner treated the vehicle, while acceleration, braking, steering response, and noise levels show whether the car performs reliably and suits your driving style. Safety features, fuel economy data, maintenance records, and professional inspections confirm whether the car justifies the asking price.
Most buyers spend 30 minutes behind the wheel and sign paperwork the same day, missing problems that emerge only after weeks of ownership. Schedule multiple test drives across different dealerships, compare vehicles using consistent criteria, and walk away from any car that feels off-a hesitating transmission, pulling brakes, or unusual noises signal you to test a different example. Document everything before you finalize your purchase: take photos of the odometer and condition, request maintenance records, verify the vehicle history report, and schedule a pre-purchase inspection from an independent mechanic (these steps cost time upfront but save thousands in unexpected repairs later).
We at LifeEventGuide understand that buying a car is a major life transition requiring planning and careful decision-making. Our event-specific checklists and guidance help you navigate this process calmly and confidently, avoiding common mistakes and reducing risk. Use this test drive checklist as your foundation, trust your observations, and move forward only when you feel certain about your choice.
Publisher’s Note: LifeEventGuide is an independent educational publisher. Some articles reference tools or services we recommend to help readers explore options related to major life transitions. Learn more about how we make recommendations here.
Adopting a dog is one of life’s most rewarding decisions, but it comes with real responsibilities and specific dog adoption requirements you need to understand first. Shelters and rescue organizations have standards in place to protect both dogs and their new families.
At LifeEventGuide, we’ve put together this guide to walk you through exactly what to expect. Whether you’re meeting age requirements, preparing your home, or understanding the costs involved, we’ll help you get ready for this major life change.
Who Can Adopt a Dog
Most shelters require adopters to be at least 18 years old and present valid identification with your current address. This legal requirement applies across nearly all of the 5,000 animal shelters and 9,500 rescues operating in the U.S., making it a universal starting point. Beyond age, shelters assess whether you have the capacity to make a long-term commitment. If you rent, you must verify that your landlord permits pets and confirm any breed or size restrictions in your lease. This matters significantly-rescues frequently contact landlords as part of their approval process, so written permission from your landlord strengthens your application considerably.
Housing and Space Considerations
For housing, shelters consider practical factors like available space and yard access. Larger dogs benefit from fenced yards, while senior dogs may struggle with homes that have multiple stairs. The shelter counselor will ask where your dog will spend the day and night, so prepare a concrete answer rather than vague intentions. Your living situation directly affects which dogs match your home, and shelters use this information to place animals into safe, loving homes that suit their specific needs.
Your Financial Readiness Matters
Adoption fees themselves are manageable, ranging from $50 to $200 depending on the dog’s age and your location. At The Animal Foundation in Las Vegas, for example, adult small dogs cost $100, adult large dogs are $50, and puppies are $200. However, adoption fees represent only the beginning. The annual cost of dog ownership averages between $1,500 and $3,000 when you factor in food, routine veterinary care, licensing, and preventive treatments like parasite control. Emergency veterinary care can spike costs dramatically-a single emergency visit costs $1,000 or more.
Shelters want to know you can handle these ongoing expenses, so discuss your budget honestly.
Planning for Long-Term Financial Commitment
Some rescues request income verification to confirm you have the financial capacity to support a dog through its entire life (typically 10 to 13 years). Consider pet insurance as a safeguard for unexpected veterinary costs. Understanding these financial realities upfront prepares you for the true cost of dog ownership and helps shelters identify adopters who can commit to their dogs’ wellbeing for years to come.
What Happens During the Adoption Process
The adoption process typically starts with an application form that shelters and rescues use to assess whether your home and lifestyle match a dog’s needs. Applications range from simple questionnaires to detailed surveys asking about your housing, daily schedule, existing pets, and experience with dogs. Shelters process applications on a first-come basis, so accuracy and completeness matter. Provide thorough, honest details about where the dog will stay during the day, your exercise plan, and whether all household members approve of adopting.
Strengthening Your Application
If you don’t have a fenced yard, outline concrete plans like daily walks or regular dog park visits to show you can meet the dog’s needs. For renters, include written permission from your landlord confirming pets are allowed and noting any size or breed limits. Strong references from people who’ve known you for years significantly strengthen your application, while weak or unresponsive references can jeopardize approval. Rescues typically call your veterinarian to verify that current and past pets received regular care, so demonstrating a history of wellness visits, vaccinations, and preventive treatments improves your prospects considerably.
Home Visits and Family Introductions
Home visits and interviews come next for many rescues, though some shelters often skip this step to enable faster adoption processing. During a home visit, a staff member assesses whether your living environment suits the dog, checking for hazards, space for the dog to sleep and play, and compatibility with existing pets. Prepare your home by securing cords, removing toxic plants, and showing where the dog will spend time. Some rescues require a family meet-and-greet so everyone in your household meets the prospective dog before paperwork is finalized. This interaction reveals whether the dog’s temperament fits your family’s energy level and lifestyle.
Adoption Fees and Timeline
Adoption fees typically range from $50 to $200 and cover spaying or neutering, initial vaccinations, microchipping, and the shelter’s costs for housing and food while the dog was in care. A pet license fee of around $10 may apply depending on your city. Same-day adoption is possible if the dog is already spayed or neutered; otherwise, expect an overnight stay for surgery. If you’re approved, most rescues expect you to bring the dog home within a few days, so be ready to move quickly once matched with your dog.
Once you’ve navigated the application, home visit, and fee payment, your focus shifts to preparing your actual living space and daily routine for your new companion.
Getting Your Home Ready for a Dog
The weeks between approval and bringing your dog home offer your window to prepare properly. Most dogs need 0 to 3 days just to settle in, then 3 weeks to decompress before they’re ready for training, so rushing your setup creates unnecessary stress for both of you. Start by identifying where your dog will sleep, eat, and spend unsupervised time. This location matters more than you’d think-a crate in your bedroom for the first few nights helps a new dog feel secure, while a designated area with a bed and toys gives them a safe retreat during the day.
Setting Up Spaces for Your New Dog
If you already have pets, plan separate spaces initially so introductions happen gradually rather than all at once in a chaotic environment. Purchase essentials before arrival: food and water bowls, a collar and leash, an ID tag, a comfortable bed, durable toys appropriate for your dog’s size, grooming supplies, and a first-aid kit. Wait until you meet your dog to understand their size and energy level, then select toys and supplies that match their needs.
Keep the food the shelter provided for at least the first week-sudden diet changes cause digestive upset, and your veterinarian can advise on transitioning to new food gradually over at least a week.
Securing Your Home’s Physical Safety
Your home’s physical safety requires deliberate attention before day one. Secure electrical cords, remove toxic plants like lilies and sago palms, store cleaning supplies and medications behind closed doors, and use baby gates to restrict access to stairs or rooms where accidents matter less. Trash cans need secure lids or cabinet storage. Chewable items like shoes, books, and remote controls should stay out of reach for at least the first month while your dog learns what’s appropriate.
Arranging Reliable Care and Veterinary Support
If you work full-time, arrange reliable dog care before adoption-this might mean hiring a dog walker for midday potty breaks, enrolling in doggy daycare two or three days weekly, or asking a trusted neighbor to help. Dogs left alone for 8+ hours daily develop anxiety and behavioral problems, so this isn’t optional if you work long shifts. Schedule a veterinary appointment within the first week for a wellness exam, and discuss vaccination schedules, parasite prevention, and any breed-specific health concerns. Having a veterinarian lined up before your dog arrives means you’re not scrambling during a crisis.
Planning Safe Introductions with Family and Pets
If your household includes children or other animals, walk through introductions step-by-step with your adoption counselor-they provide guidance on safe, gradual meetings that reduce stress for everyone involved.
Final Thoughts
Dog adoption requirements exist to protect both you and your new companion, but they’re not obstacles-they’re guardrails that help match the right dog with the right home. You now understand what shelters expect: proof of age and identity, housing verification, financial readiness, honest application details, and willingness to prepare your home thoughtfully. These requirements reflect a simple truth: shelters want dogs to succeed in their forever homes, and that success depends on honest preparation from adopters.
Start your dog adoption journey by moving through each step deliberately and completing your application with thorough, honest answers about your living situation, daily schedule, and financial capacity. Gather strong references and veterinary records that demonstrate your commitment to animal care, prepare your home with the essentials before your dog arrives, and arrange reliable care if you work full-time. Schedule a veterinary appointment within the first week, and use the 0-3-3 guideline to manage your dog’s transition: three days to settle, three weeks to decompress, three months to bond.
If you’re feeling overwhelmed by the planning involved, that’s normal-dog adoption is a major life transition with real financial, time, and emotional commitments. We at LifeEventGuide help people navigate major life changes like pet adoption by defining goals, timelines, budgets, and key decisions through structured frameworks and checklists that prevent common mistakes. Contact your nearest shelter or rescue to ask specific questions about their dog adoption requirements and process, and explore how LifeEventGuide supports adopters through major transitions.
Publisher’s Note: LifeEventGuide is an independent educational publisher. Some articles reference tools or services we recommend to help readers explore options related to major life transitions. Learn more about how we make recommendations here.
A clear, neutral guide to what comes next—before, during, and after moving, buying a home or car, getting a pet, starting a business, and more.
Big life changes don’t have to feel like free fall. With a simple plan, smart decisions, and a few protection checks, you can move forward calmly and confidently. Use this playbook as your baseline for any major life event, then plug in the mini checklists for your specific situation.
The LifeEventGuide Framework
Map: Define the goal, scope, timeline, and budget.
Decide: Make the key choices early; schedule when each decision gets made.
Protect: Identify risks and coverage needs; put safeguards in place.
Execute: Follow a clear sequence; track tasks and documents.
Review: Confirm completion, fix gaps, and note lessons for next time.
Core Checklist (Works for Any Major Transition)
Before (2–8 weeks out, or as early as possible)
Clarify the outcome: What does “success” look like? Deadline? Budget?
List dependencies: People to notify, approvals needed, legal steps, key dates.
Build a timeline: Major milestones, decision deadlines, and buffers.
Create a simple budget: One-time costs, recurring costs, contingencies (10–15%).
Day 0–7: Execute; document handoffs; track issues daily.
Day 8–30: Reconcile, update records, test systems, complete review.
Quick Copy-Paste Checklist
Goal, date, budget set
Milestones and decision deadlines scheduled
Vendors compared and contracts reviewed
Coverage verified and gaps closed
Documents centralized and backed up
Payments, deposits, refunds tracked
Records updated post-event
30-day review scheduled
Which life event are you facing next—move, home, car, pet, or business? Tell me, and I’ll adapt this framework into a detailed, step-by-step checklist tailored to your situation and location.