≡ Menu
Vehicle History Report Checklist: Verify Past Accidents and Service

Buying a used car without checking its history is like walking into a deal blind. A vehicle history report checklist helps you spot hidden problems before you hand over your money.

At LifeEventGuide, we know that past accidents, title issues, and maintenance gaps can cost you thousands in repairs down the road. This guide walks you through what to look for and how to use these reports to make a smarter purchase.

Why Vehicle Reports Matter

Hidden Damage Costs More Than You Think

A vehicle history report is your first line of defense against buying someone else’s problem. When you pull a report from Carfax or AutoCheck, you access data from thousands of sources-insurance companies, police records, service shops, and auction houses-that collectively reveal what actually happened to that car. These reports cost between $25 and $45 for a single lookup, a small price compared to the thousands you might spend fixing hidden damage later.

Hidden accident damage represents the most expensive surprise you can encounter after purchase. A vehicle that experienced a major collision but underwent repair may pass a quick visual inspection and still drive fine for months before structural issues emerge. The damage hides beneath the surface, affecting frame integrity and safety systems that won’t fail until months or years later.

Service Records Show You the Real Story

Service records tell you whether the previous owner actually maintained the vehicle or ignored it. A car with a complete service history-showing regular oil changes, fluid top-ups, and manufacturer-recommended repairs-signals that the engine and transmission received proper care. Conversely, a vehicle with no service records and suddenly appears on the market after years of silence raises serious red flags about what happened during that gap.

The National Vehicle Title Information System (NMVTIS) aggregates the most critical data from state motor vehicle agencies and law enforcement, making it the official federal resource for vehicle history. Data in these reports comes directly from official sources required by federal law to report regularly, so you work with documented facts rather than seller honesty or guesswork.

Title Problems Signal Deeper Issues

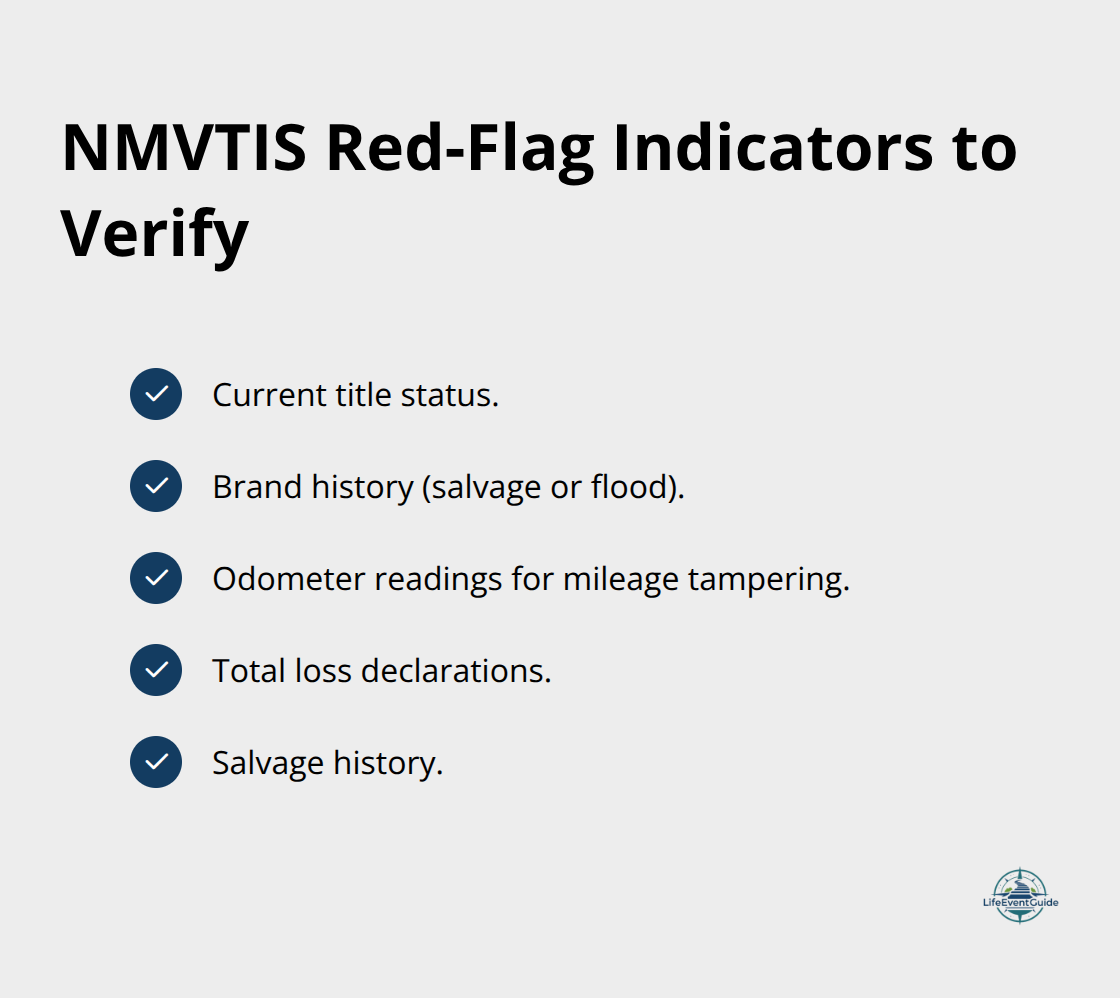
Title problems carry equal weight to accident history. Vehicles branded as salvage, flood-damaged, or lemon have significantly lower value and carry hidden risks that affect safety and reliability. A flood-damaged car may function temporarily but will develop electrical and mechanical failures that prove costly and dangerous.

NMVTIS tracks specific indicators to prevent fraud: current title status, brand history (salvage or flood), odometer readings (to catch mileage tampering), total loss declarations, and salvage history. If any of these flags appear on a report, the vehicle’s structural integrity and safety are genuinely compromised. These indicators exist because they reveal the problems most likely to cause expensive failures or safety hazards after you drive off the lot.

Key NMVTIS indicators that signal risk on a used vehicle - vehicle history report checklist

Understanding what these reports contain prepares you to spot the red flags that matter most. The next section walks you through exactly what to look for when you open that report.

What to Look For in a Vehicle History Report

Accident History and Damage Severity

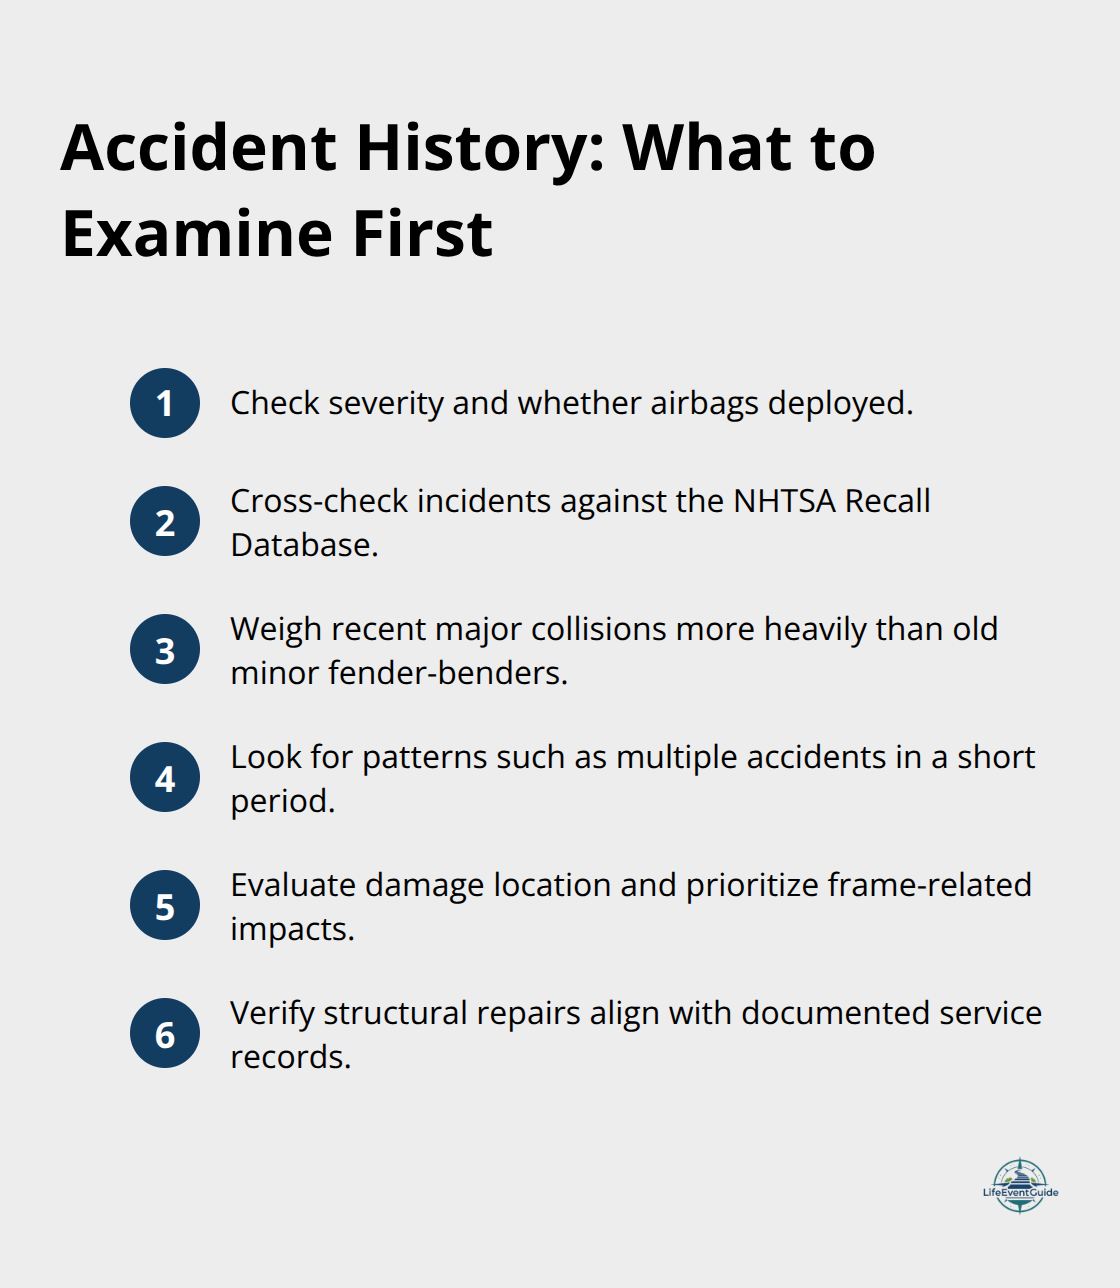
Accident reports on a vehicle history report show severity, date, location, and whether airbags deployed-this detail matters because airbag deployment signals a collision serious enough to trigger safety systems. Cross-check any accident against the NHTSA Recall Database to understand if that specific vehicle model had known issues during that time period. A minor fender-bender from five years ago carries far less weight than a major collision from last month, but both tell you something different about the car’s past.

Look for patterns in the accident history. A single accident might reflect bad luck, but three accidents in four years suggests either poor driving or unreported structural damage that keeps getting hit. The location of damage matters significantly-frame damage to the front or rear affects how the vehicle absorbs impact, while side-panel damage poses less structural risk. If the report shows structural repairs without matching service records, that’s a red flag that work occurred off-the-books or by an unqualified shop.

Key checks for interpreting accident history on a vehicle report - vehicle history report checklist

Title Status and Ownership Patterns

A clean title means no brands like salvage, flood, or lemon; any brand significantly lowers value and indicates the vehicle experienced major damage or defect. Flood-damaged vehicles warrant extra scrutiny because water damage causes hidden electrical and mechanical failures that emerge months later-look for inconsistencies in controls and brittle wiring that indicate corrosion inside components you cannot see during inspection.

The number of previous owners and how long each held the vehicle tells you about usage patterns. A car with five owners in three years suggests problems that drove people away, while one owner over eight years suggests stability. Verify that the VIN matches across all documents (title, registration, insurance, and service receipts) to avoid title or documentation fraud.

Mileage Consistency and Service Records

Mileage consistency across all records is non-negotiable: if the odometer reading jumped backward or showed massive gaps between reports, odometer fraud occurred. Service records from authorized dealerships carry more weight than independent shops because they include factory-documented maintenance. A vehicle missing service records during critical intervals-like skipping a timing belt replacement at 100,000 miles-predicts expensive future failures.

Compare reported maintenance against the manufacturer’s recommended schedule to spot what was neglected. Factor those future repairs into your offer price. Service history reveals whether the previous owner actually maintained the vehicle or ignored it; a complete record signals that the engine and transmission received proper care, while gaps raise serious red flags about what happened during those periods.

With these specific details in mind, you now know what information matters most on a report. The next step involves using multiple reports to compare vehicles and make a confident purchasing decision.

How to Use Vehicle History Reports in Your Buying Decision

Compare Reports Across Multiple Vehicles

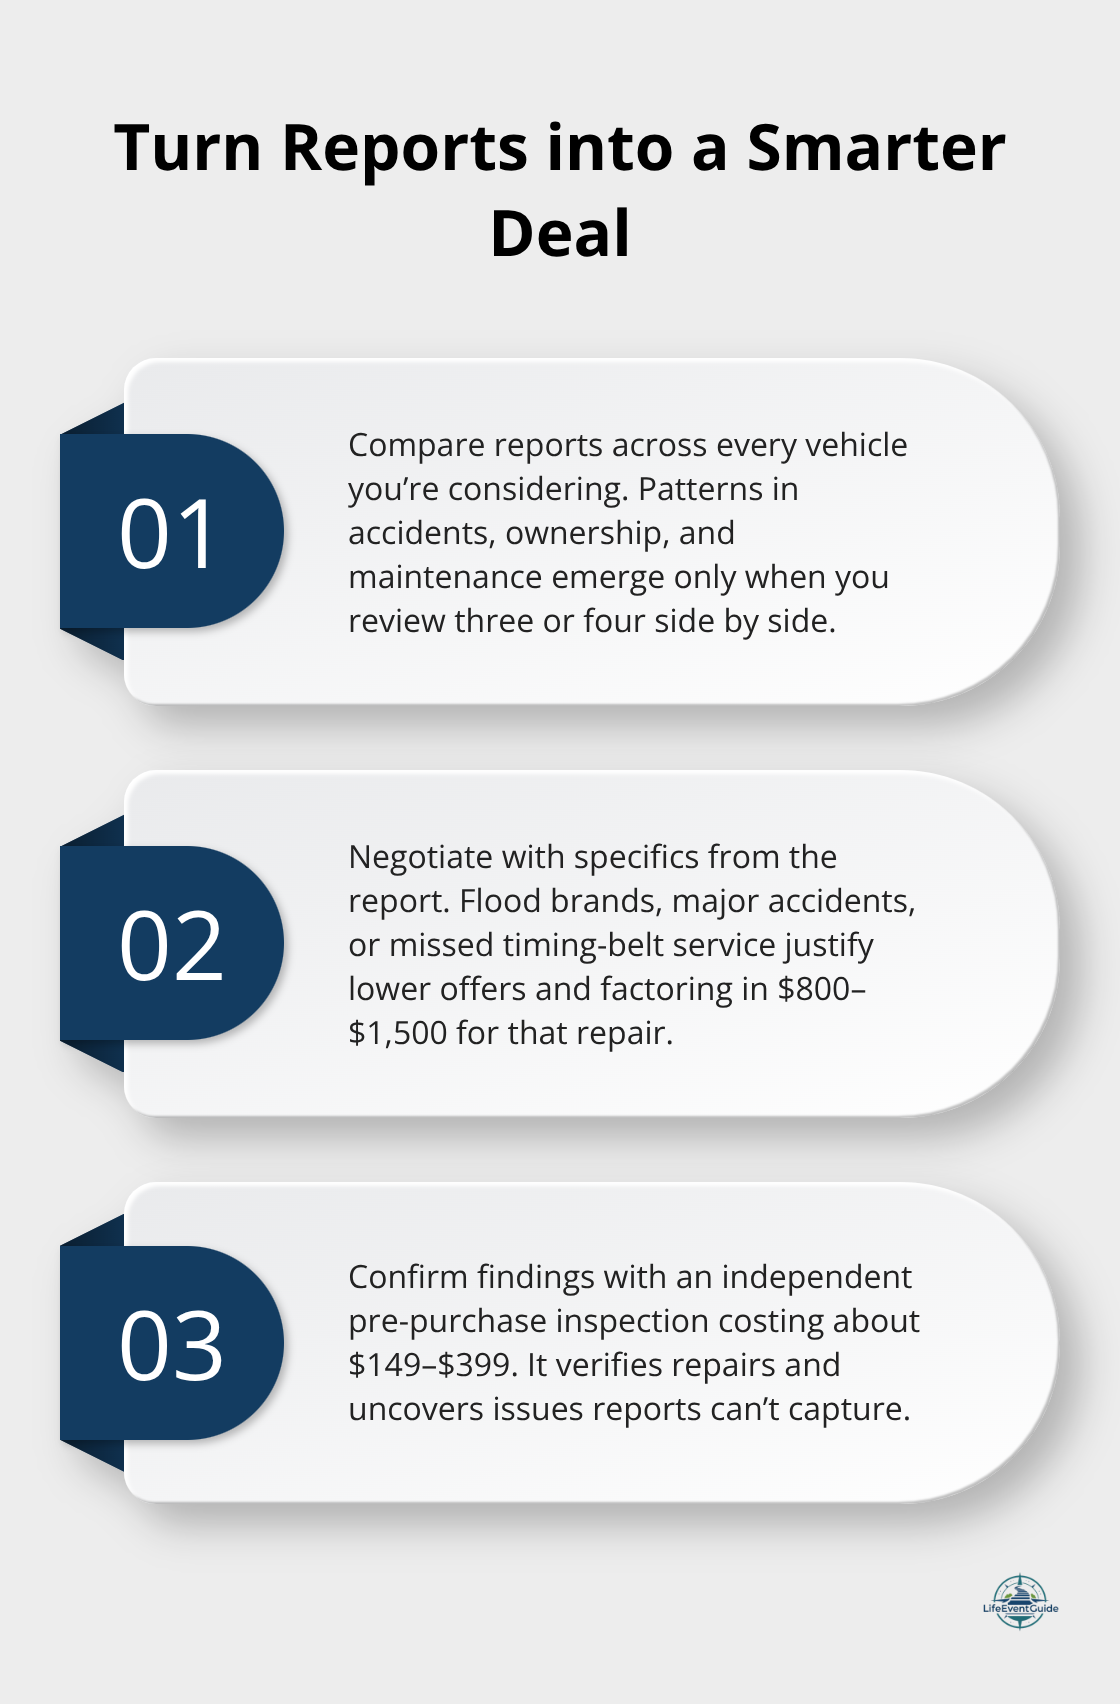
Vehicle history reports become truly powerful when you stop treating them as standalone documents and start using them as negotiation tools. Pull reports on every vehicle you seriously consider, not just your top choice. When you compare three or four reports side by side, patterns emerge that single reports hide. A car with one minor accident five years ago sits in a completely different category than an identical model with two accidents in the past year.

Carfax charges around $45 per report while AutoCheck runs about $30, so spending $90 to $180 comparing vehicles before you negotiate saves far more than that in overpriced offers. Line up the reports chronologically and note which vehicle shows the cleanest service intervals, fewest ownership changes, and most recent maintenance. That comparison instantly tells you which car represents actual value and which one carries hidden risk masked by a low asking price.

How to compare, negotiate, and verify using vehicle history reports

Negotiate Price Based on Report Findings

Use report findings as concrete leverage during price negotiations. A vehicle with a reported major accident should cost significantly less than an identical model with a clean history, yet many sellers price them identically and hope buyers don’t check. If the report shows a flood brand, the vehicle’s value drops significantly compared to an unmarked equivalent.

If service records show a missed timing belt replacement at the manufacturer’s recommended interval, factor the $800 to $1,500 replacement cost directly into your offer. Sellers who provide their own report upfront signal confidence in the vehicle’s condition, while those who resist or delay often know something problematic exists. Before you test drive a single car, obtain reports on your shortlist and use the findings to eliminate vehicles that don’t justify their asking prices.

Combine Reports with In-Person Inspection

After narrowing to your final choice, schedule an independent pre-purchase inspection from a certified mechanic, which typically costs $149 to $399 depending on scope. That inspection verifies what the report claims and catches mechanical issues that reports cannot capture. A mechanic can confirm whether accident repairs were completed properly, whether rust or corrosion indicates hidden water damage, and whether the vehicle’s current condition matches its reported history.

Never skip this step regardless of how clean the report appears. The report provides documented history, but only a hands-on inspection reveals the vehicle’s actual mechanical state and safety condition. Document everything before you finalize your purchase to protect yourself from purchasing a vehicle that looks good on paper but fails in reality.

Final Thoughts

Vehicle history reports transform used car buying from guesswork into a systematic process that protects your investment. A vehicle history report checklist ensures you examine accident severity and patterns, title brands that signal major damage, mileage consistency across all records, and service gaps that predict future repairs. These details separate vehicles worth buying from those that will drain your wallet in unexpected repairs.

Pull reports on every vehicle you seriously consider, compare them side by side, and use the findings to negotiate fair prices (reports cost $25 to $45 each, far less than the thousands hidden damage costs after purchase). Schedule an independent pre-purchase inspection from a certified mechanic for $149 to $399 to verify what the report claims and catch mechanical issues that reports cannot capture. This combination of documented history and hands-on assessment protects you from purchasing a vehicle that looks good on paper but fails in reality.

At LifeEventGuide, we help you navigate major life transitions with clear planning and systematic decision-making. Visit our resources to access checklists and frameworks that guide you through vehicle purchases and other significant life events while helping you avoid common mistakes.


Publisher’s Note: LifeEventGuide is an independent educational publisher. Some articles reference tools or services we recommend to help readers explore options related to major life transitions. Learn more about how we make recommendations here.

Home Readiness for Pet: Ready Your Space for a New Furry Family Member

Bringing a pet into your home is exciting, but it requires real preparation. Home readiness for a pet means more than just buying a food bowl-it’s about creating a safe, comfortable space where your new family member can thrive.

At LifeEventGuide, we know that thoughtful planning before your pet arrives makes the transition smoother for everyone. This guide walks you through assessing your readiness, preparing your space, and building the support system you’ll need.

Is Your Home and Life Ready for a Pet?

Assess Your Living Space and Pet Type Match

Honest self-assessment comes before anything else. Your living situation, daily schedule, and finances directly determine whether pet ownership works for you and which type of pet fits your life. An apartment with limited space suits a cat better than a high-energy dog that needs hours of daily exercise. A studio apartment can work for a small dog or cat, but a large breed requires significantly more room to move comfortably.

Consider whether your home layout actually supports the pet you want. Renters need to verify lease terms allow pets and understand any breed or size restrictions, which often exclude dogs over 25 pounds. Some landlords charge pet deposits of $200 to $500 or monthly pet rent of $25 to $75. If you rent, contact your landlord before committing to a pet.

Checklist of key readiness factors before adopting a pet in the U.S. - home readiness for pet

Homeowners with yards should inspect fencing for gaps or weak spots where dogs escape, and recognize that a yard alone doesn’t replace daily engagement-outdoor space helps but doesn’t eliminate exercise needs.

Evaluate Your Daily Schedule and Time Commitment

Your daily schedule determines what pet type works. Dogs need bathroom breaks at least every six to eight hours, though active dogs or those with smaller bladders may need more frequent breaks. If you work eight hours daily without midday pet care arranged, a puppy becomes impractical. Cats offer more flexibility since they use litter boxes indoors and tolerate alone time better, though they still need daily interaction and enrichment.

Your lifestyle also affects pet choice. Active people who enjoy outdoor activities might thrive with a hiking or running companion, but that same dog would suffer with a sedentary owner. Conversely, someone with limited mobility might struggle with a dog requiring multiple walks daily but manage perfectly with a cat. If you travel frequently for work, a pet that needs constant companionship creates stress for both you and the animal.

Plan Your Budget for Pet Care Costs

Financial readiness matters more than enthusiasm alone. Pet owners spend an average of $1,948 annually on dogs, though this varies widely based on health issues, food quality, and services like grooming or training. A single unexpected veterinary emergency can cost $1,000 to $5,000.

Financial capacity extends beyond basic food and supplies. Budget for annual veterinary care including vaccinations and preventive treatments, which costs $300 to $1,000 yearly per pet depending on age and health status. Pet insurance costs an average of $56.30 per month for dogs but can reduce catastrophic expense impact. Emergency veterinary clinics charge premium rates, often double standard clinic prices. If unexpected costs would strain your budget, reconsider timing or pet type.

Consider Your Household Composition

Your household composition matters significantly. Families with young children under five need pets with stable temperaments since toddlers can accidentally hurt animals, and pets might react defensively. Elderly household members might struggle with large dogs that pull on leashes or jump on furniture. If you have other pets, introduce a new one with planning and compatibility assessment. Cats and dogs can coexist peacefully, but some dogs have high prey drives that make small pets unsafe.

Be realistic about your motivation too. If you want a pet primarily for companionship during stressful periods, that’s valid, but understand that training and care demands add stress initially rather than relieving it. The adjustment period typically lasts weeks to months, and behavior problems often emerge during this time. Honest answers to these questions prevent the common outcome where pets are surrendered after months because the reality didn’t match expectations.

With your home and lifestyle honestly assessed, the next step involves preparing your physical space to welcome your new pet safely and comfortably.

Preparing Your Home for a New Pet

Creating a truly pet-ready home requires specific action, not just good intentions. Start with hazard removal because pets explore with their mouths and paws, and common household items pose real dangers. Secure electrical cords with cord protectors or place furniture in front of outlets, since chewing through live wires causes electrocution. Store cleaning products, paints, pesticides, and solvents on high shelves or in locked cabinets where pets cannot access them. Keep human foods that are toxic to pets-chocolate, grapes, onions, garlic, and xylitol-containing products-completely out of reach. Close trash can lids and toilet seat lids because pets rummage through garbage and drink toilet water, both of which create serious health risks. Remove or relocate any houseplants on the ASPCA Toxic and Non-toxic Plants List before your pet arrives, since many common houseplants cause poisoning. Anchor large furniture like TVs, bookcases, and floor lamps to walls to prevent tipping, which injures or kills pets. Secure small items such as coins, jewelry, rubber bands, and small tools in inaccessible drawers since they present choking hazards. For cats, install window perches and create multiple hiding spots because vertical space and escape routes reduce stress. For dogs, use baby gates or barriers to block stairs, balconies, and porches where injuries occur. Check your yard fencing thoroughly for gaps, weak spots, or areas where dogs can dig underneath and escape.

Create Designated Zones for Feeding, Sleeping, and Bathroom Needs

Designate specific areas for each function rather than allowing pets to roam freely for weeks. Place food and water bowls in a quiet, easily accessible location away from the main living area-this reduces stress during meals and keeps water spills contained. Use stainless steel or ceramic bowls instead of plastic, which harbor bacteria and can develop cracks where harmful microbes hide. Set up a litter box or potty training pad in a convenient location far from the feeding area, since cats and dogs instinctively avoid eliminating near where they eat. For cats, place the litter box in a low-traffic area where they feel safe, and use an uncovered box to minimize odors; scoop daily and wash the box with mild soap every two weeks. For dogs, designate a potty area outside and establish a consistent schedule-most dogs need bathroom breaks within 30 minutes of eating and after play or sleep. Create a dedicated sleeping area with a comfortable bed or crate that provides security and a sense of ownership. A crate becomes invaluable for house training puppies and helps anxious dogs feel safe during loud events or unfamiliar situations. Start acclimating your pet to their crate before arrival by leaving the carrier in areas they’ll frequent, feeding treats near the carrier, and adding a familiar blanket inside.

Gather Essential Supplies Before Arrival

Purchase supplies before your pet arrives so the first days feel organized rather than chaotic. For dogs, buy puppy or adult food appropriate to age and size, a collar with ID tag, a sturdy leash and harness, food and water bowls, a crate or carrier, age-appropriate toys including chewy toys for teething, a comfortable bed with washable covers, a brush suited to coat type, and training pads for house training. For cats, gather food and water bowls, the cat’s current food from the shelter or previous owner, treats, a collar with ID, a comfortable bed, toys especially wand toys for interactive play, a brush, a litter box with clumping litter, and a tall scratching post. Include grooming items like pet-safe shampoo and wipes. Have a first aid kit ready with gauze, antiseptic, tweezers, and items your veterinarian recommends.

Establish Predictable Daily Routines

Consistency reduces stress and accelerates adjustment, so establish a predictable daily routine before your pet arrives. Set regular times for meals, bathroom breaks, enrichment activities, and exercise. Feed dogs at the same times daily-twice daily is typical for most dogs-and note that free feeding often leads to overweight pets. For cats, follow a 7-day dietary transition when introducing new food: days 1–2 mix 25 percent new food with 75 percent shelter food, days 3–4 use 50/50, days 5–6 do 75 percent new and 25 percent shelter, and day 7 transition to 100 percent new food.

Percentages for a 7-day cat food transition: 25%, 50%, 75% new food stages.

This gradual approach prevents digestive upset. Plan enrichment activities daily such as walks, play sessions, and puzzle toys because bored pets develop behavioral problems and destructive habits. With your space hazard-free, zones established, and supplies stocked, you’re ready to build the professional support system that keeps your pet healthy and safe throughout their life with you.

Building Your Pet’s Safety Net

Find a Veterinarian Before Your Pet Arrives

A veterinarian becomes your most important partner in pet ownership, yet many new pet owners delay finding one until an emergency occurs. Schedule your first appointment before or within the first week of bringing your pet home, not after problems develop. During this visit, your veterinarian establishes a baseline for future comparisons, discusses vaccination schedules, and reviews preventive care including parasite control and dental health. Bring any medical records from shelters or previous owners so your veterinarian understands your pet’s history.

Ask about spaying or neutering timelines, as these procedures prevent unwanted litters and offer significant long-term health benefits. Your veterinarian can also recommend appropriate food for your pet’s age and any health conditions, suggest specific enrichment toys, and address behavioral concerns before they become serious problems. This foundational relationship prevents costly mistakes later and gives you a trusted professional to contact when questions arise during the adjustment period.

Arrange Backup Care and Pet Sitters

Research pet sitters and boarding facilities in your area at least two weeks before any planned absence, since quality options fill up quickly. Visit facilities in person rather than choosing based on websites alone, and observe cleanliness, staff interaction with animals, and safety protocols. Ask about their experience with your pet type, how they handle medical needs or behavioral issues, and what happens if your pet becomes sick or injured during care.

Boarding facilities typically cost $30 to $60 daily for dogs and $15 to $30 for cats, while pet sitters charge $15 to $30 per visit depending on location and services. Prepare an emergency contact sheet for your backup caregiver that lists your veterinarian’s phone number, your contact information, your pet’s dietary needs, medication schedules, and behavioral quirks.

Prepare a Pet Emergency Kit

Create a pet emergency kit separate from your household emergency supplies, containing several days of food in waterproof containers, a multiple-day water supply, and extra medication if your pet takes any. Include vaccination records in a waterproof folder, a recent photo of you with your pet for identification purposes, a collar with current ID tags, a leash or harness, and comfort items like toys or bedding.

Compact checklist of pet emergency kit items for U.S. households. - home readiness for pet

Pet microchipping with updated contact information is essential, as collars and tags can be lost during disasters. Keep copies of vaccination records and microchip registration information both physically and digitally in cloud storage. Store your emergency kit in an accessible location and review contents every six months, rotating food and medications to keep them fresh.

Build Your Pet Support Network

Establish a buddy system with neighbors or trusted friends who can help evacuate or care for your pet if you cannot. Verify in advance which local shelters, hotels, or evacuation centers accept animals during disasters. This network provides peace of mind and ensures your pet has protection even when you cannot provide it directly.

Final Thoughts

You’ve now covered the essential steps for home readiness for a pet: assessing whether your lifestyle and space match pet ownership, removing hazards and creating designated zones, purchasing supplies, establishing routines, and building a support system with a veterinarian and backup caregivers. This preparation work matters because it directly determines whether your pet thrives or struggles during those critical first weeks. The adjustment period typically lasts weeks to months, and expecting perfection from day one sets you up for frustration.

Your new pet will have accidents, may hide or act withdrawn, and might test boundaries as they learn your home’s rules-this is normal. Patience during this transition prevents the common mistake of surrendering pets after a few months because reality didn’t match expectations. Your prepared space, established routines, and trusted support network give your pet the stability they need to settle in confidently.

At LifeEventGuide, we understand that major life transitions require more than enthusiasm-they require planning. Getting a pet ranks among significant life changes, and approaching it with the same thoughtfulness you’d apply to moving or buying a home increases your chances of success. We offer a framework and checklists designed specifically to help you navigate major life events by defining goals, timelines, and key decisions while avoiding common mistakes.


Publisher’s Note: LifeEventGuide is an independent educational publisher. Some articles reference tools or services we recommend to help readers explore options related to major life transitions. Learn more about how we make recommendations here.

Neighborhood Research Checklist: Find a Community That Fits Your Life

Choosing where to live shapes your daily life in ways that go far beyond the house itself. The neighborhood you select affects your commute, your safety, your finances, and your family’s opportunities.

We at LifeEventGuide know that picking the right community requires more than a quick drive-by. This neighborhood research checklist walks you through the specific factors that matter most, the tools that make research easier, and the mistakes that catch most people off guard.

What Matters Most When Researching a Neighborhood

The four factors that shape your daily life in a neighborhood are school quality, safety, commute time, and housing costs. These aren’t equally important to everyone, but they determine whether you’ll feel at home or regret your move within six months.

Hub-and-spoke showing school quality, safety, commute time, and housing costs as core neighborhood factors.

School quality and property values influence your family’s future, so start by checking your state’s education department for official district rankings and graduation rates. Minnesota publishes detailed data through the Minnesota Report Card, which includes graduation rates, test scores, and special education resources. Beyond test scores, look at teacher-to-student ratios and staff turnover rates, which reveal whether a school is stable and well-resourced. Contact the school directly or reach out to the PTA president for unfiltered insights about school culture and parent involvement.

Safety Data Tells the Real Story

Safety data comes from safety data from official crime statistics and local law enforcement reports, not from neighborhood rumors or real estate agent reassurances. Compare crime rates across neighborhoods you’re considering, and recognize that crime patterns shift by season and time of day. Walk the neighborhood at different hours-morning, afternoon, and evening-to see how safe streets actually feel when you’re there. Check for street lighting quality and whether an active neighborhood watch exists, both of which meaningfully reduce crime and improve perceived safety.

Commute Time Affects Your Weekly Hours

Commute time matters more than most people admit because it eats hours from your week and affects family stress levels. Map your actual routes from home to work, school, and other places you visit regularly, accounting for rush-hour delays and weather. If you rely on public transit, research actual reliability data rather than just published schedules; transit delays are common and can derail your entire day.

Housing Costs Go Beyond the Mortgage

Housing costs include the mortgage or rent, property taxes, insurance, maintenance, and HOA fees if applicable. Many people overlook HOA fees, which can add hundreds to your monthly payment and restrict how you use your property. Pull public property records to see actual sales prices in the neighborhood over the past two years, which reveals real market value and appreciation trends. Cost of living extends beyond housing to groceries, utilities, and childcare; neighborhoods with lower home prices sometimes have higher costs for everyday services.

Use Data to Narrow Your Choices

NeighborhoodScout analyzes over 200 neighborhood characteristics across six categories and more than 600 data elements, offering address-level insights that help you avoid stereotypes and hearsay. The platform provides crime ratings, school performance scores, and price forecasts specific to each address, which is far more useful than general neighborhood impressions. Walk Score measures walkability on a scale of 0 to 100, with maximum points awarded for amenities within a 5-minute walk of your home. A Walk Score above 70 means you can accomplish most errands without a car, while a score below 25 means you’ll need a vehicle for nearly everything. Transit Score and Bike Score work similarly, measuring public transportation access and biking infrastructure so you understand your actual mobility options. Combine these three scores to get a clear picture of how you’ll move around the neighborhood daily.

Three-point explanation of Walk Score, Transit Score, and Bike Score for neighborhood mobility. - neighborhood research checklist

Verify Information in Person

Online research gets you 70 percent of the way there, but neighborhoods feel different when you’re actually standing on the street. Visit at least twice-once during the week and once on a weekend-and spend time in areas where you’ll actually spend time, like near schools, grocery stores, or your workplace. Talk to residents about their experience, ask about neighborhood changes they’ve seen, and notice whether people seem engaged with their community or isolated.

Percentage showing how far online research gets you before in-person visits. - neighborhood research checklist

Pay attention to sidewalk conditions, whether storefronts are occupied or vacant, and whether parks look maintained. These observations tell you whether the neighborhood is stable and well-cared-for or showing signs of decline. Once you’ve gathered this data and walked the streets yourself, you’re ready to identify the specific mistakes that catch most people off guard-and how to avoid them.

Where to Find Reliable Neighborhood Data

NeighborhoodScout Provides Address-Level Insights

NeighborhoodScout delivers address-level analytics rather than broad neighborhood generalizations. The platform analyzes over 200 characteristics across crime, demographics, housing, school performance, and real estate forecasts, giving you specific data for the exact address you’re considering instead of vague impressions. You pay $30 per report or subscribe for ongoing access at roughly $112.50 per month. This investment pays for itself when you avoid buying in a neighborhood with hidden crime spikes or declining property values.

Walk Score, Transit Score, and Bike Score Show Your Mobility

Walk Score measures walkability on a 0–100 scale with maximum points for amenities within a 5-minute walk, meaning a score above 70 lets you handle most errands without a car while anything below 25 locks you into car dependency. Transit Score and Bike Score work the same way for public transportation and cycling infrastructure. These three scores together tell you whether you can realistically walk to the grocery store, bike to work, or reach transit within reasonable distance.

Public Records Reveal Real Market Trends

Local real estate databases and public property records show actual sales prices from the past two years, revealing genuine market trends instead of asking prices that sellers hope to receive. Most counties maintain free online property records where you can pull sale prices, property taxes, and HOA fees for specific addresses. This data exposes whether a neighborhood is appreciating steadily or stalling, which matters enormously for your financial future. Local community websites, neighborhood Facebook groups, and Nextdoor accounts give you unfiltered resident perspectives that online databases cannot provide. People on these platforms complain freely about noise, problematic landlords, flooding issues, and neighborhood changes, which means you learn about real problems before you commit. However, treat these sources as conversation starters rather than definitive truth because one vocal resident’s experience may not reflect the broader neighborhood.

In-Person Visits Confirm What Data Cannot Show

Visit the neighborhood at different times-morning during school drop-off, midday on a weekday, and evening on a weekend-because the same street feels completely different depending on when you’re there. Morning visits show you traffic congestion and school activity. Midday visits reveal whether the neighborhood feels active or abandoned. Evening visits expose whether streets are well-lit and whether people are outside or locked inside their homes. Talk directly to residents you encounter and ask what they wish they’d known before moving there. Notice whether they seem satisfied or counting down to their next move. These in-person visits confirm whether the data you found online actually matches reality on the ground, and they prepare you to spot the specific mistakes that most people make when they rush through neighborhood selection.

What Actually Changes a Neighborhood During Your Research Timeline

Most people spend three to six weeks researching neighborhoods before making an offer, but neighborhoods shift constantly in ways that data from last month won’t capture. The mistake isn’t gathering information-it’s treating that information as static. A neighborhood that looked stable in online records might have just announced a major development project, or a thriving commercial corridor might lose tenants month by month. Walk the neighborhood at morning rush hour to see real congestion levels rather than relying on traffic maps that show averages. Morning visits also reveal whether school drop-off chaos affects residential streets or whether traffic flows smoothly, which determines your actual daily experience.

Visit at Different Times to See Real Conditions

Visit again on a Saturday afternoon when families are outside, then return on a weeknight around 7 PM to see how the same streets feel after dark. This matters enormously because a neighborhood can feel active and safe at 2 PM but isolating and poorly lit by 9 PM. Talk to residents during each visit and ask specifically what surprised them after moving in-not whether they like it generally, but what caught them off guard. You’ll hear about seasonal flooding that isn’t visible in dry months, noise from nearby bars that only starts on weekends, or parking problems that emerge only during winter. These details won’t appear in crime statistics or Walk Score calculations.

Hidden Costs Destroy Neighborhood Satisfaction

Hidden costs destroy neighborhood satisfaction far more often than crime rates or school rankings. Hidden costs in HOA fees typically run $200 to $300 monthly for single-family homes and often increase annually, which means a fee today becomes significantly higher in five years-money that never showed up in your initial mortgage calculation. Pull the HOA rules and reserve studies from public records, which reveal whether the association is properly funded or headed toward special assessments that hit owners with substantial bills. Property taxes vary dramatically within the same city depending on local school funding formulas and municipal services, so two homes with identical prices can have annual tax bills differing by $2,000 or more. Check your county assessor’s website for actual tax rates on specific properties you’re considering, not just state averages.

Long-Term Development Plans Reshape Neighborhoods

Long-term development plans reshape neighborhoods completely-a vacant lot near your potential home might become a shopping center, a highway expansion, or affordable housing that brings dramatic changes to traffic and character. Contact your city planning department and ask about zoning changes, approved developments, and infrastructure projects planned for the next five to ten years. These conversations take thirty minutes but prevent the shock of discovering a major development announced after you’ve already committed.

Declining Retail Signals Neighborhood Trouble

Neighborhoods with declining retail also signal trouble because empty storefronts mean fewer services, reduced foot traffic, and lower property values. Drive the main commercial streets in your target neighborhood and count vacant spaces, then check back three months later. If vacancies are growing, that neighborhood is losing economic vitality and residents are likely moving out, which affects property appreciation and community stability.

Final Thoughts

You’ve now gathered crime data, walked the streets at different times, checked school ratings, and verified commute times. You’ve pulled property records, reviewed HOA fees, and talked to residents about what surprised them after moving. This neighborhood research checklist gives you the foundation to make a decision that actually fits your life, not just a house that looks good in photos.

The final step is confirming that your top choice aligns with how you actually want to live. A neighborhood with excellent schools means nothing if you spend three hours daily commuting, and a walkable area with great restaurants doesn’t matter if the schools are struggling and your family’s education is your priority. Return to the factors that matter most to you personally, then measure your top candidates against those specific priorities-you’ll likely find that one neighborhood consistently ranks highest across your must-haves.

Visit your top choice one more time at a time of day when you’ll actually be there most often, and trust the work you’ve invested in this neighborhood research checklist. We at LifeEventGuide understand that decisions this significant deserve a structured approach, which is why our Decide-Protect-Execute-Review framework walks you through major life changes with clear checklists and timelines so you avoid common mistakes and move forward with confidence.


Publisher’s Note: LifeEventGuide is an independent educational publisher. Some articles reference tools or services we recommend to help readers explore options related to major life transitions. Learn more about how we make recommendations here.

Financing Options Checklist: Compare Mortgages and Programs

Buying a home is one of the biggest financial decisions you’ll make, and the mortgage options available can feel overwhelming. At LifeEventGuide, we’ve created this financing options checklist to help you understand what’s out there and make a choice that fits your situation.

The right mortgage depends on your budget, timeline, and comfort with risk. This guide walks you through the main types of mortgages, how to compare costs, and the steps to pick the best option for you.

What Mortgage Types Should You Consider

Fixed-rate mortgages lock your interest rate for the entire loan term, typically 15 or 30 years. Your monthly payment stays the same from day one to the final payment. The stability of fixed-rate mortgages makes them predictable for budgeting, which is why most homebuyers choose this option. You know exactly what you’ll pay each month, so you can plan your finances around your mortgage with confidence. The trade-off is that fixed rates are typically higher than the initial rates on adjustable-rate mortgages, so you pay for that certainty upfront.

When adjustable rates make sense

Adjustable-rate mortgages start with a lower initial rate that increases after a set period, usually 3, 5, 7, or 10 years. If you plan to sell or refinance before the rate adjusts, an ARM can save you thousands in interest during those early years. This option works best if you’re confident about your timeline and comfortable with the risk that rates could rise significantly. Many first-time buyers avoid ARMs because the uncertainty feels risky, but if your situation is temporary, the math often favors this choice. The CFPB recommends understanding exactly how your payment will change over time before you commit to an ARM, since some borrowers face payment increases of several hundred dollars monthly when rates adjust.

Government-backed programs for qualified buyers

Federal Housing Administration loans allow down payments as low as 3.5% with credit scores starting at 580, according to FHA guidelines. VA loans offer 0% down for eligible service members and veterans with no mortgage insurance requirement. USDA loans provide 0% down financing for rural and suburban properties, often with lower interest rates than conventional options. Fannie Mae’s HomeReady and Freddie Mac’s Home Possible programs target low-to-moderate income buyers with 3% down and reduced mortgage insurance costs (each program has specific eligibility requirements and features). Comparing these programs against conventional mortgages reveals which option saves you the most money based on your circumstances.

Key features of FHA, VA, USDA, and HomeReady/Home Possible loan programs - financing options checklist

The next step is to understand how these different mortgage types affect your actual costs and monthly payments.

What Actually Costs More When Comparing Mortgages

Interest rates tell only half the story

Interest rates grab all the attention, but they’re only part of the picture. The CFPB recommends you obtain at least three loan estimates from different lenders so you can see the full cost breakdown, not just the rate. When you compare offers, look at the APR instead of the interest rate alone-APR includes the rate plus fees and closing costs, which gives you a more honest comparison of total borrowing cost. A lender advertising 6.5% might charge $3,000 in fees, while another at 6.75% charges $500. Over a 30-year loan, that rate difference saves roughly $72,000 according to CFPB data, but you need to subtract the fee difference to see which lender actually costs less.

Hub-and-spoke diagram of total mortgage cost components beyond the interest rate - financing options checklist

Closing costs and upfront expenses

Closing costs can vary significantly by state, ranging from less than 1 percent of the home’s sale price to nearly 3 percent, so on a $300,000 home, you should expect $3,000 to $9,000 upfront. The estimated cash to close shows exactly how much money you need to bring to closing day, not just your monthly payment. Compare this figure across multiple lenders to understand your true upfront cost. This comparison reveals which lender fits your financial situation best.

How loan terms reshape your total cost

A 15-year mortgage has higher monthly payments but costs far less in interest over time compared to a 30-year loan on the same amount. The 30-year fixed remains standard for most 3% down programs like Conventional 97, HomeReady, and Home Possible because it keeps monthly payments manageable. When you review loan documents, check for prepayment penalties (which prevent you from paying off the loan early without a fee) and balloon payments (which require a large lump sum at the end). Discount points let you lower your interest rate by paying upfront-each mortgage point typically lowers your loan’s interest rate by 0.25 percentage points for the life of the loan, so calculate your break-even point to decide if paying points makes sense for your timeline.

Mortgage insurance and program differences

Private mortgage insurance adds to your monthly cost when your down payment is under 20%, but different programs handle it differently. FHA requires mortgage insurance premiums for the life of the loan, while HomeReady and Home Possible offer reduced PMI for eligible borrowers, which makes a real difference in long-term cost. You should also shop across lender types: national banks, regional banks, credit unions, and mortgage companies all offer different fee structures and product menus. Some credit unions provide better rates or lower costs for their members, so don’t overlook this option.

Where to find the best rates and terms

National banks, regional banks, credit unions, and mortgage companies each bring different advantages to the table. You can compare current offers using online rate tables and calculators to estimate long-term costs across different scenarios. Ask lenders for a detailed breakdown of closing costs and fees, and don’t hesitate to negotiate terms or costs when possible. The next step is to assess your own financial situation and determine which mortgage option aligns with your budget and timeline.

How to Pick Your Mortgage Without Getting Lost in the Details

Assess your financial situation first

Know exactly what you can afford before you talk to a single lender. Pull together your recent tax returns, W-2s, bank statements, and a list of all your debts-credit cards, student loans, car payments, everything. Lenders will ask for these documents anyway, so gathering them now speeds up the process and forces you to see your full financial picture. Calculate your debt-to-income ratio by dividing your monthly debt payments by your gross monthly income. Most lenders want this ratio below 43%, meaning if you earn $5,000 monthly, your total monthly debt shouldn’t exceed $2,150.

Important mortgage-related percentage benchmarks for DTI, PMI, and down payments

This number matters more than how much a lender says you can borrow. Set your maximum mortgage payment based on what actually fits your lifestyle, not what a lender approves. If you can comfortably afford $1,500 monthly but a lender approves you for $2,200, stick with $1,500.

Obtain multiple loan estimates strategically

The CFPB recommends obtaining at least three loan estimates from different lenders, and the 14- to 45-day window for rate shopping means multiple credit inquiries during this period won’t significantly damage your credit score. Spread your applications across this timeframe rather than submitting them all at once. Request loan estimates in writing from each lender, and they must provide the same standardized form so you can compare apples to apples.

Compare what actually matters on each estimate

Ignore the interest rate and focus on the APR versus interest rate and total estimated cash to close instead. The APR reveals what you actually pay when fees are included, while cash to close shows your upfront burden. A lender offering 6.5% with $2,000 in fees costs less than 6.3% with $5,000 in fees if you’re keeping the loan long-term. Look for prepayment penalties on each estimate-if one lender charges a fee for paying off early and another doesn’t, that changes your flexibility. Ask each lender whether their rate is locked or if it floats until closing, since floating rates can increase if market conditions shift.

Negotiate fees and lock in your terms

Request a detailed breakdown of all closing costs and third-party fees, then ask which items are negotiable. Some lenders will reduce origination fees or waive certain charges to win your business. Don’t accept vague language like miscellaneous fees-demand specifics. Once you’ve narrowed your choice to one lender, apply for preapproval rather than prequalification. Preapproval means the lender has verified your income and credit, making your offer stronger when you find a home. The entire preapproval process typically takes minutes to a few days and gives you concrete proof of your buying power before you start house hunting.

Final Thoughts

You now understand the main mortgage types, how to compare costs honestly, and the steps to select financing that fits your life. Fixed-rate mortgages offer predictability, adjustable-rate mortgages can save money if your timeline is short, and government-backed programs like FHA, VA, and USDA loans open doors for buyers who might otherwise struggle to qualify. The key takeaway is simple: interest rates matter far less than your total cost, which includes fees, closing costs, and mortgage insurance.

Comparing options isn’t optional if you want to avoid overpaying. You need at least three loan estimates from different lenders to see real differences in what you’ll actually pay over 15 or 30 years. A rate difference of just 0.5% saves roughly $72,000 on a 30-year loan, but only if you compare APRs and total closing costs across lenders, not just the advertised rate.

Your next move is to gather your financial documents, calculate what you can genuinely afford, and start requesting loan estimates. We at LifeEventGuide help people navigate major life transitions like buying a home by providing clear frameworks and practical checklists-our financing options checklist approach breaks down complex decisions into manageable steps so you can move forward with confidence. Explore our resources to find tools and support for your home buying journey, then apply for preapproval and start your house hunt knowing exactly what you can afford and what you’ll pay.


Publisher’s Note: LifeEventGuide is an independent educational publisher. Some articles reference tools or services we recommend to help readers explore options related to major life transitions. Learn more about how we make recommendations here.

Home Sale Moving Checklist: Coordinate Selling, Packing, and Moving

Selling your home while managing packing and moving is one of life’s most demanding transitions. You’re juggling real estate timelines, showing schedules, and logistics all at once, which makes a home sale moving checklist essential to stay organized.

At LifeEventGuide, we’ve seen how coordinating these three moving parts prevents costly mistakes and reduces stress. This guide walks you through a practical system that keeps your sale, packing, and moving aligned from start to finish.

Start With Your Home’s Real Value

Price Your Home Based on Market Data, Not Wishful Thinking

Getting your price right matters more than most sellers realize. According to Zillow’s 2024 data on home listing timing, homes listed in late May sell for about 1.6% more than those listed earlier in spring, but that advantage disappears fast if your asking price doesn’t match what buyers actually see in the market. Pull sold comparables on Zillow for homes similar to yours in size, location, age, condition, and recent upgrades. Your real estate agent will order a formal appraisal later, but using local sold data now prevents you from pricing too high and sitting on the market for months. Overpriced homes rarely attract serious offers, even with price cuts later.

If you list at 5% above market value, you’ll spend extra weeks competing against better-priced homes while your moving timeline stretches. 89% of sellers hired a real estate agent in 2024 according to Zillow, and interviewing multiple agents helps you ground your price in reality and maximize MLS exposure. Ask each agent what homes like yours sold for in the last 30 to 60 days, not what they think you can get.

Infographic showing 5% overpricing risk, 1.6% late-May premium, and 89% agent usage among sellers

Focus on Affordable Cosmetic Fixes, Not Full Renovations

Before listing, focus on affordable cosmetic fixes rather than full renovations. Tackle sticking cabinets, freshen paint in neutral colors, fix leaks, and replace broken fixtures where they have the highest impact on buyer perception. Skip the kitchen remodel or master bath overhaul unless your market demands it. These high-cost projects rarely return their full investment and consume time you don’t have during a sale.

Work Backward From Your Expected Closing Date

Plan your move-out date backward from when you expect to close, typically 30 to 45 days after listing in an active market. This backward timeline prevents you from packing too early and disrupting showings, or waiting too late and scrambling at the last minute. Work backward from your expected closing date by coordinating with your agent on the expected closing date, factoring in any contingencies or inspections, and building in buffer time for closing delays (spring markets move faster than winter ones, so your timeline shifts based on season).

Once you know your target closing date, you can schedule repairs, arrange for utilities to disconnect and reconnect, and plan when decluttering and packing actually start without creating a chaotic overlap between showings and moving logistics. This single master date becomes the anchor for every other decision you make about packing and moving.

Sync Your Sale Timeline With Packing Phases

The gap between listing your home and closing can range from 20 days in a hot market to 90+ days in slower conditions, and this unpredictable window causes most sellers to pack too early or wait too long. Your real estate agent can estimate your local time-to-pending based on recent sales data for your neighborhood, so ask for that number before you create your packing schedule. Once you know whether you’ll likely close in 30 days or 60 days, build your packing phases backward from closing day, not from listing day. Start packing non-essential items four to six weeks before your expected closing, which gives you buffer time without cluttering your home during the critical showing period. Pack your kitchen pantry, off-season clothes, books, and decorative items first since buyers rarely care about these spaces. Keep your living areas, bedrooms, and bathrooms visibly uncluttered but still lived-in during showings, which means holding off on packing these spaces until two to three weeks before closing. This staggered approach prevents the common mistake of boxing everything up immediately after listing, only to have your home look staged and uninviting to buyers who want to picture themselves living there.

Stylized three-step plan for packing in phases leading up to closing - home sale moving checklist

Declutter to Boost Sale Appeal and Cut Moving Costs

Decluttering serves double duty during a home sale: it makes your home more attractive to buyers and reduces moving volume, which lowers your moving costs. Homes that look spacious and uncluttered show better to buyers, so tackle this before you list. Sort your belongings into four categories: keep, donate, sell, and discard. Items you plan to sell on Facebook Marketplace or Craigslist should move quickly since you need the space back, so list high-value items like furniture or electronics within the first week after listing. Donate or discard the rest within two weeks to avoid letting clutter pile up while your home sits on the market.

Moving companies charge by volume or weight, so every item you remove now saves you money later. The average cost to move a 3-bedroom house long-distance ranges between $2,300 and $9,600, depending on distance, weight, packing, and more, and reducing that volume through aggressive decluttering can save you hundreds of dollars. This financial incentive alone justifies spending time on decluttering early rather than moving items you don’t actually want in your new home.

Batch Showings to Protect Your Packing Progress

Ask your agent to batch showings into specific windows rather than spreading them throughout the week, which allows you to pack strategically without constant disruption. If your agent can schedule most showings on weekends or specific weekday afternoons, you can pack intensively on other days without worrying that buyers will arrive to find boxes stacked in hallways. Communicate clearly with your agent about which rooms you’re actively packing and when, so they can guide showings away from heavily boxed areas.

Keep your master bedroom, kitchen, and main living spaces show-ready at all times, even if you’re packing the guest bedroom or basement. Maintain a quick-clean routine the night before and morning of any showing day, which takes 30 to 45 minutes and keeps your home market-ready without requiring a professional stager to return. This coordination between your agent’s showing schedule and your packing timeline prevents the frustration of unpacking items you just boxed because a showing came up unexpectedly.

Prepare for the Final Showing Phase

As your closing date approaches, your showing activity typically slows down, which signals that you can accelerate packing in the main living spaces. Most homes receive the majority of showings in the first two to three weeks on the market, so you’ll have more freedom to pack aggressively in the final weeks before closing. This shift in buyer traffic gives you the green light to box up your bedroom furniture, kitchen items, and living room décor without worrying that you’ll need to unpack everything for a last-minute showing. Coordinate this final packing push with your agent to confirm that showing activity has genuinely dropped before you commit to packing your most visible spaces.

Finalize Utilities and Address Changes Before Closing

The two weeks before closing demand intense coordination between your closing attorney, utility companies, and moving logistics. Notify your current utility providers at least 30 days before your move-out date, not the day before, since disconnection appointments fill up quickly during peak moving seasons.

Checklist of key steps to disconnect and activate utilities around moving day - home sale moving checklist

Contact your electric, gas, water, internet, and trash providers separately and request final meter readings on your move-out date so you can verify charges are accurate. Many utility companies require 48-hour notice for disconnection, and missing this window means paying for utilities you no longer use or dealing with service interruptions in your new home.

Schedule utilities activation at your new address simultaneously, ideally for the day before or morning of your move-in, so you have power, water, and heat ready when you arrive. Internet activation often takes longer than other utilities, so request installation 3 to 4 weeks before moving day to avoid sitting without connectivity for days after arrival.

Update Your Address Across All Services

Update your address with your post office, banks, employer, insurance companies, and subscription services immediately after closing, not weeks later. The US Postal Service processes address changes within up to 2 weeks, and delaying this step means missing important mail about property taxes, insurance renewals, or financial statements sent to your old address. File your change-of-address form online at USPS.gov or in person at your local post office for a one-time fee of around $1.10.

Notify your homeowners or renters insurance company at least two weeks before closing so coverage transfers smoothly, and confirm your new address is active in their system before moving day. Banks, credit card companies, and investment firms need address updates to prevent misdirected statements (though many now offer digital-only statements that eliminate this concern). Your employer’s HR department, healthcare providers, and subscription services should also receive your new address in writing, since phone calls alone often disappear into voicemail.

Complete Your Final Walkthrough Strategically

Schedule your final walkthrough with your real estate agent for two to three days before closing, not the day before, so you have time to address any last-minute issues the seller’s inspector may have flagged. During this walkthrough, confirm that any agreed-upon repairs were actually completed to your satisfaction, verify that appliances or fixtures you negotiated to keep are still in place, and photograph or video-record the home’s condition as proof for your closing documents.

Check that all utilities function, doors lock properly, and the home matches the condition specified in your purchase agreement. If the seller failed to complete repairs or removed items you negotiated to keep, document this immediately and contact your real estate agent to address it before closing, since post-closing disputes cost far more to resolve than pre-closing corrections.

Pack Your Essentials Box and Valuables Correctly

Three days before moving day, pack your essentials box with items you need immediately upon arrival: medications, phone chargers, toiletries, a change of clothes for each family member, basic tools, important documents, and pet supplies if applicable. Keep this box with you in your car during the move, never on the moving truck, so you have these items regardless of moving delays or truck arrival times.

Medications and medical equipment are non-negotiable since you cannot function without them, and moving trucks sometimes arrive late or encounter delays that would leave you without necessary items for 24 hours or more. Pack a second box with cleaning supplies, paper towels, and trash bags so you can immediately clean your old home before the final walkthrough and do a quick cleanup of your new home before unpacking furniture.

Photograph your electronics and furniture before movers arrive so you have visual references for reassembly and can verify nothing arrived damaged. Keep valuable items like jewelry, financial documents, passports, and electronics in your personal possession during the move rather than loading them onto the truck, since moving companies limit liability for high-value items.

Final Thoughts

A home sale moving checklist anchored to a single master timeline prevents the chaos of managing three separate schedules that pull you in different directions. Your real estate agent can estimate your local time-to-pending, which gives you the closing window you need to work backward and schedule packing phases, utility transfers, and address changes without overlap or scrambling. Each phase has specific tasks, and completing them in order prevents the common mistake of packing too early and disrupting showings or waiting too late and moving in crisis mode.

The stress of selling, packing, and moving stems from uncertainty and poor coordination, not from the tasks themselves. When you know exactly when utilities disconnect, when your final walkthrough happens, and when your essentials box needs packing, you can focus on one major task at a time instead of worrying about everything simultaneously. This calm, sequential approach transforms a complex transition into a manageable series of steps.

We at LifeEventGuide created practical frameworks to help you navigate major life transitions with confidence. Explore our resources and tools to support your home sale and move from start to finish.


Publisher’s Note: LifeEventGuide is an independent educational publisher. Some articles reference tools or services we recommend to help readers explore options related to major life transitions. Learn more about how we make recommendations here.

Packing Checklist for Moves: Efficient, Stress-Free Packing Tips

Moving day stress often comes from poor planning, not the move itself. We at LifeEventGuide know that a solid packing checklist for moves makes the difference between chaos and calm.

This guide walks you through proven strategies to pack efficiently, stay organized, and actually enjoy the process. You’ll learn exactly what supplies you need and how to pack so nothing breaks and nothing gets lost.

When Should You Start Packing

Starting your packing four to six weeks before moving day isn’t optional if you want to avoid last-minute panic. Most people underestimate how long packing actually takes. A study by the American Moving and Storage Association found that the average household spends between 40 to 60 hours packing, yet most people allocate only two to three weeks for the task. This gap between reality and expectation is why moving stress peaks in the final week. Starting early means you pack during calm evenings rather than frantic all-nighters. You’ll also spot problems early, like discovering you need twice as many boxes as you thought or realizing certain items require special handling.

Build Your Timeline Around Your Move Date

Work backward from your moving date to create a realistic schedule. Four weeks out, focus on decluttering and gathering supplies. This is when you decide what stays and what goes, which directly reduces the number of boxes you’ll pack. Three weeks before the move, start packing items you rarely use: seasonal decorations, off-season clothing, books you haven’t opened in a year, and formal dining pieces. Two weeks before, shift to items used occasionally, like guest bedroom contents and garage equipment. One week before, pack everyday items you can live without for seven days. The final week covers only essentials you use daily, which you’ll pack last and unload first. This staggered approach prevents the psychological overwhelm of facing hundreds of boxes at once and keeps your home functional until moving day.

Organize Items by How Often You Use Them

Sort items by frequency of use rather than by room, because this creates a natural packing sequence. Items you never touch should go into boxes first. Items you use monthly come next. Weekly-use items pack in week two. Daily essentials pack last. This system works because it acknowledges that packing is a process, not an event. You won’t have motivation or energy to pack everything in one weekend, so this method sustains momentum over weeks. It also prevents the frustration of needing something that’s already sealed in a box. When you pack your winter coat in August and won’t need it until November, you feel confident sealing that box. When you pack your coffee maker three days before moving, you know exactly where it is because it just went in a box.

Create a Dedicated Packing Station

Choose one room or corner of your home as your packing headquarters. This is where you store all boxes, tape, markers, and packing materials. Having everything in one place saves time and prevents the scattered frustration of hunting for supplies. Stock this station with sturdy boxes in multiple sizes, packing tape, bubble wrap, packing paper, and permanent markers. A survey by moving companies found that households using a centralized packing station completed their packing faster than those without one. Keep your labeling system visible here too, whether that’s color-coded tape, markers, or a printed legend. This station also serves as your staging area where boxes wait before loading into the moving truck. Having a system prevents boxes from spreading throughout your entire home, which creates visual chaos and makes it harder to track what’s packed versus what still needs attention.

With your timeline set and your station ready, you can now focus on gathering the right supplies and learning the specific techniques that prevent damage and loss during the move.

Essential Packing Supplies and Strategies

Choose the Right Boxes for Your Items

Quality boxes matter far more than most people realize, and skimping here costs you money and stress later. Thin boxes collapse under weight, crushing contents and forcing repacking. Purchase boxes rated for 32 pounds or more per carton-these are labeled as heavy-duty or double-wall boxes. Standard single-wall boxes work only for lightweight items like pillows or decorations. Size your boxes strategically: small boxes (1.5 cubic feet) hold heavy items like books and kitchen equipment, while large boxes (4.5 cubic feet) contain bulky light items like bedding and towels. The weight rule is absolute-a 40-pound box of books becomes impossible to lift and damages your back.

Select Tape, Wrap, and Protective Materials

Pressure sensitive tape works well for light-duty packing tasks. Bubble wrap protects breakables far better than newspaper because it cushions impact without transferring ink to dishes. Packing paper works for wrapping individual items and filling gaps. Plastic bags serve soft items well, and stretch wrap bundles furniture components effectively. Permanent markers label boxes clearly and durably. Most households underestimate quantities dramatically. A typical three-bedroom home requires 40 to 50 small boxes, 60 to 80 medium boxes, and 40 to 50 large boxes. Purchasing 20 percent more than your estimate prevents the frustration of running short mid-packing.

Organize and Label by Room

Organizing by room creates natural stopping points and prevents the exhaustion of moving randomly through your home. When you pack the guest bedroom first, you finish a complete space and feel genuine progress. This momentum carries into the next room. Label each box with the destination room, a brief contents list, and whether it contains fragile items. Use thick permanent markers on all four sides of each box so labels remain visible no matter how boxes stack. Color-coding by room transforms packing, loading, and unpacking into a more organized experience-assign blue tape to kitchen boxes, green to bedrooms, red to living areas. Movers can then place boxes directly in correct rooms without opening them. This single system reduces unpacking time by roughly 30 percent compared to unmarked boxes.

Two key moving stats: 30% faster unpacking with color-coding and 20% extra boxes to avoid shortages. - packing checklist for moves

Protect Fragile Items and Track Everything

Include a fragile label on any box containing dishes, glassware, mirrors, or electronics. Photograph the contents of fragile boxes before sealing them, creating visual proof of what’s inside for insurance purposes if damage occurs. Never pack boxes so heavy that one person cannot lift them alone, and never stack boxes more than five high because weight accumulates and crushes lower boxes. Keep a master inventory document listing box numbers, contents, and destination rooms-this prevents losing track of items and simplifies claiming insurance for anything damaged or lost during transit.

With your supplies organized and your labeling system in place, you’re ready to learn the specific techniques that prevent damage and loss while keeping your stress levels manageable throughout the packing process.

How to Pack Without Breaking Things or Losing Your Mind

Distribute Weight Correctly to Protect Your Items and Back

The weight distribution rule separates successful packers from those who end up repacking boxes mid-move. Heavy items like books, kitchen equipment, and electronics go into small boxes, with a maximum of 50–60 pounds per box. This prevents boxes from collapsing under weight and protects your back from injury when lifting. Light items like pillows, linens, and decorations belong in large boxes where they fill space without creating dangerous weight. Violate this rule and you create immediate problems: a heavy box of books becomes impossible for one person to lift, gets dropped, damages contents, and strains whoever attempts to move it. Place heavier boxes on the bottom of stacks and lighter boxes on top, never the reverse. This simple principle protects items in lower boxes from being crushed and keeps the stack stable enough that movers can transport it safely. Most people pack intuitively, putting whatever fits into whatever box is closest, which is why moving day becomes chaotic. Instead, weigh boxes as you pack them using a bathroom scale and mark the weight on the box with your marker. This creates accountability and prevents the guessing game of whether a box is safe to lift.

Prepare Your Open-First Box for Immediate Needs

Your open-first box deserves more attention than most people give it because this single container determines whether your first night in a new home feels manageable or miserable. Stock this box with essentials you need immediately: cleaning supplies, foods and beverages, linens and sleeping arrangements, and personal items. Include a roll of duct tape because it solves unexpected problems. Keep this box with you during the move rather than loading it onto the truck, and unload it first so these essentials sit within arm’s reach. This approach eliminates the frustration of searching through dozens of boxes for your toothbrush or phone charger on your first exhausting night.

Document Electronics Before Disconnecting Anything

Electronics require a different approach entirely. Before unplugging any device, photograph the cable connections from multiple angles. Label each cable with tape and a marker indicating where it connects, or place all cables for one device in a labeled plastic bag. Keep instruction manuals and original boxes for expensive electronics if you have them, as these protect items during transit and simplify setup in your new home. For your home office or entertainment system, take a photo of the entire setup before disconnecting anything, creating a visual reference for reassembly. Many people underestimate how long electronics setup takes, spending hours on moving day tracing cables and guessing which cord goes where. This photo method eliminates that frustration entirely and typically saves two to three hours of setup time.

Final Thoughts

Before moving day arrives, walk through your home and verify that every box has labels on multiple sides with its destination room and contents. Count your boxes and cross-reference them against your master inventory list to catch mistakes early, such as a box labeled for the kitchen that actually holds bedroom items. This verification step transforms your packing checklist for moves from a planning tool into an active quality-control system that prevents confusion on moving day.

Your organized system becomes your moving day asset when you hand your inventory list and color-coded boxes to your movers so they place items directly in correct rooms. Keep your open-first box with you during transit, and take photos of your empty rooms before leaving your old home for insurance documentation. These final preparations mean your moving day runs smoothly because you’ve already solved the problems that typically create chaos.

We at LifeEventGuide understand that moving involves more than just packing boxes. Our Decide-Protect-Execute-Review framework helps you navigate every aspect of your move with clear timelines and checklists that prevent common mistakes.


Publisher’s Note: LifeEventGuide is an independent educational publisher. Some articles reference tools or services we recommend to help readers explore options related to major life transitions. Learn more about how we make recommendations here.

Car Buying Checklist: A Practical Roadmap for Your Next Vehicle Purchase

Buying a car is one of the biggest purchases you’ll make, and it’s easy to feel overwhelmed by the options and decisions ahead. We at LifeEventGuide know that having a clear car buying checklist makes the entire process less stressful and helps you avoid costly mistakes.

This guide walks you through each stage, from setting your budget to signing the paperwork, so you can make a confident choice that fits your life and finances.

What Should You Actually Spend on a Car

The biggest mistake people make is treating a car purchase like a single transaction instead of a financial commitment that extends years into the future. Your actual cost of ownership includes far more than the sticker price. Calculate your total cost of ownership by adding the vehicle price, sales tax, registration fees, insurance, fuel, and maintenance over the time you’ll own the car. If you finance, factor in interest payments too.

Visual guide to all the cost components that make up a car’s total cost of ownership.

This number often shocks people because it reveals the true financial weight of their decision. Use a car loan calculator to run different scenarios with various down payments and loan terms. The average auto loan in 2025 runs about 69 months according to CNBC, which means you commit to payments for nearly six years. That’s a long time to regret a poor financial choice.

How Much You Can Actually Afford Each Month

Don’t just look at what monthly payment feels comfortable. Instead, follow the 20/3/8 rule: put down 20 percent, finance over no more than 3 years if possible, and keep your total vehicle costs under 8 percent of your gross monthly income. If you earn 5,000 dollars per month, your entire car-related expenses shouldn’t exceed 400 dollars. This includes the monthly payment, insurance, fuel, and maintenance. Most people underestimate insurance costs, so get actual quotes from providers like Allstate, GEICO, Progressive, and State Farm before you fall in love with a specific model. Insurance varies wildly between vehicles and your personal situation.

Your credit score directly affects your financing rate, so check your score at AnnualCreditReport.com before shopping. Scores above 750 typically unlock the best rates, while scores below 650 can cost you thousands in extra interest over the life of the loan. If your score is lower, delay your purchase by several months and work on paying down debt and making on-time payments.

What Your Down Payment Should Actually Be

A 20 percent down payment is the gold standard because it reduces your loan amount, lowers your monthly payment, and protects you if the car depreciates faster than expected. On a 25,000 dollar vehicle, that’s 5,000 dollars down. If you don’t have that saved, consider whether you’re truly ready to purchase. A smaller down payment means higher monthly payments and more interest paid overall.

Secure pre-approval for financing from a bank or credit union before visiting a dealership. This gives you real leverage because you’ll know exactly how much you can borrow and at what rate, which prevents dealers from steering you toward expensive financing options. Compare the dealership’s offer against your pre-approval to verify you’re getting the best deal. With your budget, credit score, and down payment strategy locked in, you’re ready to research the specific vehicles that fit your financial picture and test how the car actually performs on the road.

Research and Compare Your Options

New cars come with warranties, latest technology, and no hidden damage history, but they depreciate in the first year according to Edmunds data, meaning you lose thousands immediately. Used vehicles avoid that cliff, yet you inherit someone else’s maintenance problems and unknown wear patterns. The real question isn’t which is objectively better-it’s which aligns with your budget and risk tolerance. If you have the down payment saved and can afford higher monthly payments, a new car under warranty makes sense. If you’re stretching financially, a used vehicle from 3 to 5 years old often delivers better value because depreciation has stabilized and you can find well-maintained examples with substantial warranty coverage remaining. Certified pre-owned programs from manufacturers typically include extended warranties and thorough inspections, reducing guesswork compared to private sales.

Pull Reliability and Safety Data Before Narrowing Your List

Magazine reviews and manufacturer claims won’t tell you what actually matters. Kelley Blue Book and the National Highway Traffic Safety Administration provide reliability data and safety ratings you can compare side by side for specific models. Insurance quotes for your top three choices reveal hidden costs-a seemingly affordable car might carry premiums 30 percent higher than alternatives due to repair costs or accident history. The EPA estimates on fueleconomy.gov show actual fuel economy rather than manufacturer figures, which often run optimistic.

Two quick car-buying statistics on insurance premiums and how far buyers travel. - car buying checklist

For used cars, a Carfax or AutoCheck report immediately reveals accidents, title issues, mileage discrepancies, and maintenance records that determine whether a vehicle is reliable or a money pit. A car with consistent oil changes and service records outperforms a lower-mileage vehicle with gaps in maintenance history.

Build Your Shortlist Based on Real Costs and Availability

Three to five models that meet your transportation needs, fit your budget (including insurance and fuel costs), and have strong reliability ratings form your working shortlist. Narrow this further by checking local inventory across dealerships using Autotrader, Cars.com, or CarGurus to understand pricing variations and availability in your area. Regional price differences are substantial-the same 2022 Toyota Camry might cost 22,000 dollars in one state and 19,500 dollars in another depending on supply and demand. Focus on local dealers first since 44 percent of buyers travel no more than 5 miles to purchase, according to Demand Local research, meaning you can negotiate better when you’re nearby and ready to act quickly. With your shortlist finalized and pricing data in hand, you’re prepared to move into the actual buying process where test drives and inspections separate the right vehicle from the wrong one.

How to Lock In the Right Deal

Prepare Your Documentation and Approach

Arrive at the dealership with research, pre-approval, and a shortlist in hand so you act decisively rather than emotionally. Bring your driver’s license, proof of insurance, and documentation of your pre-approval offer to every dealership visit. If you’re trading in a vehicle, gather the title and registration beforehand so paperwork flows smoothly. This preparation eliminates delays and signals to dealers that you’re a serious buyer ready to move forward.

Checklist of documents to bring when visiting a car dealership. - car buying checklist

Test Drive and Inspect Thoroughly

The test drive matters far more than most buyers realize. Spend at least 30 minutes on both highway and city streets to assess acceleration, braking, handling, and how all the features actually function in real conditions. A car that feels fine during a 10-minute loop around the dealership often reveals problems during genuine driving. Listen for unusual noises, check blind spots, test the infotainment system, and pay attention to how the vehicle responds to your inputs. Some problems only surface when you’re merging on a highway or navigating tight parking situations.

For any used vehicle, hire an independent mechanic inspection before you commit. This evaluation helps you assess the condition of the car and prevents purchasing a vehicle with hidden mechanical problems that could cost thousands to repair. The inspection report gives you concrete leverage during negotiations because issues become objective facts rather than disagreements about condition.

Negotiate From a Position of Strength

Negotiation starts with knowing your walk-away price before you enter the dealership. Use your pre-approval amount, the vehicle’s Kelley Blue Book value for its specific year and mileage, and any comparable sales data from your local market to anchor a reasonable offer. According to DAS Technology’s Lead Response Study from 2025, dealers who respond to inquiries within five minutes are 21 times more likely to convert sales, which means they’re motivated to move quickly. Use this to your advantage by obtaining multiple quotes and letting dealers know you’re comparing offers.

Start negotiations from a data-backed position rather than the sticker price. Focus on the out-the-door price including taxes and fees rather than monthly payments, and understand your trade-in value separately so you’re not confused during discussions. Never let emotions override your budget or credit score research-the wrong car at a high interest rate will drain your finances for years.

Review and Sign the Final Paperwork

Before signing any paperwork, review every line of the contract and verify that all numbers match your negotiated price. Confirm the vehicle identification number matches your test-drive vehicle, and check that promised warranties or incentives appear in writing. Sign only when everything aligns with your pre-approval terms and your 20/3/8 budget rule still holds true.

Final Thoughts

Before you sign the paperwork, verify that every number on the contract matches your negotiated price and that all promised warranties or incentives appear in writing. Confirm the vehicle identification number matches the car you test-drove, and check that your financing terms align with your pre-approval. Walk away if anything feels rushed or doesn’t match your budget.

The most common mistakes happen when buyers skip steps in their car buying checklist. Skipping the pre-approval leaves you vulnerable to dealer financing that costs thousands more, ignoring insurance quotes means you discover after purchase that your dream car carries premiums you can’t afford, and rushing the inspection or test drive surfaces problems only after you’ve signed. Letting emotions override your 20/3/8 budget rule leads to payments that strain your finances for years.

After you buy, secure your car insurance immediately and review the maintenance schedule in your owner’s manual. Follow the recommended service intervals to protect your investment and maintain reliability. Keep all receipts and service records because they document the vehicle’s condition and support its resale value later, and visit our resources on major purchases to explore how we guide people through life transitions with clarity and confidence.


Publisher’s Note: LifeEventGuide is an independent educational publisher. Some articles reference tools or services we recommend to help readers explore options related to major life transitions. Learn more about how we make recommendations here.

Pet Suitability Checklist: Matching Your Family With the Right Companion

Getting a pet is one of life’s biggest decisions, and it deserves real thought before you bring an animal home. The wrong match between your family and a pet leads to stress, expense, and heartbreak for everyone involved.

At LifeEventGuide, we’ve created this pet suitability checklist to help you match your actual life with the right companion. Honest answers about your schedule, budget, and living space make all the difference.

Your Schedule Determines Pet Compatibility

Your daily schedule is the single most important factor in choosing the right pet, and most people underestimate how much time pets actually need. If you work ten hours a day and travel frequently, adopting a highly social dog breed like a Vizsla or Labrador Retriever will lead to separation anxiety, destructive behavior, and a miserable animal. Dogs left alone for more than four hours at a time regularly develop anxiety and may start chewing furniture, having accidents indoors, or barking excessively. Certain breeds like Vizslas are so attached to their owners that they struggle significantly when left alone. If your work schedule keeps you away that long, you need either a pet sitter, dog walker, or a breed known for independence like a Basset Hound or Greyhound, which can handle longer stretches alone more comfortably. Cats are far more independent than dogs and can manage eight to ten hours alone without major issues, though they still need daily interaction and mental stimulation. Small animals like hamsters and guinea pigs require daily cage cleaning and feeding but minimal time commitment beyond that, making them realistic for busier households.

Visualization of daily time requirements for dogs, cats, and small animals - pet suitability checklist

Home Size Limits Your Pet Options

Your living space directly limits which pets are practical for your family. Large breeds like Labrador Retrievers and Golden Retrievers typically need at least a medium-sized home with outdoor space to prevent weight gain and behavioral problems from insufficient exercise. A Labrador confined to a small apartment without regular access to a yard or nearby park will develop frustration and weight issues that cost thousands in veterinary care over their lifetime. Apartments work best for smaller breeds like French Bulldogs, Cavalier King Charles Spaniels, or Greyhounds, which adapt well to limited space despite their varying exercise needs. Cats and small animals require minimal square footage and actually prefer contained environments where they feel secure. Giant breeds like Great Danes need more space than their size suggests because they’re prone to hip dysplasia and joint problems, requiring careful movement and frequent position changes, so cramped quarters accelerate their health decline. If you’re renting, verify your lease allows pets and understand any size or breed restrictions before falling in love with a dog you cannot legally keep.

Travel and Work Commitments End Many Pet Relationships

Extended travel or unpredictable work schedules are relationship killers for pets. If you travel more than three weeks per year or work irregular hours that shift your availability week to week, pet ownership becomes a logistical nightmare that costs money and creates stress. Dog boarding costs between $40–$50 a night or day on average, and some pets struggle with the stress of unfamiliar environments, returning home anxious or sick. If your job requires frequent overnight travel, a pet that depends on you is unfair to the animal. Some people think they can manage with a pet sitter, but most sitters provide only thirty minutes of daily care, which is insufficient for high-energy dogs needing two hours of exercise. If your work situation is unstable or your schedule changes regularly, wait until your life stabilizes before bringing a pet into it. Cats tolerate occasional absences better than dogs if you arrange daily check-ins, but they still need consistency and routine to feel secure.

Next: Understanding What Different Pets Actually Cost

Once you’ve honestly assessed your schedule and living space, the next step is understanding the financial reality of pet ownership. Different species and breeds carry vastly different costs-not just for food and basic supplies, but for veterinary care, grooming, and unexpected emergencies that can strain your budget significantly.

What Different Pets Actually Cost

Dogs occupy 38 percent of American households, but they rank as the most expensive companion you can bring home. A medium-sized dog costs between $1,500 and $3,000 in the first year alone when you factor in adoption fees, vaccines, microchipping, spaying or neutering, food, toys, and basic supplies.

Percentage of American households that own dogs

After that first year, annual costs drop to $500–$1,500 depending on breed size and health needs, but emergency veterinary care can spike costs dramatically. A single emergency surgery or extended illness runs $2,000–$10,000, which is why pet insurance matters if your budget is tight. Professional grooming for long-haired breeds like Poodles or Shih Tzus costs $50–$100 every six to eight weeks, adding up to $5,000–$10,000 over the dog’s lifetime.

Lifespan and Size Shape Your Total Investment

Giant breeds like Great Danes have shorter lifespans of seven to ten years but compress those costs into a shorter window, while small breeds live twelve to sixteen years, spreading expenses across more time. Cats cost significantly less at $800–$1,500 in the first year and $400–$800 annually afterward because they need no grooming, less food, and fewer behavioral interventions. Small animals like guinea pigs or rabbits cost $300–$600 initially and $200–$400 yearly, making them realistic for budget-conscious families, though they require daily cage maintenance that many people underestimate.

Health Risks and Breed-Specific Conditions

Breed-specific traits directly determine your actual spending beyond food and routine care. Golden Retrievers and Labrador Retrievers face hip dysplasia and cancer at elevated rates, requiring imaging, medications, and sometimes surgical intervention costing thousands. French Bulldogs and other flat-faced breeds struggle with breathing problems and ear infections, driving regular veterinary visits and medications. If you adopt from a shelter, ask staff about known health issues or behavioral needs before committing, because managing a dog with chronic anxiety or diabetes requires ongoing veterinary care and specialized food.

Energy Level and Grooming Demands

High-energy breeds like Border Collies, Siberian Huskies, and Dalmatians need sixty to ninety minutes of daily exercise plus consistent mental stimulation, which means you’re either investing your time or paying for dog walkers and training classes that add $50–$200 monthly. Hypoallergenic breeds like Poodles need professional grooming every four to six weeks to prevent matting, while short-haired breeds like Basset Hounds need minimal grooming but shed heavily and require frequent vacuuming and lint rolling.

Independence and Behavioral Needs

Independent breeds like Greyhounds or Basset Hounds tolerate longer alone periods without behavioral fallout, reducing your need for paid dog walkers, while clingy breeds demand constant attention or develop separation anxiety. Your honest assessment of which traits matter most-energy level, grooming time, health risks, independence, or temperament-directly shapes whether pet ownership fits your budget and lifestyle realistically. Once you understand the financial picture, the next step involves matching these costs and care demands against your family’s actual capacity to provide them.

Ready to Choose Your Pet

Match Your Life Against Pet Demands

Stop making pet decisions based on emotion and start using a structured comparison that matches your actual life against realistic pet demands. Create a simple three-column chart on paper or a spreadsheet where you list each pet you’re considering, then rate how well your schedule, home, and budget align with that pet’s needs on a scale of one to five, with five being a perfect fit. If a dog scores a two for schedule compatibility because you work nine hours daily, no amount of love changes that reality, and adopting it anyway guarantees failure. Most people skip this step entirely and wonder why their new pet becomes a source of stress within months.

The pets that thrive in your home are the ones where your lifestyle creates at least a four or five across all three categories: schedule, space, and financial capacity. Your living space plays a significant role in determining the suitable canine companion, so if you’re comparing a French Bulldog against a Border Collie for an apartment with a busy work schedule, the math is obvious before you ever visit a shelter. Write down the specific daily hours you can dedicate to exercise and play, your actual monthly budget surplus after rent and food, and the square footage of your living space. These numbers eliminate guesswork and prevent adoption regret.

Invest Upfront to Prevent Larger Expenses Later

Once you know which pet type fits, spend money upfront to prevent far larger expenses later. Budget for your first year with a dog, which covers adoption fees, initial veterinary care, spaying or neutering, quality food, a bed, toys, and a collar with ID tag. Many people cheap out on initial supplies and end up replacing items repeatedly, wasting money in the process.

Invest in a sturdy crate for training and safety, quality food appropriate to your dog’s age and size, and basic tools to reduce professional grooming costs. Set aside $500 minimum as an emergency fund for unexpected veterinary issues, because a single UTI or ear infection costs $300 to $500 at most clinics. Pet insurance runs $20 to $50 monthly depending on breed and age, and it protects you against catastrophic bills if your dog develops a chronic condition or requires surgery.

Establish Veterinary Care and Health Baselines

Before your pet arrives home, identify a veterinary clinic within ten minutes of your house and schedule an initial exam within one week of adoption. An early veterinary visit establishes a health baseline for your pet and detects hidden health concerns early, preventing complications that cost thousands later. This step matters more than most people realize because early detection prevents expensive problems from developing.

Prepare Your Home for Safe Pet Integration

Prepare your home by removing toxic plants like lilies and sago palms, securing electrical cords, and storing medications and cleaning supplies out of reach. Designate a quiet space where your pet can retreat when stressed.

Checklist of steps to prepare your home before bringing a pet home - pet suitability checklist

Install baby gates if you have children under twelve to create safe zones where your pet can rest undisturbed.

Stock food and water bowls, a bed or crate, appropriate toys for the species, and any breed-specific gear like a harness for a strong puller. Your family should agree on basic rules before the pet arrives so everyone enforces the same boundaries consistently. If your children have never lived with a pet, spend time at shelters or with friends’ animals to help them understand that pets are not toys and require gentle handling and respect for boundaries.

Final Thoughts

Choosing the right pet comes down to honest answers about your actual life, not the life you wish you had. Your schedule, home size, budget, and willingness to commit for ten to sixteen years determine whether pet ownership succeeds or fails. The pet suitability checklist you worked through in this guide matches you with an animal that will thrive in your home instead of becoming a source of regret and expense.

The families who keep their pets longest made decisions based on reality, not impulse. They knew their work hours before adopting a dog, measured their apartment before bringing home a large breed, and calculated their monthly budget before committing to ongoing costs. These steps take time, but they prevent the heartbreak of returning a pet to a shelter or watching an animal suffer in a mismatched home.

If you worked through this guide and your answers show a strong match between your life and a pet’s needs, you stand ready to move forward with confidence. We at LifeEventGuide believe that major life decisions like pet adoption deserve the same careful planning you apply to buying a home or starting a business-and our decision-making framework helps you navigate this transition with clarity and purpose.


Publisher’s Note: LifeEventGuide is an independent educational publisher. Some articles reference tools or services we recommend to help readers explore options related to major life transitions. Learn more about how we make recommendations here.

Inventory Before Moving: A Simple Step to Track Everything You Own

Moving day chaos is real. Between coordinating logistics and managing dozens of boxes, it’s easy to lose track of what you own and where it goes.

Here at LifeEventGuide, we’ve seen how a simple inventory before moving prevents lost items, speeds up unpacking, and protects you if something gets damaged. Taking an hour to document your belongings transforms your entire moving experience.

Why an Inventory Protects Your Move

Without documentation, you operate blind when items go missing or arrive damaged. Movers handle thousands of boxes monthly, and items disappear during transport more often than people realize. An inventory provides proof of what you owned, its condition before moving, and its approximate value. If a box never arrives or a piece of furniture shows up scratched, you have concrete evidence to file an insurance claim. Many homeowners insurance policies cover belongings during transit, but insurers won’t pay without documentation showing what was damaged and what it cost to replace.

Diagram showing how a moving inventory protects you with proof, value, and claim support. - inventory before moving

The National Association of Insurance Commissioners recommends photographing high-value items and keeping detailed records of serial numbers and purchase dates. Without this documentation, you’ll spend weeks arguing with your mover or insurer instead of settling into your new space.

Tracking What Actually Makes the Move

Boxes become difficult to locate the moment they start loading. A room-by-room inventory with box numbers lets you verify on moving day that nothing stayed behind and cross-check upon arrival that everything made it. This matters because moving companies report that approximately 1 in 10 boxes gets misplaced or delayed. When you arrive at your new home with a numbered list matching specific boxes to rooms, you can immediately spot gaps instead of discovering three weeks later that your kitchen supplies never showed up. This approach also helps your movers work more efficiently. When they see a detailed inventory listing what goes where, they understand the full scope of your move, handle items more carefully, and avoid overloading trucks. Color-coded boxes paired with a written inventory dramatically speeds unpacking because you’re not opening random boxes searching for essentials.

Insurance and Damage Documentation

Moving damage happens constantly, yet many people never recover their losses. Professionals understand that proving damage requires evidence collected before, during, and after transit. Take photos of valuable furniture from multiple angles, document any existing wear or scratches, and note the condition of electronics. Keep receipts and warranty information for items you want to insure. When something arrives damaged, compare the current condition to your photos and file a claim immediately with your moving company. Under federal law, the time period allowed for filing a claim cannot be less than 9 months from the date of delivery, so having your inventory and photos ready means you meet deadlines instead of missing them. This documentation transforms an inventory from a simple packing list into your financial protection, which is why the next step focuses on how to actually create one that works for your situation.

Building Your Moving Inventory

Choose Your Format Before You Start

You need to decide on format before you write anything down. Digital tools like Google Sheets, Sortly, or Move Advisor’s Home Inventory feature work best if you want searchability, automatic backups, and the ability to share your list with movers or insurers instantly. Sortly stores up to 8 photos per item and lets you tag serial numbers and warranty dates, which speeds up insurance claims significantly. Google Sheets costs nothing and syncs across your phone, tablet, and computer, so you can update your inventory in real time as you pack. Move Advisor estimates total volume, weight, and the number of boxes you’ll need based on what you input, which helps you understand truck capacity before you book movers.

Checklist of recommended inventory tools and what each does best. - inventory before moving

Paper works if you prefer something tactile and don’t worry about losing a physical list, but a hybrid approach works better: use an app to photograph items and record details, then print a summary for moving day when your phone battery might die.

Document Room by Room, Not by Category

Walk into your bedroom and photograph furniture and contents, then list what sits inside each drawer and closet. Move to your kitchen and repeat this process. This room-based approach prevents you from overlooking entire spaces and matches how your movers will load and unload trucks. Whichever method you choose, start with this room-by-room inventory documentation rather than organizing items by category.

Record Details That Matter for Insurance

For each item worth more than $100, record its description, color, brand, model number, and any existing damage or wear. Photograph electronics from multiple angles so you capture the serial number visible on the back or bottom. Include purchase price and the date you bought it if you have receipts, because insurers need this information to calculate replacement cost. Don’t photograph every sock or paperback book unless they’re genuinely valuable to you. Focus on furniture, appliances, electronics, artwork, and collections where replacement costs matter. Assign approximate values to high-value items based on what you’d pay to replace them today, not what you originally paid. A five-year-old refrigerator worth $300 today isn’t worth the $1,200 you paid originally. These realistic values help your insurer process claims faster and prevent disputes about item worth.

Track Boxes Through Loading and Arrival

Assign a box number to items as you pack and note what goes into each box on your inventory. Use a box numbering and tracking system by marking each box with a number so you can match it to your list. Color-code boxes by room using markers or colored tape, then match the colors to your digital notes. When movers load the truck, check off each box on your list to confirm nothing stayed behind. This simple step catches items left in closets or garages before the truck departs. Upon arrival at your new home, cross-check boxes against your inventory again. If a box never shows up, you have documentation proving it was packed and loaded, which strengthens any claim you file with the moving company.

Now that you’ve created your inventory and tracked items through the move, the next step focuses on what you actually do with this list once you arrive at your new address.

What to Do With Your Inventory Once You Arrive

Verify Items Against Your List Immediately

Your inventory doesn’t stop being useful the moment the last box enters your new home. Walk through each room with your inventory in hand and cross-check box numbers as items arrive. If a box never shows up, you have timestamped evidence from loading day proving it was packed and loaded-exactly what moving companies and insurers need to process claims. Most moving companies require damage or loss claims within 9 months of delivery, so having your inventory photos and condition notes ready means you file within that window instead of scrambling months later.

Three-step checklist to verify delivery, document damage, and file claims on time.

Document Damage Right Away

When you spot damage during unpacking, photograph the item in its current condition and compare it to your pre-move photos. This side-by-side documentation is what actually convinces insurers to pay out claims. If your refrigerator arrived with a dent, your photos showing it was damage-free before transport prove the moving company caused it. File claims immediately after you identify damage rather than waiting weeks or months.

Unpack Faster With Your Organized List

The unpacking process moves significantly faster when your inventory is organized by room and box number. Instead of opening random boxes hoping to find your kitchen supplies, you consult your list, locate box 47 labeled kitchen essentials, and go straight to it. This targeted approach cuts unpacking time by roughly half compared to the chaotic box-by-box method most people use. Keep your inventory accessible during the first two weeks after arrival, not packed away in a closet.

Catch Missing Items Before It’s Too Late

Many people discover missing items weeks later when they need something specific and can’t locate it. With your list handy, you catch these gaps immediately while you can still file claims. After unpacking completes, store your inventory in a digital format or a fireproof safe. This documentation remains valuable for years. Future moves become faster because you already know what you own and can reuse the same list. More importantly, your inventory serves as proof of possessions for insurance purposes long after moving ends. If a fire or theft occurs at your new home, you have detailed records with photos showing what you owned, its condition, and approximate value. This transforms a moving inventory into permanent household documentation that protects your financial security well beyond the move itself.

Final Thoughts

An inventory before moving transforms what feels like chaos into a manageable process. You’ve learned how documentation prevents lost items, protects you financially when damage occurs, and speeds up unpacking at your new home. The real power comes from having proof of what you owned, its condition before transit, and its value-information that matters most when something goes wrong.

Pick a format that works for you, whether that’s a simple Google Sheet, a dedicated app like Sortly, or pen and paper. Walk through your home room by room, photograph items worth more than $100, and note box numbers as you pack. Assign each box a number and color-code by room (this takes far less time than you’d expect).

Your movers work more efficiently because they understand the full scope of what they’re handling, you catch missing items immediately instead of discovering weeks later that something never arrived, and if damage occurs, you file claims confidently because you have timestamped photos proving what happened during transport. We at LifeEventGuide created guidance for major life transitions to help you define goals, set realistic timelines, and avoid common mistakes during moves and other significant changes.


Publisher’s Note: LifeEventGuide is an independent educational publisher. Some articles reference tools or services we recommend to help readers explore options related to major life transitions. Learn more about how we make recommendations here.

Cat Adoption Considerations: Essentials for a Successful Match

Bringing a cat into your home is a significant decision that affects both you and the animal for years to come. At LifeEventGuide, we know that cat adoption considerations go far beyond simply falling in love with a cute face at the shelter.

This guide walks you through the practical steps needed to find the right match between your lifestyle and a cat’s needs. We’ll help you assess your home, understand different cat personalities, and prepare for the financial and emotional responsibilities ahead.

Assessing Your Lifestyle and Home Environment

Your daily routine is the first reality check in cat adoption. Cats require consistent care, but the intensity depends entirely on which cat you choose. If you work nine to five with a predictable schedule, you can support an adult cat comfortably. Adult cats aged one to ten years typically have established personalities and often handle alone time well, especially if they’re independent types. However, if your schedule is erratic or you travel frequently, a high-energy kitten will struggle. Kittens up to one year old demand supervision, interactive play, and attention multiple times daily. They cannot remain alone for extended periods without developing behavioral problems or getting into dangerous situations.

Age groups and care needs for cats in U.S. homes - cat adoption considerations

A kitten in a home where everyone works full-time often becomes destructive or anxious. Senior cats aged ten years and older actually thrive in stable, quieter homes where someone is around regularly. They need consistent routines and gentle handling, but they don’t demand the active engagement that younger cats do. The rule is straightforward: match the cat’s energy to your availability, not the other way around.

Space Requirements Vary Less Than You Think

Apartment living works perfectly fine for cats. You don’t need a sprawling house. What matters far more is vertical space and mental stimulation. Cats feel secure when they can climb and observe from high vantage points, so cat trees and wall-mounted shelves are more valuable than square footage. A small apartment with enrichment beats a large house with nothing to do. Provide one litter box per cat plus one additional box, and keep them separated from food and water bowls. In smaller homes, this spacing becomes more challenging but still manageable with thoughtful placement. Loud environments stress some cats, so if your home is consistently noisy with young children or frequent guests, seek a calm, tolerant cat specifically. Conversely, if you have a quiet household, a nervous or shy cat may flourish. The physical environment matters less than the atmosphere you create.

Your Energy Aligns with Cat Selection

High-energy people often assume they want high-energy cats, but this creates friction. Active, playful cats demand constant interactive engagement with toys and games. If you’re genuinely willing to dedicate thirty to forty-five minutes daily to structured play, this works. Most people aren’t. Moderate-energy cats balance play with independence, making them suitable for busy families who want engagement without constant demands. Low-energy cats are content with quiet homes, long naps, and gentle interactions. They’re ideal for people with lower activity levels or health limitations. Shelter staff can describe cat temperament if you ask specific questions about how each cat behaves around people, how much they sleep, and what triggers their play response. Spend actual time with potential cats at the shelter before adopting. Observe whether a cat approaches you, hides, or ignores you. This behavior reveals compatibility far better than any description. Once you understand your schedule, space, and energy level, you’re ready to explore which cat personalities and breeds align with your household dynamics.

Understanding Cat Personality Types and Health Needs

Active Cats Demand Real Commitment

Cat personality falls into three distinct categories, and understanding where a cat lands determines whether adoption succeeds or fails. Active and playful cats are genuinely demanding. These cats zoom around, pounce on toys, and seek constant interaction. They won’t nap all day contentedly. They need two or three 10- to 15-minute play sessions a day, depending on their age and energy level. If you cannot commit this time consistently, an active cat will become destructive, scratch furniture aggressively, and develop behavioral problems. Shelter staff can tell you exactly which category a specific cat fits into if you ask how much the cat sleeps, whether it approaches visitors, and what triggers its play response.

Calm and Independent Cats Thrive Alone

Calm and independent cats occupy the opposite end of the spectrum. They’re content with quiet environments, minimal handling, and long stretches alone. These cats do well in homes where people work full-time. They don’t require constant engagement. Moderate-energy cats fall between these extremes. They enjoy play but also respect alone time. They’re genuinely the easiest match for most households because they adapt to busy schedules without becoming anxious or destructive.

Visualizing active, moderate, and calm cat types with tips

Spend fifteen to twenty minutes observing a potential cat at the shelter. Does it approach you or hide? Does it engage with toys staff offer? This real-world observation beats any personality description. Physical traits offer hints too. Long-haired, round-headed cats tend toward calm temperaments, while lean, short-haired cats often display higher activity levels and more demanding behaviors.

Age Shapes Health Risks and Care Needs

Health considerations shift dramatically based on age and breed background. Senior cats over ten years old may experience arthritis, dental disease, hearing and vision loss, and other age-related conditions. They need softer food, easier litter box access with lower sides, and regular veterinary check-ups at least twice yearly. Kittens require vaccinations, deworming, and spaying or neutering before adoption, which shelters typically handle. However, newly adopted cats from shelters face higher health risks even when they appear healthy initially.

Common Health Issues in Newly Adopted Cats

Diarrhea strikes many newly adopted cats and stems from stress, food changes, or parasitic infections. A veterinary visit within the first few days, bringing a stool sample, identifies the cause. Respiratory infections and eye discharge appear frequently in shelter cats. Ringworm, a contagious skin disease, can be hard to spot in long-coated cats but shows up as scabs, bald patches, or scaling. Get veterinary treatment immediately if skin issues appear. Lack of appetite after adoption isn’t unusual but warrants evaluation if it persists beyond three days. Budget for a first vet visit costing one hundred to three hundred dollars depending on your location and what testing is needed. Establish a relationship with a veterinarian before bringing a cat home so you know where to go if problems emerge. Some breeds carry specific health predispositions, so ask shelter staff about the cat’s background and any known health concerns. The commitment to ongoing care, preventive medicine, and prompt attention to health changes separates successful adoptions from situations where people return cats to shelters. With personality and health factors now clear, your next step involves preparing your physical space and finances for the responsibilities ahead.

Preparing Your Home and Financial Planning

Stock Essential Supplies Before Adoption Day

The temptation to buy everything at a pet store is real, but most cat owners waste money on items they never use. Focus on what actually matters: one litter box per cat plus one extra, unscented litter, food and water bowls made from ceramic or stainless steel, quality food, a comfortable bed, a carrier for vet visits, and scratching posts. Cats need vertical space far more than horizontal clutter, so invest in a sturdy cat tree or wall-mounted shelves before you bring the cat home. Your cat will use these daily. Toys rotate weekly-four or five is enough-and you can make enrichment cost-effective with cardboard tubes, paper bags, or crumpled paper. Shelters often include spaying or neutering, initial vaccines, and microchipping in adoption fees, which typically range from fifty to one hundred fifty dollars depending on your location. This upfront cost saves you three hundred to five hundred dollars on these procedures elsewhere.

Cat-Proof Your Space Immediately

Before the cat arrives, cat-proof your space by securing electrical cords, removing small objects that could be swallowed, and eliminating loose items a curious cat might destroy. Open shelving becomes a hazard, so think vertically about what a climbing cat can access. Stock supplies before adoption day-don’t plan to shop after bringing the cat home when you are managing stress and adjustment. This preparation prevents accidents and reduces your stress during the critical first days.

Budget for Realistic Monthly and Annual Costs

Financial planning for cat ownership requires honesty about long-term costs, not just adoption fees. Food costs between twenty and forty dollars monthly depending on quality and whether you feed wet or dry food. Litter runs ten to twenty dollars monthly for unscented varieties. The first veterinary visit costs one hundred to three hundred dollars and should happen within the first few days of adoption.

Monthly and annual cost checklist for cat owners in the United States - cat adoption considerations

Annual wellness visits run one hundred fifty to three hundred dollars per cat. Unexpected medical issues in newly adopted shelter cats happen frequently-respiratory infections, parasitic treatments, or dental problems can cost three hundred to one thousand dollars without warning.

Plan for Emergency Medical Expenses

Cat insurance exists but varies widely in coverage and cost, starting around ten to twenty dollars monthly. Many people skip insurance and regret it when an adopted cat develops a health issue within the first year. Set aside at least five hundred dollars in emergency funds specifically for cat medical care. Senior cats need veterinary check-ups twice yearly instead of annually, doubling ongoing costs. Budget for enrichment supplies, grooming tools, nail clippers, and occasional replacement items like litter boxes or beds. Over two million cats are adopted annually, yet many adoptions fail because people underestimate the financial commitment. Create a dedicated budget line in your household finances for cat expenses before adoption, not after.

Final Thoughts

Successful cat adoption hinges on matching your lifestyle, home, and finances to a cat’s actual needs rather than an idealized version of pet ownership. The cat adoption considerations we’ve covered-your schedule, living space, energy level, the cat’s personality, health status, and financial capacity-work together to determine whether adoption succeeds or fails. Ignore any single factor and adoption struggles follow, whether that’s a beautiful kitten in a home where no one has time for interactive play or a senior cat adjusting to a chaotic household with young children.

Visit shelters with a clear picture of what you can realistically provide, and spend time with potential cats before making your decision. Ask shelter staff specific questions about behavior, energy level, and health background, then bring a stool sample to your first veterinary appointment and stock your home with essentials before adoption day. Set aside emergency funds (aim for at least five hundred dollars) to handle unexpected medical issues that commonly affect newly adopted shelter cats.

Building a long-term relationship with your new cat requires patience during the adjustment period, as cats from shelters may have unknown histories and feel overwhelmed initially. Create a quiet sanctuary room where your cat can retreat and feel secure, use positive reinforcement when your cat uses the litter box correctly or engages with appropriate toys, and establish consistent routines with regular feeding, play, and quiet time. We at LifeEventGuide understand that major life transitions like pet adoption require planning and clear decision-making, which is why our life event guides provide frameworks and checklists to help you navigate significant changes with confidence.


Publisher’s Note: LifeEventGuide is an independent educational publisher. Some articles reference tools or services we recommend to help readers explore options related to major life transitions. Learn more about how we make recommendations here.