

Moving day chaos is real. Between coordinating logistics and managing dozens of boxes, it’s easy to lose track of what you own and where it goes.
Here at LifeEventGuide, we’ve seen how a simple inventory before moving prevents lost items, speeds up unpacking, and protects you if something gets damaged. Taking an hour to document your belongings transforms your entire moving experience.
Why an Inventory Protects Your Move
Without documentation, you operate blind when items go missing or arrive damaged. Movers handle thousands of boxes monthly, and items disappear during transport more often than people realize. An inventory provides proof of what you owned, its condition before moving, and its approximate value. If a box never arrives or a piece of furniture shows up scratched, you have concrete evidence to file an insurance claim. Many homeowners insurance policies cover belongings during transit, but insurers won’t pay without documentation showing what was damaged and what it cost to replace.
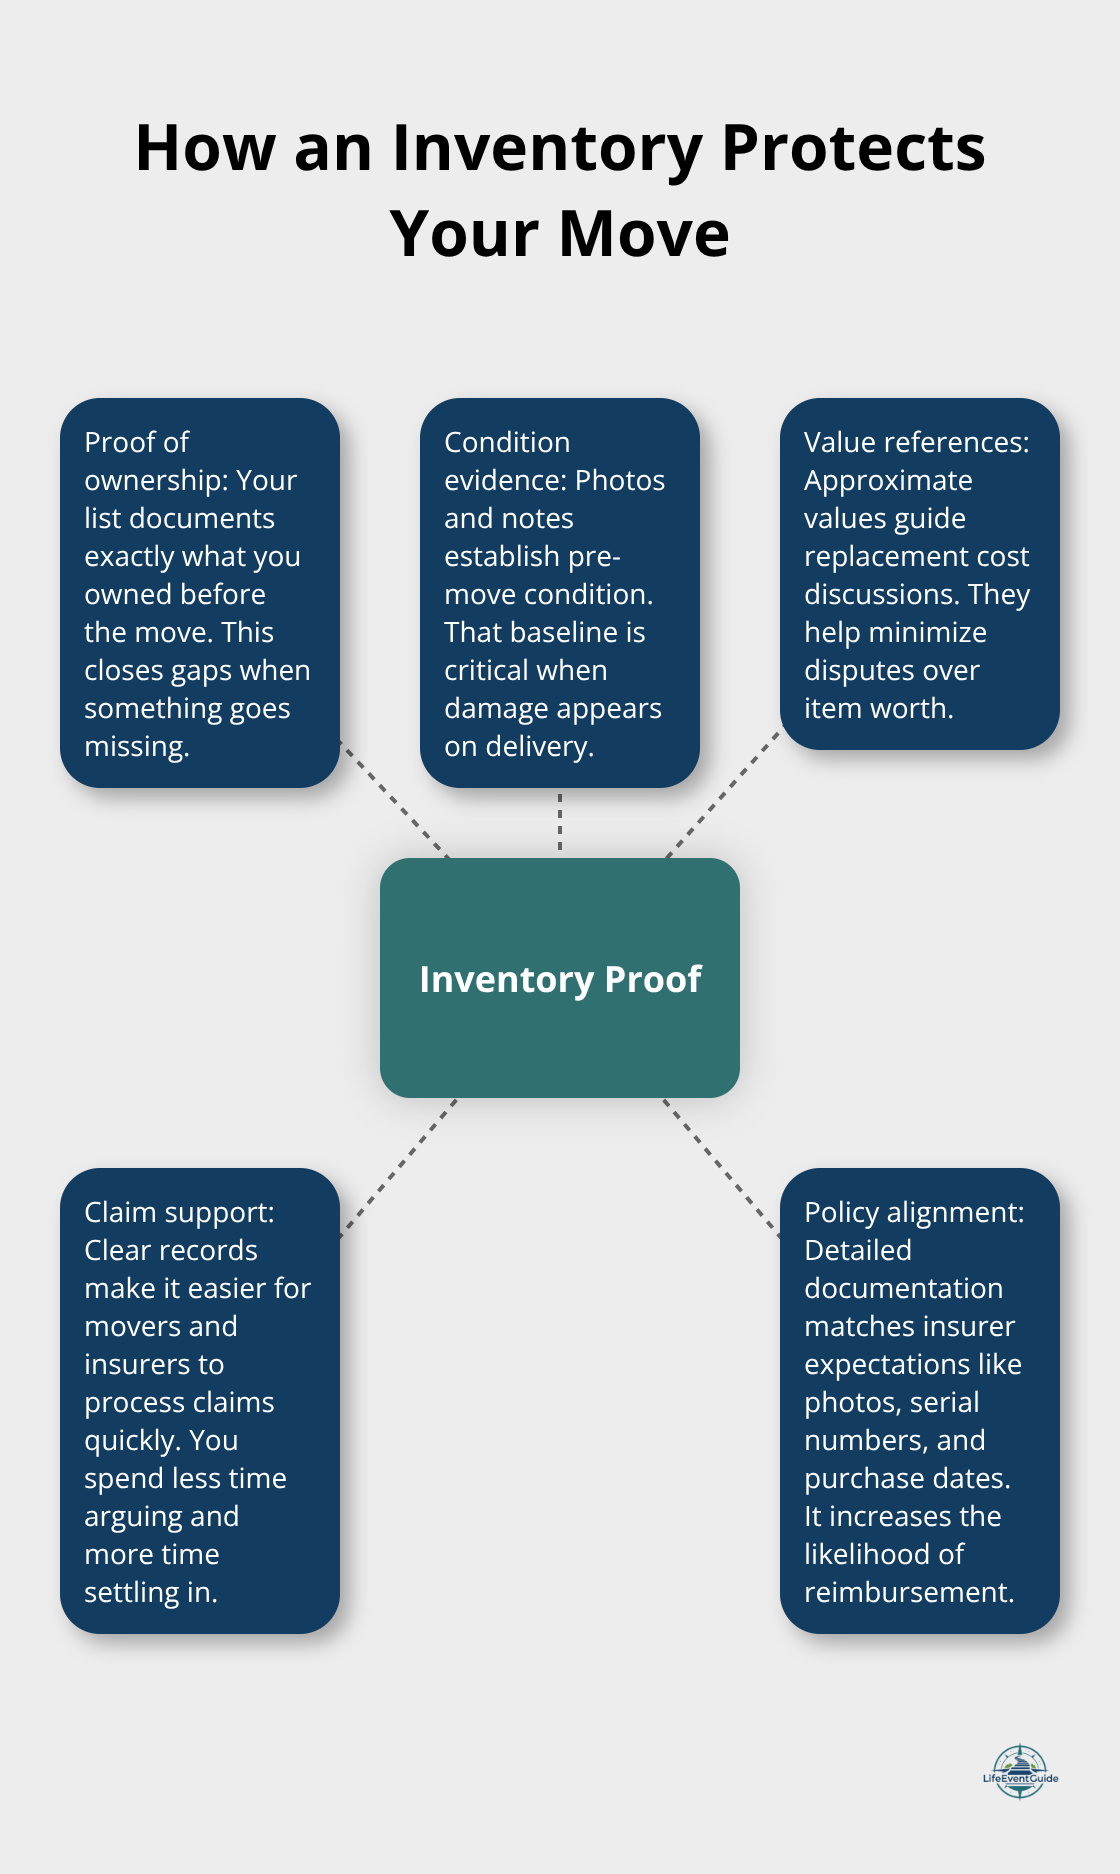
The National Association of Insurance Commissioners recommends photographing high-value items and keeping detailed records of serial numbers and purchase dates. Without this documentation, you’ll spend weeks arguing with your mover or insurer instead of settling into your new space.
Tracking What Actually Makes the Move
Boxes become difficult to locate the moment they start loading. A room-by-room inventory with box numbers lets you verify on moving day that nothing stayed behind and cross-check upon arrival that everything made it. This matters because moving companies report that approximately 1 in 10 boxes gets misplaced or delayed. When you arrive at your new home with a numbered list matching specific boxes to rooms, you can immediately spot gaps instead of discovering three weeks later that your kitchen supplies never showed up. This approach also helps your movers work more efficiently. When they see a detailed inventory listing what goes where, they understand the full scope of your move, handle items more carefully, and avoid overloading trucks. Color-coded boxes paired with a written inventory dramatically speeds unpacking because you’re not opening random boxes searching for essentials.
Insurance and Damage Documentation
Moving damage happens constantly, yet many people never recover their losses. Professionals understand that proving damage requires evidence collected before, during, and after transit. Take photos of valuable furniture from multiple angles, document any existing wear or scratches, and note the condition of electronics. Keep receipts and warranty information for items you want to insure. When something arrives damaged, compare the current condition to your photos and file a claim immediately with your moving company. Under federal law, the time period allowed for filing a claim cannot be less than 9 months from the date of delivery, so having your inventory and photos ready means you meet deadlines instead of missing them. This documentation transforms an inventory from a simple packing list into your financial protection, which is why the next step focuses on how to actually create one that works for your situation.
Building Your Moving Inventory
Choose Your Format Before You Start
You need to decide on format before you write anything down. Digital tools like Google Sheets, Sortly, or Move Advisor’s Home Inventory feature work best if you want searchability, automatic backups, and the ability to share your list with movers or insurers instantly. Sortly stores up to 8 photos per item and lets you tag serial numbers and warranty dates, which speeds up insurance claims significantly. Google Sheets costs nothing and syncs across your phone, tablet, and computer, so you can update your inventory in real time as you pack. Move Advisor estimates total volume, weight, and the number of boxes you’ll need based on what you input, which helps you understand truck capacity before you book movers.
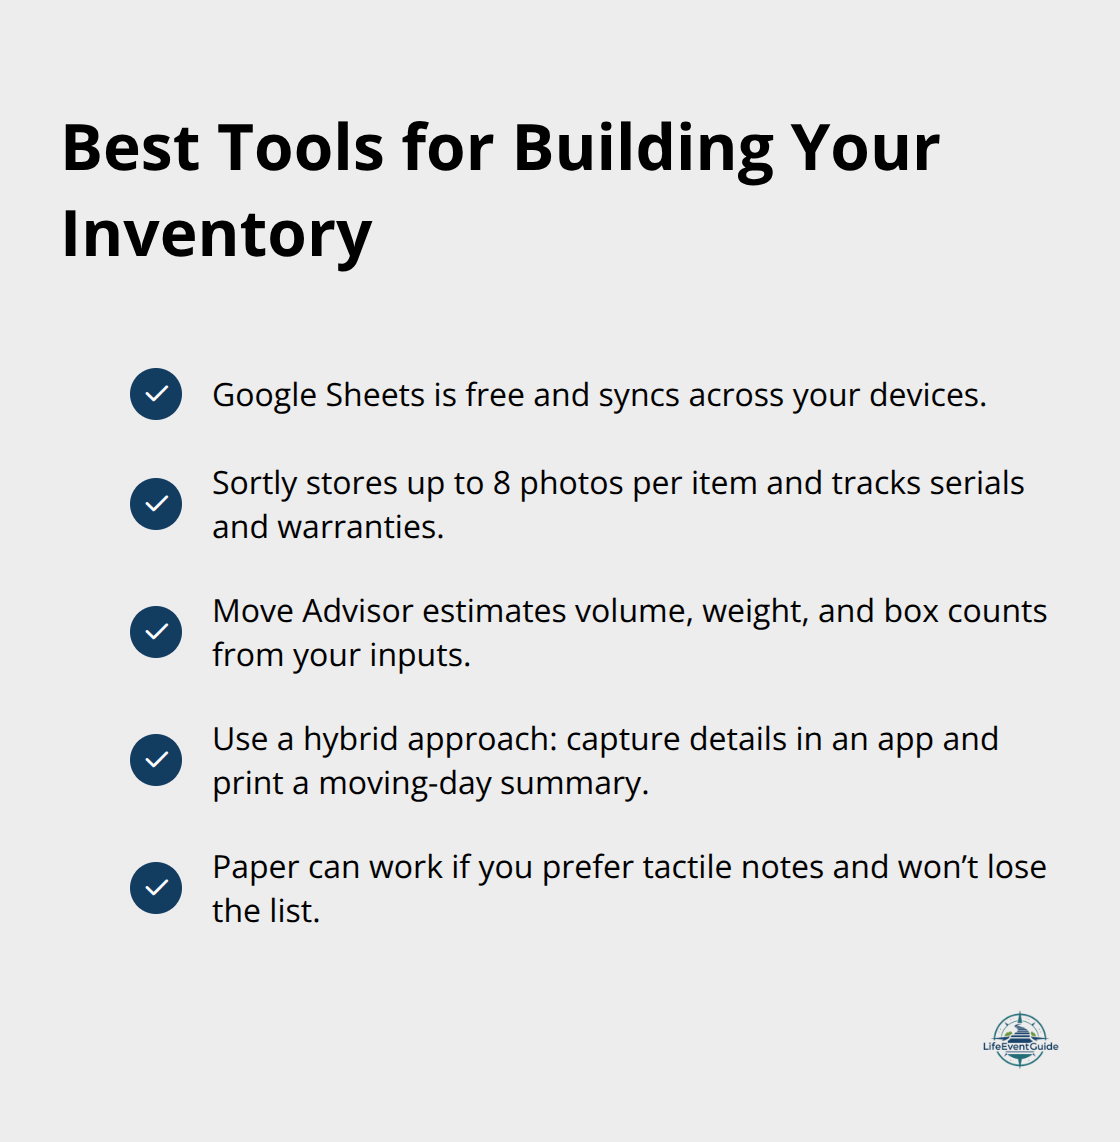
Paper works if you prefer something tactile and don’t worry about losing a physical list, but a hybrid approach works better: use an app to photograph items and record details, then print a summary for moving day when your phone battery might die.
Document Room by Room, Not by Category
Walk into your bedroom and photograph furniture and contents, then list what sits inside each drawer and closet. Move to your kitchen and repeat this process. This room-based approach prevents you from overlooking entire spaces and matches how your movers will load and unload trucks. Whichever method you choose, start with this room-by-room inventory documentation rather than organizing items by category.
Record Details That Matter for Insurance
For each item worth more than $100, record its description, color, brand, model number, and any existing damage or wear. Photograph electronics from multiple angles so you capture the serial number visible on the back or bottom. Include purchase price and the date you bought it if you have receipts, because insurers need this information to calculate replacement cost. Don’t photograph every sock or paperback book unless they’re genuinely valuable to you. Focus on furniture, appliances, electronics, artwork, and collections where replacement costs matter. Assign approximate values to high-value items based on what you’d pay to replace them today, not what you originally paid. A five-year-old refrigerator worth $300 today isn’t worth the $1,200 you paid originally. These realistic values help your insurer process claims faster and prevent disputes about item worth.
Track Boxes Through Loading and Arrival
Assign a box number to items as you pack and note what goes into each box on your inventory. Use a box numbering and tracking system by marking each box with a number so you can match it to your list. Color-code boxes by room using markers or colored tape, then match the colors to your digital notes. When movers load the truck, check off each box on your list to confirm nothing stayed behind. This simple step catches items left in closets or garages before the truck departs. Upon arrival at your new home, cross-check boxes against your inventory again. If a box never shows up, you have documentation proving it was packed and loaded, which strengthens any claim you file with the moving company.
Now that you’ve created your inventory and tracked items through the move, the next step focuses on what you actually do with this list once you arrive at your new address.
What to Do With Your Inventory Once You Arrive
Verify Items Against Your List Immediately
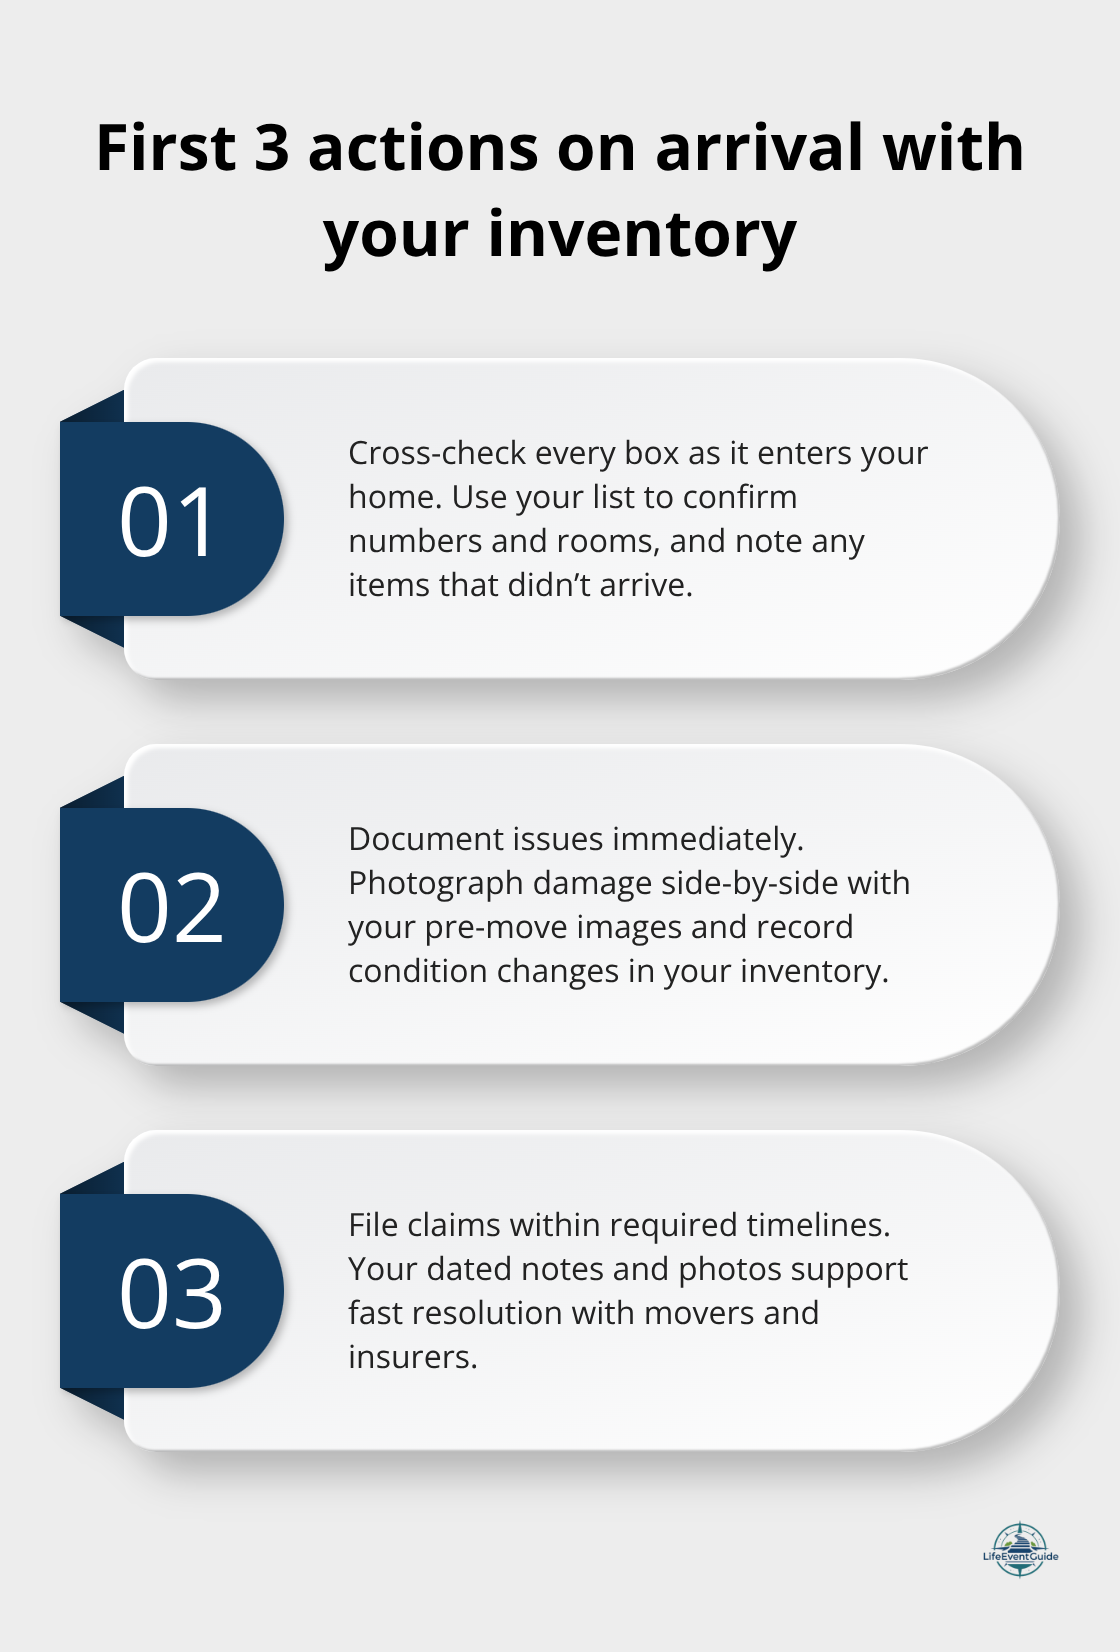
Your inventory doesn’t stop being useful the moment the last box enters your new home. Walk through each room with your inventory in hand and cross-check box numbers as items arrive. If a box never shows up, you have timestamped evidence from loading day proving it was packed and loaded-exactly what moving companies and insurers need to process claims. Most moving companies require damage or loss claims within 9 months of delivery, so having your inventory photos and condition notes ready means you file within that window instead of scrambling months later.
Document Damage Right Away
When you spot damage during unpacking, photograph the item in its current condition and compare it to your pre-move photos. This side-by-side documentation is what actually convinces insurers to pay out claims. If your refrigerator arrived with a dent, your photos showing it was damage-free before transport prove the moving company caused it. File claims immediately after you identify damage rather than waiting weeks or months.
Unpack Faster With Your Organized List
The unpacking process moves significantly faster when your inventory is organized by room and box number. Instead of opening random boxes hoping to find your kitchen supplies, you consult your list, locate box 47 labeled kitchen essentials, and go straight to it. This targeted approach cuts unpacking time by roughly half compared to the chaotic box-by-box method most people use. Keep your inventory accessible during the first two weeks after arrival, not packed away in a closet.
Catch Missing Items Before It’s Too Late
Many people discover missing items weeks later when they need something specific and can’t locate it. With your list handy, you catch these gaps immediately while you can still file claims. After unpacking completes, store your inventory in a digital format or a fireproof safe. This documentation remains valuable for years. Future moves become faster because you already know what you own and can reuse the same list. More importantly, your inventory serves as proof of possessions for insurance purposes long after moving ends. If a fire or theft occurs at your new home, you have detailed records with photos showing what you owned, its condition, and approximate value. This transforms a moving inventory into permanent household documentation that protects your financial security well beyond the move itself.
Final Thoughts
An inventory before moving transforms what feels like chaos into a manageable process. You’ve learned how documentation prevents lost items, protects you financially when damage occurs, and speeds up unpacking at your new home. The real power comes from having proof of what you owned, its condition before transit, and its value-information that matters most when something goes wrong.
Pick a format that works for you, whether that’s a simple Google Sheet, a dedicated app like Sortly, or pen and paper. Walk through your home room by room, photograph items worth more than $100, and note box numbers as you pack. Assign each box a number and color-code by room (this takes far less time than you’d expect).
Your movers work more efficiently because they understand the full scope of what they’re handling, you catch missing items immediately instead of discovering weeks later that something never arrived, and if damage occurs, you file claims confidently because you have timestamped photos proving what happened during transport. We at LifeEventGuide created guidance for major life transitions to help you define goals, set realistic timelines, and avoid common mistakes during moves and other significant changes.
Publisher’s Note: LifeEventGuide is an independent educational publisher. Some articles reference tools or services we recommend to help readers explore options related to major life transitions. Learn more about how we make recommendations here.