

Selling your home while managing packing and moving is one of life’s most demanding transitions. You’re juggling real estate timelines, showing schedules, and logistics all at once, which makes a home sale moving checklist essential to stay organized.
At LifeEventGuide, we’ve seen how coordinating these three moving parts prevents costly mistakes and reduces stress. This guide walks you through a practical system that keeps your sale, packing, and moving aligned from start to finish.
Start With Your Home’s Real Value
Price Your Home Based on Market Data, Not Wishful Thinking
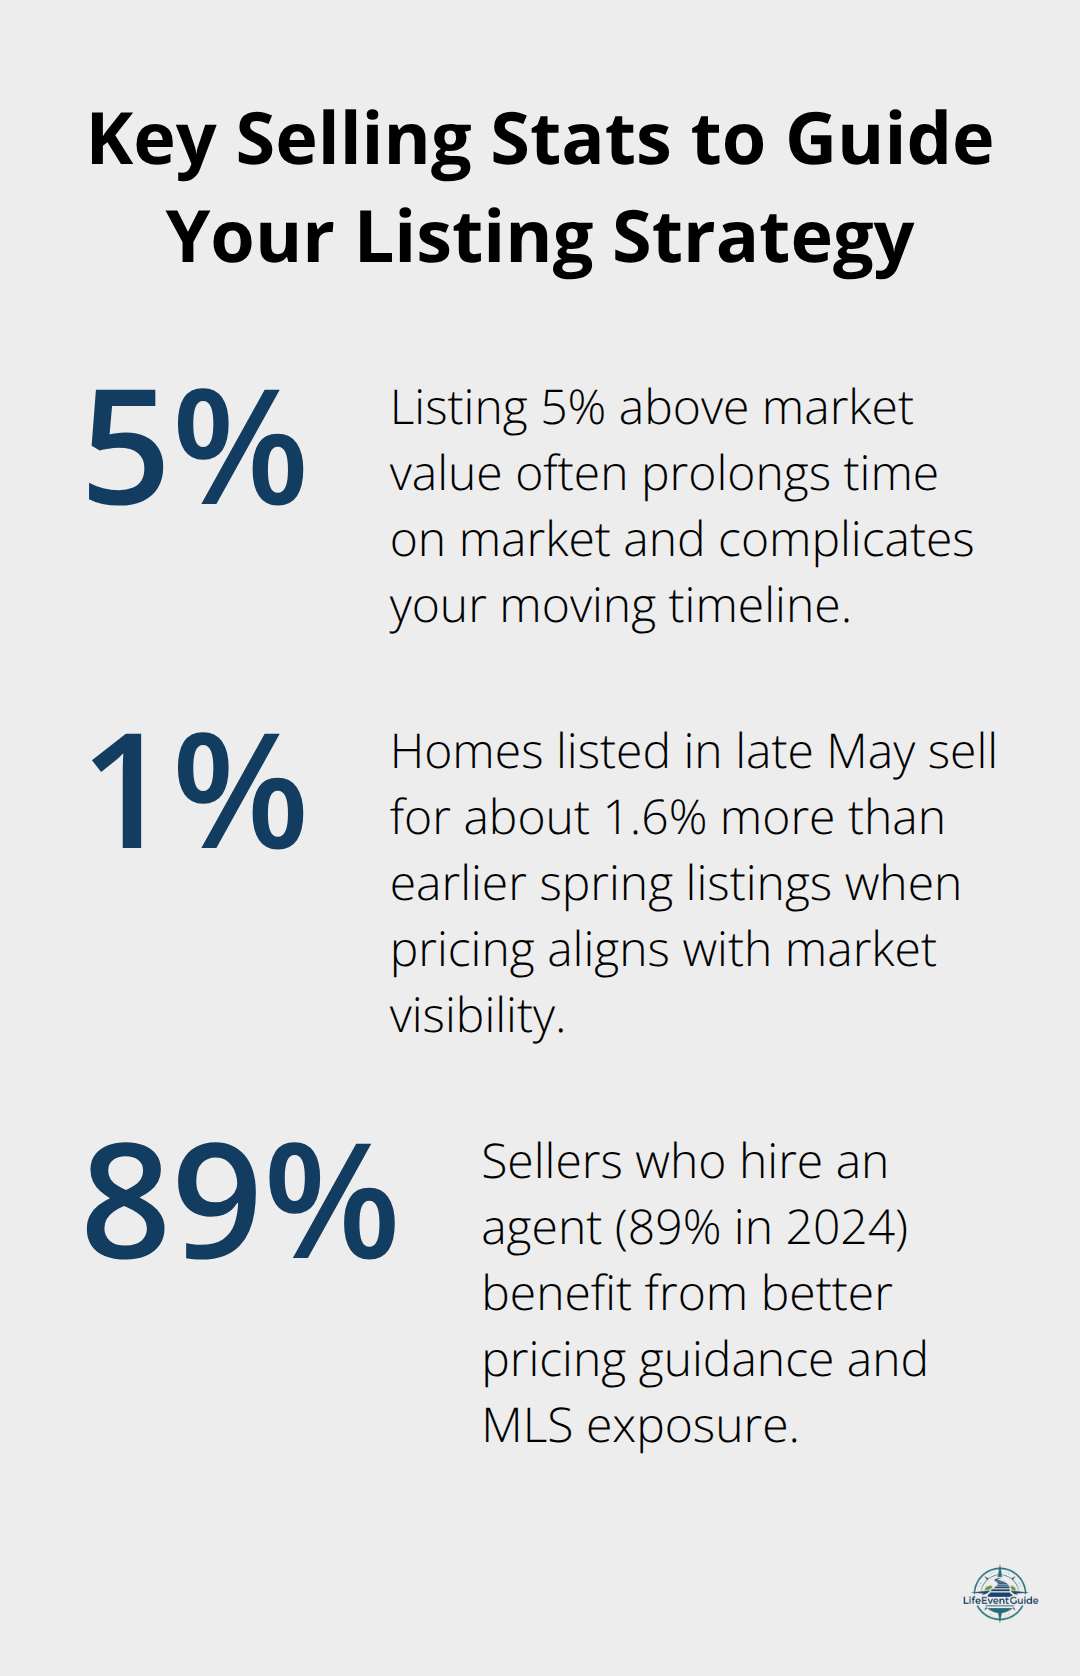
Getting your price right matters more than most sellers realize. According to Zillow’s 2024 data on home listing timing, homes listed in late May sell for about 1.6% more than those listed earlier in spring, but that advantage disappears fast if your asking price doesn’t match what buyers actually see in the market. Pull sold comparables on Zillow for homes similar to yours in size, location, age, condition, and recent upgrades. Your real estate agent will order a formal appraisal later, but using local sold data now prevents you from pricing too high and sitting on the market for months. Overpriced homes rarely attract serious offers, even with price cuts later.
If you list at 5% above market value, you’ll spend extra weeks competing against better-priced homes while your moving timeline stretches. 89% of sellers hired a real estate agent in 2024 according to Zillow, and interviewing multiple agents helps you ground your price in reality and maximize MLS exposure. Ask each agent what homes like yours sold for in the last 30 to 60 days, not what they think you can get.
Focus on Affordable Cosmetic Fixes, Not Full Renovations
Before listing, focus on affordable cosmetic fixes rather than full renovations. Tackle sticking cabinets, freshen paint in neutral colors, fix leaks, and replace broken fixtures where they have the highest impact on buyer perception. Skip the kitchen remodel or master bath overhaul unless your market demands it. These high-cost projects rarely return their full investment and consume time you don’t have during a sale.
Work Backward From Your Expected Closing Date
Plan your move-out date backward from when you expect to close, typically 30 to 45 days after listing in an active market. This backward timeline prevents you from packing too early and disrupting showings, or waiting too late and scrambling at the last minute. Work backward from your expected closing date by coordinating with your agent on the expected closing date, factoring in any contingencies or inspections, and building in buffer time for closing delays (spring markets move faster than winter ones, so your timeline shifts based on season).
Once you know your target closing date, you can schedule repairs, arrange for utilities to disconnect and reconnect, and plan when decluttering and packing actually start without creating a chaotic overlap between showings and moving logistics. This single master date becomes the anchor for every other decision you make about packing and moving.
Sync Your Sale Timeline With Packing Phases
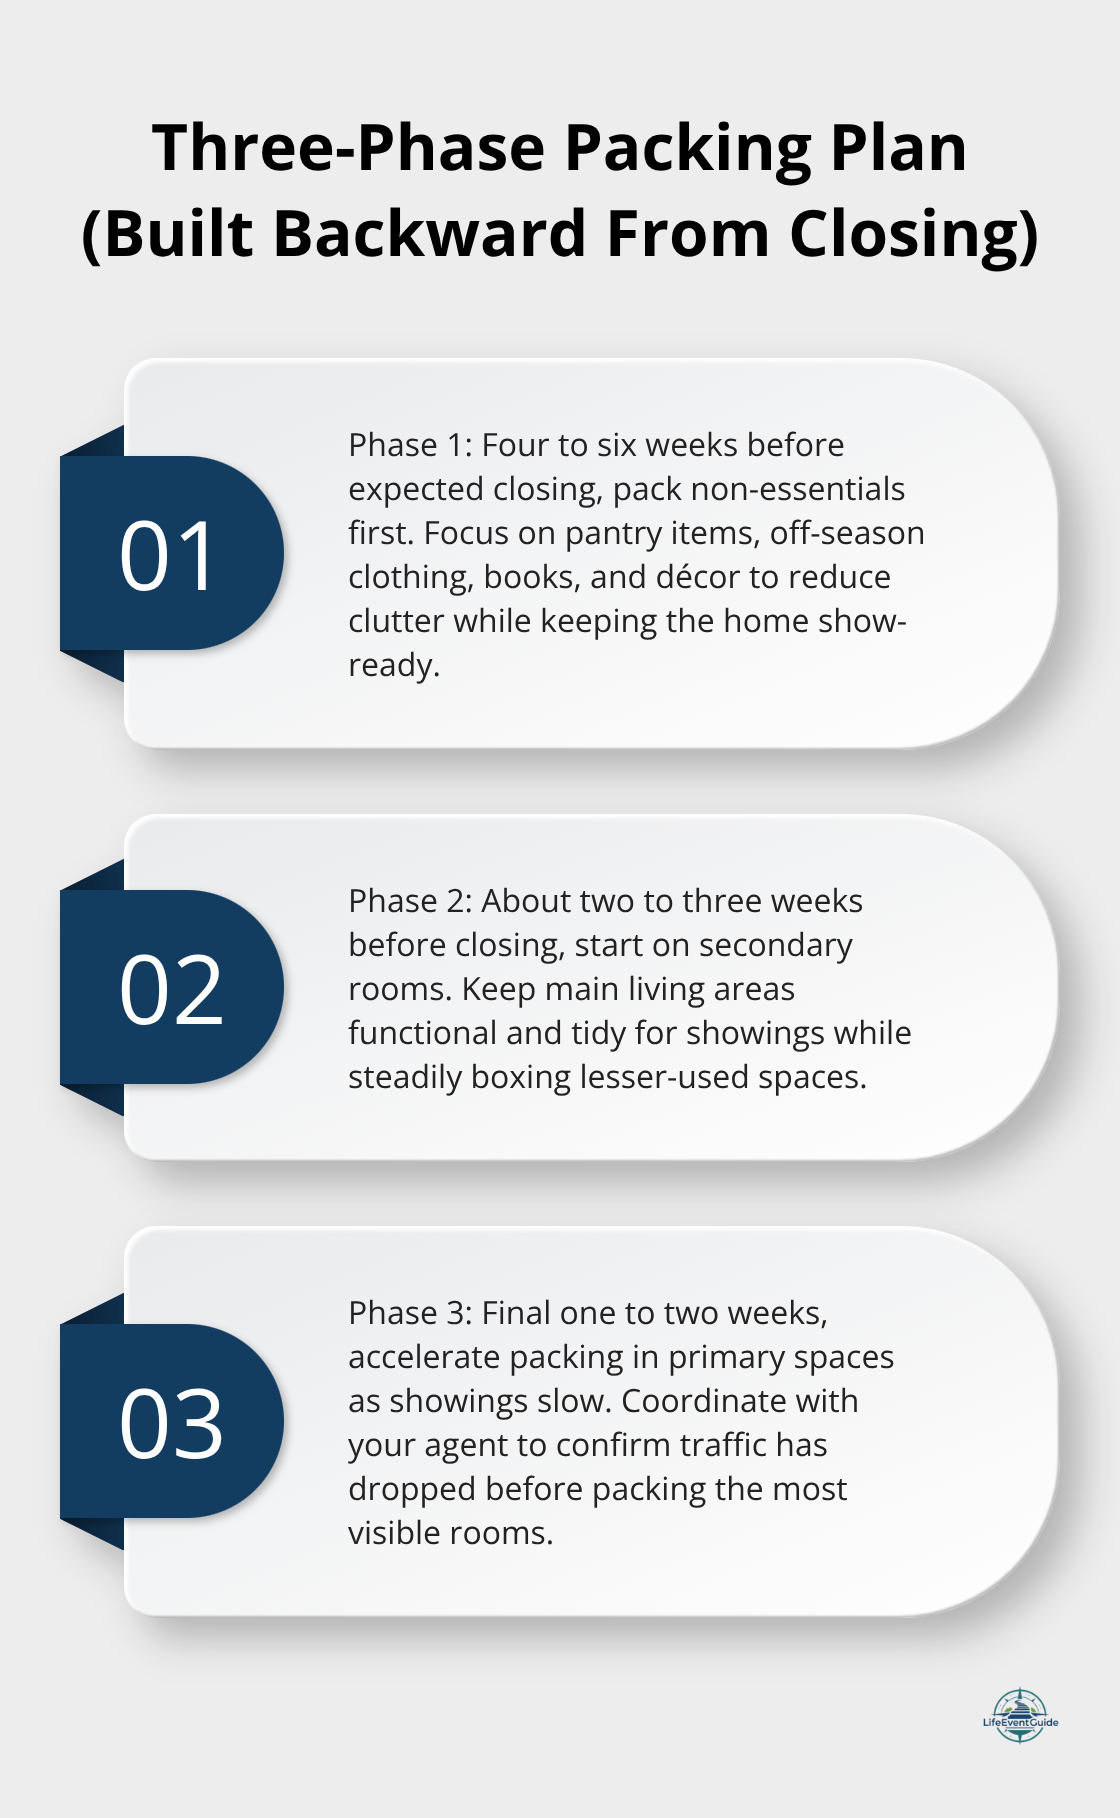
The gap between listing your home and closing can range from 20 days in a hot market to 90+ days in slower conditions, and this unpredictable window causes most sellers to pack too early or wait too long. Your real estate agent can estimate your local time-to-pending based on recent sales data for your neighborhood, so ask for that number before you create your packing schedule. Once you know whether you’ll likely close in 30 days or 60 days, build your packing phases backward from closing day, not from listing day. Start packing non-essential items four to six weeks before your expected closing, which gives you buffer time without cluttering your home during the critical showing period. Pack your kitchen pantry, off-season clothes, books, and decorative items first since buyers rarely care about these spaces. Keep your living areas, bedrooms, and bathrooms visibly uncluttered but still lived-in during showings, which means holding off on packing these spaces until two to three weeks before closing. This staggered approach prevents the common mistake of boxing everything up immediately after listing, only to have your home look staged and uninviting to buyers who want to picture themselves living there.
Declutter to Boost Sale Appeal and Cut Moving Costs
Decluttering serves double duty during a home sale: it makes your home more attractive to buyers and reduces moving volume, which lowers your moving costs. Homes that look spacious and uncluttered show better to buyers, so tackle this before you list. Sort your belongings into four categories: keep, donate, sell, and discard. Items you plan to sell on Facebook Marketplace or Craigslist should move quickly since you need the space back, so list high-value items like furniture or electronics within the first week after listing. Donate or discard the rest within two weeks to avoid letting clutter pile up while your home sits on the market.
Moving companies charge by volume or weight, so every item you remove now saves you money later. The average cost to move a 3-bedroom house long-distance ranges between $2,300 and $9,600, depending on distance, weight, packing, and more, and reducing that volume through aggressive decluttering can save you hundreds of dollars. This financial incentive alone justifies spending time on decluttering early rather than moving items you don’t actually want in your new home.
Batch Showings to Protect Your Packing Progress
Ask your agent to batch showings into specific windows rather than spreading them throughout the week, which allows you to pack strategically without constant disruption. If your agent can schedule most showings on weekends or specific weekday afternoons, you can pack intensively on other days without worrying that buyers will arrive to find boxes stacked in hallways. Communicate clearly with your agent about which rooms you’re actively packing and when, so they can guide showings away from heavily boxed areas.
Keep your master bedroom, kitchen, and main living spaces show-ready at all times, even if you’re packing the guest bedroom or basement. Maintain a quick-clean routine the night before and morning of any showing day, which takes 30 to 45 minutes and keeps your home market-ready without requiring a professional stager to return. This coordination between your agent’s showing schedule and your packing timeline prevents the frustration of unpacking items you just boxed because a showing came up unexpectedly.
Prepare for the Final Showing Phase
As your closing date approaches, your showing activity typically slows down, which signals that you can accelerate packing in the main living spaces. Most homes receive the majority of showings in the first two to three weeks on the market, so you’ll have more freedom to pack aggressively in the final weeks before closing. This shift in buyer traffic gives you the green light to box up your bedroom furniture, kitchen items, and living room décor without worrying that you’ll need to unpack everything for a last-minute showing. Coordinate this final packing push with your agent to confirm that showing activity has genuinely dropped before you commit to packing your most visible spaces.
Finalize Utilities and Address Changes Before Closing
The two weeks before closing demand intense coordination between your closing attorney, utility companies, and moving logistics. Notify your current utility providers at least 30 days before your move-out date, not the day before, since disconnection appointments fill up quickly during peak moving seasons.
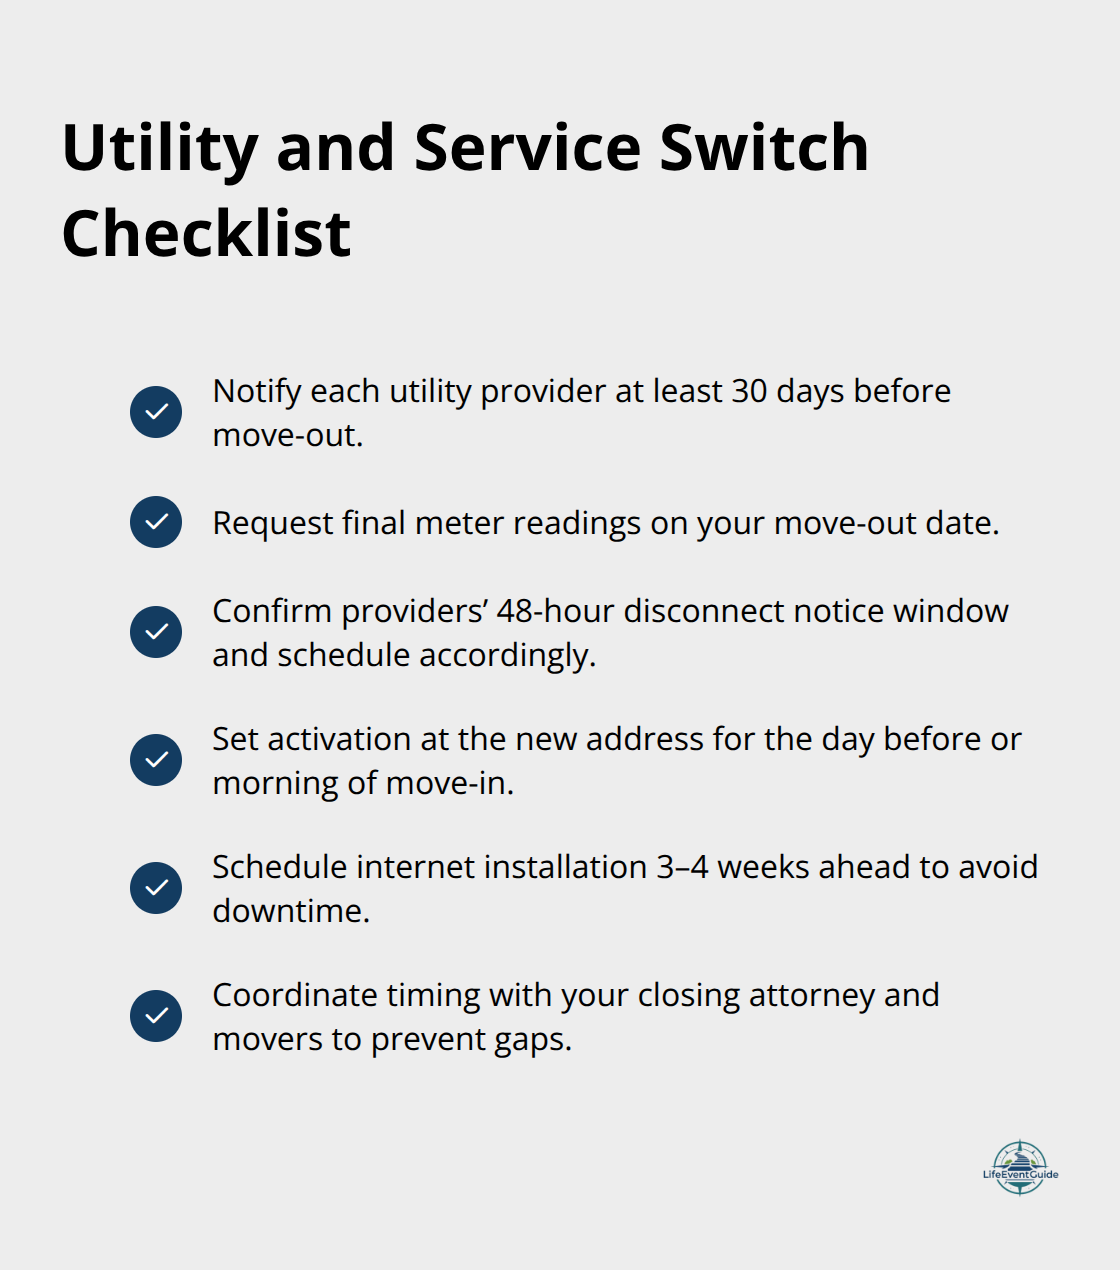
Contact your electric, gas, water, internet, and trash providers separately and request final meter readings on your move-out date so you can verify charges are accurate. Many utility companies require 48-hour notice for disconnection, and missing this window means paying for utilities you no longer use or dealing with service interruptions in your new home.
Schedule utilities activation at your new address simultaneously, ideally for the day before or morning of your move-in, so you have power, water, and heat ready when you arrive. Internet activation often takes longer than other utilities, so request installation 3 to 4 weeks before moving day to avoid sitting without connectivity for days after arrival.
Update Your Address Across All Services
Update your address with your post office, banks, employer, insurance companies, and subscription services immediately after closing, not weeks later. The US Postal Service processes address changes within up to 2 weeks, and delaying this step means missing important mail about property taxes, insurance renewals, or financial statements sent to your old address. File your change-of-address form online at USPS.gov or in person at your local post office for a one-time fee of around $1.10.
Notify your homeowners or renters insurance company at least two weeks before closing so coverage transfers smoothly, and confirm your new address is active in their system before moving day. Banks, credit card companies, and investment firms need address updates to prevent misdirected statements (though many now offer digital-only statements that eliminate this concern). Your employer’s HR department, healthcare providers, and subscription services should also receive your new address in writing, since phone calls alone often disappear into voicemail.
Complete Your Final Walkthrough Strategically
Schedule your final walkthrough with your real estate agent for two to three days before closing, not the day before, so you have time to address any last-minute issues the seller’s inspector may have flagged. During this walkthrough, confirm that any agreed-upon repairs were actually completed to your satisfaction, verify that appliances or fixtures you negotiated to keep are still in place, and photograph or video-record the home’s condition as proof for your closing documents.
Check that all utilities function, doors lock properly, and the home matches the condition specified in your purchase agreement. If the seller failed to complete repairs or removed items you negotiated to keep, document this immediately and contact your real estate agent to address it before closing, since post-closing disputes cost far more to resolve than pre-closing corrections.
Pack Your Essentials Box and Valuables Correctly
Three days before moving day, pack your essentials box with items you need immediately upon arrival: medications, phone chargers, toiletries, a change of clothes for each family member, basic tools, important documents, and pet supplies if applicable. Keep this box with you in your car during the move, never on the moving truck, so you have these items regardless of moving delays or truck arrival times.
Medications and medical equipment are non-negotiable since you cannot function without them, and moving trucks sometimes arrive late or encounter delays that would leave you without necessary items for 24 hours or more. Pack a second box with cleaning supplies, paper towels, and trash bags so you can immediately clean your old home before the final walkthrough and do a quick cleanup of your new home before unpacking furniture.
Photograph your electronics and furniture before movers arrive so you have visual references for reassembly and can verify nothing arrived damaged. Keep valuable items like jewelry, financial documents, passports, and electronics in your personal possession during the move rather than loading them onto the truck, since moving companies limit liability for high-value items.
Final Thoughts
A home sale moving checklist anchored to a single master timeline prevents the chaos of managing three separate schedules that pull you in different directions. Your real estate agent can estimate your local time-to-pending, which gives you the closing window you need to work backward and schedule packing phases, utility transfers, and address changes without overlap or scrambling. Each phase has specific tasks, and completing them in order prevents the common mistake of packing too early and disrupting showings or waiting too late and moving in crisis mode.
The stress of selling, packing, and moving stems from uncertainty and poor coordination, not from the tasks themselves. When you know exactly when utilities disconnect, when your final walkthrough happens, and when your essentials box needs packing, you can focus on one major task at a time instead of worrying about everything simultaneously. This calm, sequential approach transforms a complex transition into a manageable series of steps.
We at LifeEventGuide created practical frameworks to help you navigate major life transitions with confidence. Explore our resources and tools to support your home sale and move from start to finish.
Publisher’s Note: LifeEventGuide is an independent educational publisher. Some articles reference tools or services we recommend to help readers explore options related to major life transitions. Learn more about how we make recommendations here.