

Buying your first home is one of the biggest decisions you’ll make. Understanding the home buying timeline helps you stay organized and avoid surprises along the way.
At LifeEventGuide, we’ve created this step-by-step schedule to walk you through each phase. From preparing your finances to signing the final papers, you’ll know exactly what to expect.
Preparing Your Finances for Home Buying
The first step toward homeownership requires an honest look at your financial health. Your credit score determines everything in the mortgage process-lenders use it to decide whether to approve you and what interest rate you’ll pay. A score of 620 is the minimum for most conventional loans, but scores above 740 typically qualify for the best rates. If your score falls below 620, you need to improve it before applying. Check your credit report for errors at the authorized free source, annualcreditreport.com. Dispute any inaccuracies immediately because fixing them takes time. Pay down existing debts, especially credit card balances, since high utilization ratios damage your score. Avoid opening new credit accounts or missing payments for at least six months before applying for a mortgage-this period matters more than most people realize.
Calculate Your Down Payment and Closing Costs
Down payments range from 3% to 20% of the home price, depending on the loan type. Federal Housing Administration loans require only 3.5% down, while conventional loans typically need 5% to 20%. A 3% down payment on a $350,000 home means saving $10,500, but closing costs add another 2% to 5% of the purchase price-typically $7,000 to $17,500 for that same home. Many first-time buyers underestimate closing costs, which include appraisal fees, title insurance, inspection fees, and lender fees. You cannot borrow closing costs from your lender, so this money must come from your savings. Start saving now, and consider opening a high-yield savings account to grow your down payment faster than a traditional savings account.
Secure Pre-Approval Before House Hunting
Pre-approval for a mortgage changes everything before you start house hunting. Pre-approval means a lender has verified your income, debts, and credit, then committed to lending you a specific amount. This letter proves to sellers that you’re a serious buyer and can actually afford an offer. The process takes three to five business days and costs nothing. You’ll need recent pay stubs, tax returns from the last two years, bank statements, and a list of debts. Pre-approval differs from pre-qualification, which is just a rough estimate based on information you provide-it carries no weight with sellers. With pre-approval in hand, you move into the next phase ready to search for properties with confidence.
Finding Properties, Making Offers, and Inspecting Your Home
Work with a Real Estate Agent to Find Properties
With pre-approval in hand, you’re ready to search for properties. Most first-time buyers work with a real estate agent, and this choice matters significantly. Agents have access to the Multiple Listing Service, which shows all available properties in your area before they hit public websites. When selecting an agent, interview at least three candidates and ask about their experience with first-time buyers specifically. An agent familiar with your local market knows neighborhood trends, school district boundaries, and which properties tend to appreciate.
Stay Disciplined During Your Property Search
Once you start viewing homes, stay disciplined about your budget and must-have features. It’s easy to fall in love with a home outside your price range, but doing so creates financial stress immediately. Attend open houses on weekends when possible, as they draw multiple buyers and give you a sense of market competition. This exposure helps you understand what your money actually buys in your area and prevents emotional decisions later.
Make Your Offer and Negotiate Terms
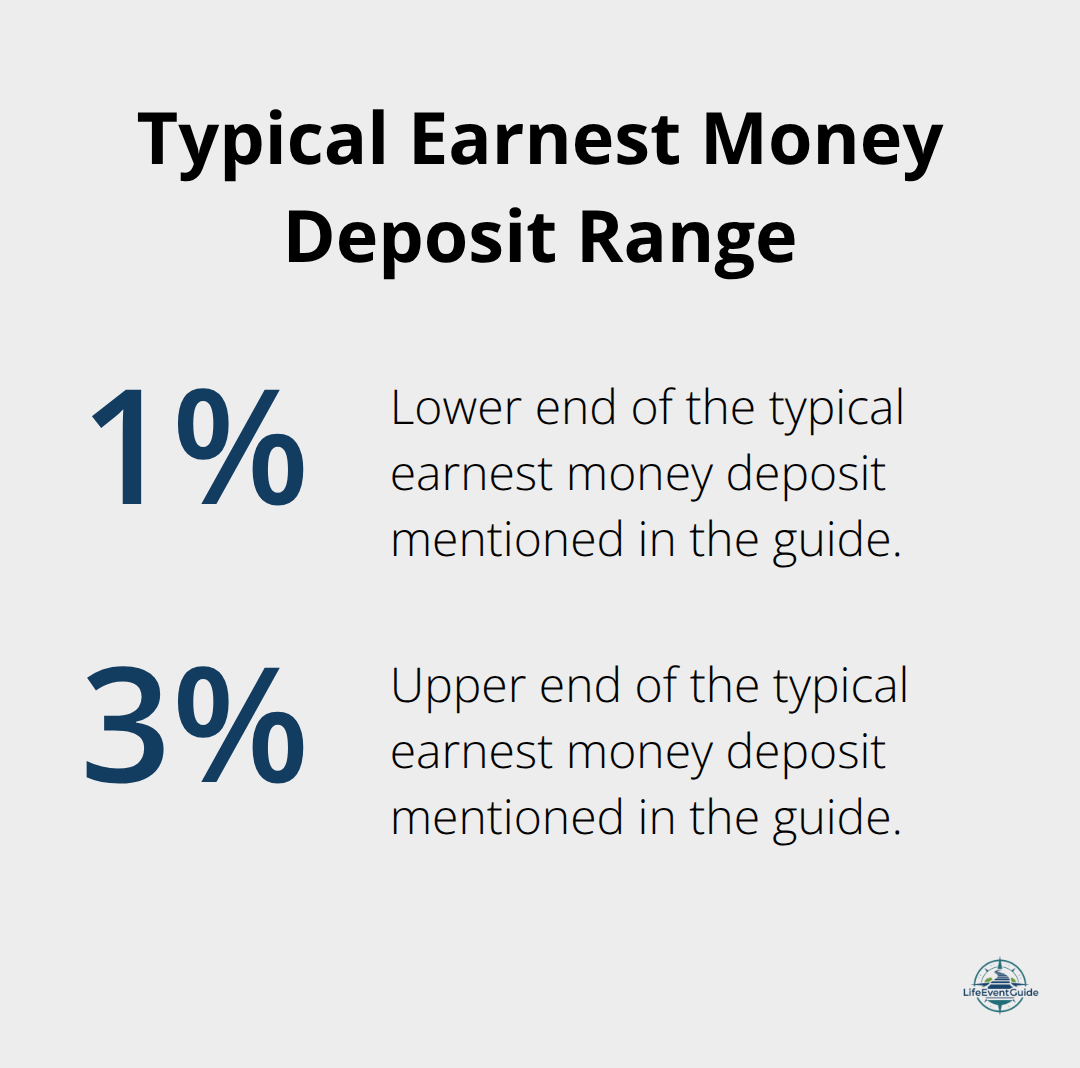
When you find a property you want, your agent will help you craft an offer. The offer includes the purchase price, earnest money deposit (typically 1-3% of the purchase price), and contingencies like inspection and appraisal. In competitive markets, offering above asking price or waiving contingencies might seem necessary, but this strategy backfires frequently.
Contingencies protect your interests without preventing sales in normal conditions.
Complete the Home Inspection
Once your offer is accepted, the inspection phase begins within 7-10 days. A professional home inspector examines the roof, foundation, plumbing, electrical systems, HVAC, and structural integrity, then provides a detailed report. This inspection protects you from inheriting expensive repairs-a roof replacement costs $8,000-$15,000 on average, while foundation repairs can exceed $20,000. If the inspection reveals significant issues, you can renegotiate the price, request repairs, or walk away entirely.
Verify the Appraisal and Protect Your Finances
Simultaneously, the lender orders an appraisal to verify the home’s value matches your offer price. The appraisal typically takes 7-10 business days and costs $400-$600. If the appraisal comes in lower than your offer price, you have three options: negotiate a lower price with the seller, increase your down payment to cover the gap, or withdraw your offer. This step stops many buyers from overpaying in heated markets. Throughout this phase, communicate with your lender about any changes to your finances-new debts, job changes, or large purchases can jeopardize your approval. Stay disciplined during this waiting period, and avoid making major financial moves until closing. Once the inspection and appraisal clear, you move into the final phase where you’ll review loan documents, conduct a final walkthrough, and prepare to sign the papers that make you a homeowner.
What Happens in Your Final Week Before Closing
Review Your Closing Disclosure Carefully
The three weeks between appraisal approval and closing move quickly, and most first-time buyers feel overwhelmed by paperwork during this stretch. Your lender will send you a Closing Disclosure, a standardized document required by federal law that outlines your final loan terms, interest rate, monthly payment, and all closing costs broken down by line item. You must receive this document at least three business days before closing, and you should read it carefully against your initial Loan Estimate to spot any changes. Common discrepancies include title insurance costs that shifted, property taxes recalculated based on new assessment data, or lender fees that increased without explanation. If anything differs significantly from your Loan Estimate, contact your lender immediately and ask for a written explanation before closing day arrives. Many lenders add unnecessary fees or miscalculate property taxes, so questioning these items protects your wallet.
Conduct Your Final Walkthrough
Schedule your final walkthrough 24 hours before closing, not three days before, because things change in real estate constantly. Bring a checklist and verify that agreed-upon repairs were actually completed, that the seller removed personal items they promised to take, and that no new damage appeared. Check that utilities still function, appliances included in the sale remain in place, and the property matches the condition documented during your inspection.
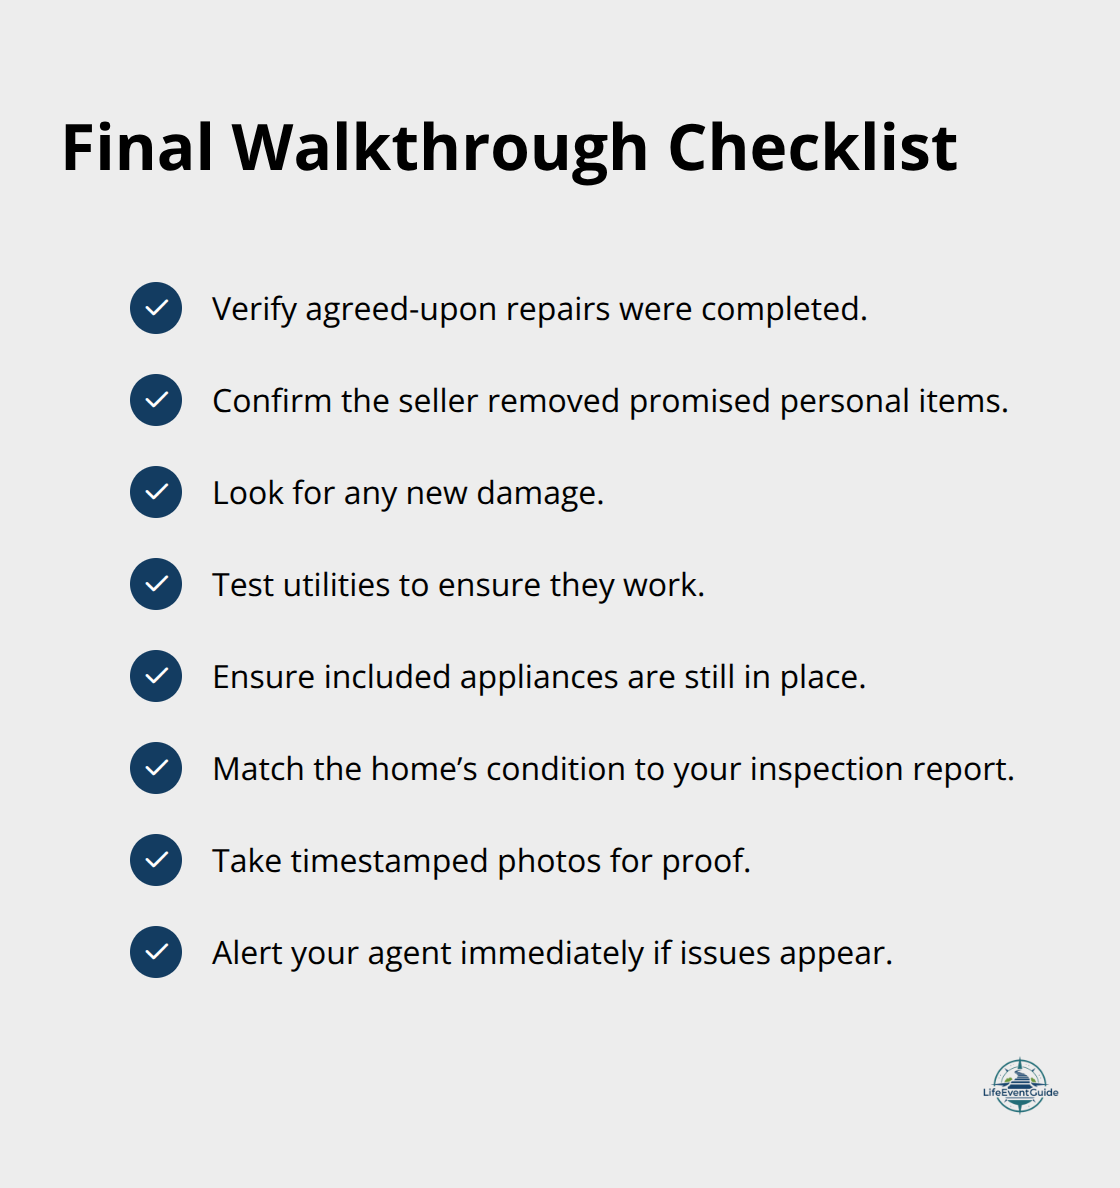
Take photos of the final walkthrough as proof of the property’s condition on closing day. If the seller failed to complete promised repairs or removed items you expected, document everything and notify your real estate agent immediately so they can contact the seller’s agent before closing.
Prepare for Closing Day
Closing day itself involves signing approximately 50 to 100 pages of documents, though many are duplicates required by different lenders or government agencies. Arrive 15 minutes early, bring a government-issued ID and proof of homeowners insurance, and plan to spend 60 to 90 minutes at the title company or attorney’s office. The closing agent will walk you through each document, but they cannot provide legal advice, so if anything confuses you, ask questions directly. Wire your down payment and closing costs to the title company before closing day, never the day of closing, because wire fraud targeting homebuyers costs victims significant losses per incident. Contact your lender directly using a phone number from their official website to confirm wire instructions rather than trusting email or documents provided by the title company (this step prevents criminals from intercepting your funds through fraudulent communications).
Complete the Final Transfer
After all documents are signed and funds transfer, the title company records the deed with the local government, and you officially own the property. Your lender will fund the mortgage and send the seller’s proceeds, typically completing within 24 hours. Keep copies of every document you sign at closing, including the final Closing Disclosure, deed, title insurance policy, and mortgage note, because you’ll need these for tax purposes, future refinancing, or if disputes arise later.
Final Thoughts
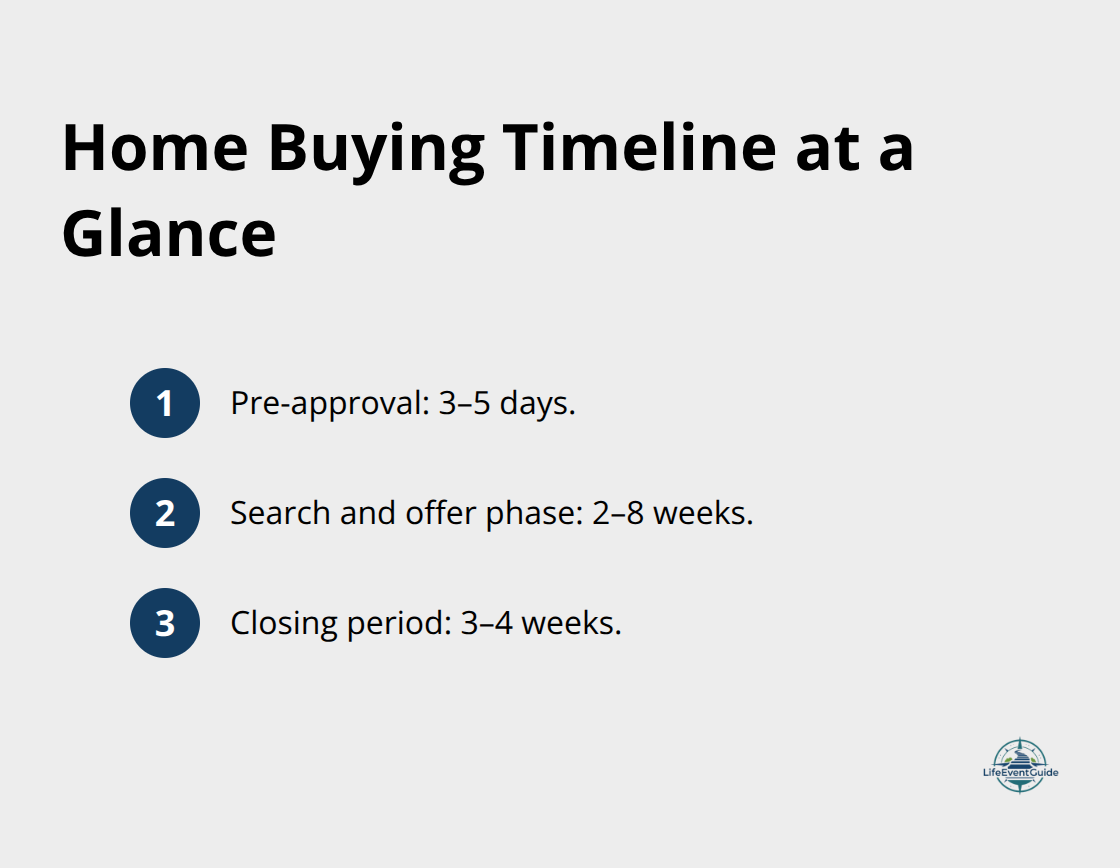
You’ve now walked through the entire home buying timeline from financial preparation through closing day. The journey involves multiple phases, each with specific tasks and timelines that compound if you skip steps or rush through them. Pre-approval takes three to five days, the search and offer phase typically spans two to eight weeks depending on market conditions, and closing takes another three to four weeks after your offer is accepted. Understanding this schedule prevents panic when timelines stretch longer than expected.
First-time buyers commonly make preventable mistakes that cost thousands of dollars or derail purchases entirely. Overextending your budget happens when you fall emotionally attached to a property and ignore your pre-approval limits. Opening new credit accounts or making large purchases between pre-approval and closing jeopardizes your loan approval, even after you’ve been cleared to proceed. Skipping the home inspection to save $300–$500 exposes you to repair costs that dwarf inspection fees, while waiving contingencies in competitive markets removes your protection if the appraisal comes in low or inspections reveal major problems.
Moving into your new home marks the beginning of homeownership, not the end of planning. You’ll face decisions about maintenance schedules, property taxes, homeowners insurance adjustments, and long-term improvements. Visit our publisher recommendations to explore resources that support your transition into homeownership with confidence and clarity.
Publisher’s Note: LifeEventGuide is an independent educational publisher. Some articles reference tools or services we recommend to help readers explore options related to major life transitions. Learn more about how we make recommendations here.